Feeds:
Posts
Comments

Posts Tagged ‘steam education’

Frames from a project on stellar evolution created in Wick Editor, a linear animation/interactive software. Students can choose which type of software and which type of project (here a branching informational program) to demonstrate mastery of their chosen STEM concept.

The purpose of this post is to invite you, as a STEM classroom teacher or informal educator, to participate in my doctoral dissertation research study. I need teachers to look over the new website I’ve been putting together at https://science-creativity.com (everything on it is free – I made it with WordPress which is why it is a .com website) and provide feedback in the following ways:
A – How functional and usable is the website? Are there any problems or issues that need to be resolved?
B – Are there any features you would like to see that are not currently there, including blog post topics related to teaching creativity and innovation in STEM classrooms that you would like to learn about?
C – If you are planning to conduct a project-based learning activity in one or more of your classes before the end of June 2023, please consider having your students create a project using media design software as described on the website. They could choose one of the 40 or so projects described on the Projects page (where there are also excellent student examples). Have your students try out the videos linked on the Software Training page to learn any software they do not know and then use that software to create their own media content to present to each other.
D – If your students do try out the software training videos and create a STEM media project, then please share good examples with me and I will post them on this website. You could explain it as a competition – only the best projects will be selected and displayed. The winning students and their parents will need to sign consent forms if they want recognition by name.
E – I will ask you to fill out a survey on how well the project went with your students, to what extent they used the training videos, the level of their creativity, etc. Since I will be using your responses in my final dissertation, I will also ask you to sign a consent form. Both of these forms will be posted to the https://science-creativity.com website. If you decide to participate, I will send them to you.

Two frames from an Animaker resume, one of the types of projects described on my website. Instead of the usual static Powerpoint or Google slideshow, why not allow your students to do something with a bit more pizzazz, such as an animated slideshow or Prezi?

This is a lot to ask, especially so far into the school year. Any feedback you can give will be helpful, not only for my final dissertation but to improve this website as a teacher resource. It is entirely free and always will be, and is a work in progress. I will upload additional posts as it becomes an increasingly important focus of my work going forward. With this announcement, the site is officially in beta form. Let me know how it can become more useful for you and what features or topics you would like to see. Spread the word. I can be reached at: David Black, elementsunearthed@gmail.com or write a comment to this post.

In the meantime as I continue to build this site, I am proceeding with the revisions to my research proposal. I mentioned last post that I have focused in on a final three-part research question, which is the following:

To what extent can STEM teachers implement choice boards for using browser-based media design software to:
A – promote differentiation, access, and equity through Universal Design for Learning (UDL)?
B – establish the components of “Gold Standard” Project-Based Learning (PjBL)?
C – enhance student creativity and Social and Emotional Learning (SEL)?

I have to establish a need for this line of research, how it fills gaps in previous studies, and why my approach will sufficiently answer this question. These are the first three chapters of the final dissertation and what I am working to revise right now. I have written extensively on this website about why such research is needed, but it is finally time to move forward with the actual study. As described in my last post, I will be tasking my students with three major projects over this semester, culminating with the STEAM Showcase at the end of April and the Stanford Innovation Lab project in May. Each project involves using choice boards and media design software to demonstrate STEAM concept mastery.

A unit choice matrix for my biology students at New Haven School. Concepts with green bars are covered in class, and concepts that are open must be completed through student-created projects. The types of possible projects are listed horizontally.

The idea of choice boards is an extension of what I was doing with my classes at New Haven School. I built a choice matrix for each unit, listing the unit concepts vertically and the types of projects they could do horizontally, as shown here. On the back of the sheet I listed a series of questions for the unit; if students knew the answers, they would be well prepared for the unit test. It acted as their study guide. On the matrix, the horizontal colored lines represent projects or concepts we covered together in class through activities, videos, or lectures. The open topics were the ones the students would need to learn through creating their own projects. Since the school’s email system was tightly locked down (because it is a residential treatment center) and we only had Chromebook computers, I couldn’t use very many types of software – only those that didn’t require an email verification and were browser-based. I taught my students how to use Scratch, SculptGL, Tinkercad, and a few others. Because Canva requires email verification, we couldn’t use it, so any layout design had to be done by hand or I had to design it for them; our Ad Astra newsletters in astronomy were laid out on my computer using Adobe InDesign. I didn’t know about Photopea or Wick Editor at the time or I would have used them. Many of the examples I have of excellent student projects were therefore done by hand.

Scratch by MIT is an excellent method for students to demonstrate their mastery of STEM concepts by creating an interactive game or quiz, such as this test on types of rocks. It can be programmed to be self-scoring and choose random questions, as shown by my training videos on the website.

The unit matrix worked fairly well at showing students the types of projects they could do with the limited software available to them and included hand-drawn options. Now, with my dissertation, I am focusing on browser-based media design software through the lenses of universal design for learning (UDL), project-based learning (PjBL), social-emotional learning (SEL), and student creativity. With more software available to regular public or private school students, they need more extensive lists of choices with better descriptions. My dissertation committee chairperson, Dr. Farber, suggested choice boards as a possible answer. I have adapted my previous unit matrix idea to allow for three dimensions of choice: choice of a specific topic for a course concept, choice of type of software(s) to use, and choice of the type of project to create. The diagram shown here demonstrates these three dimensions for an upcoming biology project.

Altogether I have grouped different types of browser-based media design software into nine categories including image creation software (Photopea, Inkscape, Procreate); infographics/poster creation or desktop publishing software (Easel.ly, PicktoChart, Canva, and ThingLink); animated presentation software (Animaker, Powtoons, Prezi, or Voki); storyboard or comic strip software (MakeBeliefsComix or StoryBoardThat); 3D modeling and animation software, including augmented reality (SculptGL, Tinkercad, Mixamo, or Aero); sound editing or music creation software (Audacity, Soundation, or Vocaroo); video editing software (WeVideo, Canva, Adobe Express, or iMovie); interactive or linear 2D frame-based programming (Wick Editor); and stage-based programmable control of sprites or characters (Scratch). I also added choices for using mini-computers and robotics, plus multi-vector projects that combine several other choices.

For students up to the challenge, they can build 3D characters using SculptGL along with textures, import them to Adobe Mixamo (a free program online) to add rigging and animations, then program them to move around in an Augmented Reality (AR) scene in Adobe Aero. Here, my gray alien character is doing a dance routine in my doctor’s office.

There are many other types of browser-based or free software, including some for iPads that I am not familiar with (my students showed me one a few days ago for creating animation that I need to check out, but my iPad is too old to run it). The point of my dissertation is to combine student choice and voice (a necessary part of project-based learning) with media design software for student-created media content of STEM concepts. This is all meant to increase student engagement, access, equity, creativity, social-emotional learning, project quality, and content mastery.

The PDF at the bottom of this post describes each of these project types listed by software. It is not an exhaustive list, as there are many more ways to do things than I can possibly imagine and types of software that I am not even aware of despite a great deal of research. As I say frequently in the training videos, the possibilities are endless and entirely depend on the imagination of the students.

Students in a chemistry class can pick a favorite molecule (such as Tyrian purple) and create a 3D model in Tinkercad, then capture different angles to use in an illustration or poster inside Photopea or Canva. Or they could build a model of a space probe or a virus using Tinkercad or SculptGL.

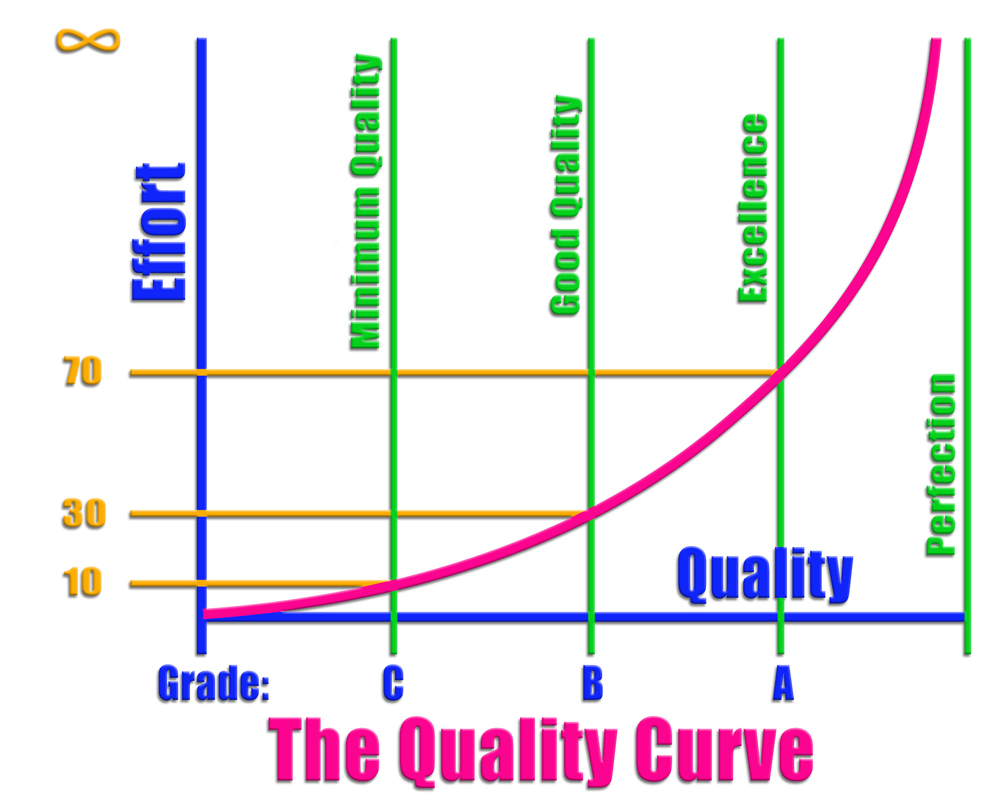
Because some students will try to get away with doing the least amount of effort (which, of course, leads to the least amount of learning), it is necessary to build in structure and scaffolding with tight rubrics for what is expected. That is why I use peer critique and revision as an important component of this process. The students’ peers act as an audience for the projects, which must be presented as part of “gold standard” PjBL. Students provide feedback through a Google form on five aspects of project quality: Does the project show deep mastery of content? Does it demonstrate creativity? Is there evidence of high student effort and professionalism? Do they show competency with using the software? Are they able to effectively teach their topic/concept to their peers? Students use the forms to rate their peers using suggestions that are kind, specific, and useful (Berger, 2018) and if teams do not get the rating they desire, they are allowed to revise their project and re-present it to me for a better final score.

All of this is to explain to you how to implement these choices, projects, and videos in your own STEM classes. I am hoping to gather data by the end of the school year so that I can analyze the results and draw conclusions by the end of August and have my dissertation defense by October 2023. I hope that you can review the website and try out the projects and videos with your own students. Let me know if you would like to participate and I’ll have you sign the consent form (this is a requirement of my university’s IRB) and send you the assessment survey link, then you can report on how it goes, make suggestions, and send some student examples. If the students want recognition by name, they will need to sign consent forms along with their parents.

The benefits to your students is that they will learn the content of your class more thoroughly and deeply and learn valuable and marketable media design skills. It will be much more engaging and fun for them to create their own STEM media projects than it is to read a textbook and answer questions at the end of the chapter. Hopefully, they will be motivated by the project to learn the concepts on their own. They will be recognized for their creativity.

As a final project, students can prepare mini-lessons, presentations, activities, and handouts for a STEAM Showcase night at the end of the school year. Here, students are demonstrating how to make soap for their siblings and parents.

The benefits for you as a teacher will be to see alternatives for project-based learning, with flipped video instruction already provided so that you don’t have to build it all yourself. You choose the topics the student teams can choose from, provide them with examples and scaffolding for the content, and allow them to create something useful that you could show to future groups of students. You’ll also get to participate in advancing methods for teaching STEM courses. At the end, once the dissertation is successfully defended and edited, I will send you the final version which could be helpful to enhance your own teaching. While you are at it, try out the videos yourself and increase your own media design skills. I find them to be very useful as a teacher. One final benefit to you is the future possibility of grant money; I hope to extend this project beyond the dissertation and apply for grants with the NSF and others, which you would be the first in line to be part of. Those teachers who participate now will be the first I will consider for the grants. I wish that I could offer a stipend for your participation now, but that will come eventually.

Once again, the website is: https://science-creativity.com (remember that everything on the site is entirely free. You have my permission to use any idea or document posted there). I can be contacted at: elementsunearthed@gmail.com or by adding a comment to this post. I hope you choose to participate – it will be well worth the effort.

Thank you for reading this and for considering my invitation.

Here is the Choice Matrix PDF:

Read Full Post »

Zen and the Art cover

The cover to my edition of Zen and the Art of Motorcycle Maintenance by Robert Pirsig, which I first read as a freshman at BYU in an Honors Colloquium class.

As a freshman at Brigham Young University forty years ago I had the privilege of taking an interdisciplinary class called Honors Colloquium. It was taught by three professors and a graduate student, including Dr. Eugene England (literature and writing), Dr. Larry Knight (physics), and Pro. Omar Kadar (political science). Our theme for the two-semester class was the intersection between Classical and Romantic modes of thought in various disciplines. We had frequent guest professors teach units on everything from international politics to science fiction to Russian literature.

Alto Computer

An Alto computer, the first to truly be a personal computer with the capability for digital drawing, music, and other forms of art. It was developed by the Palo Alto Research Center of Xerox Corporation but was never sold commercially. An article on this system written by Alan Kay titled “Microelectronics and the Personal Computer” was in the back of the Sept. 1977 edition of Scientific American, but I never found it for my paper because there was no Internet back then to do a comprehensive search by keyword. There was only the old printed periodical index . . . I do not miss those days. The article would have proven my point that computers were already beginning to become a tool for artistic expression.

One of the most influential papers I ever wrote was for this class, where I reported on how computers (the ultimate expression of Classical thought) might someday be used to create art or literature or music. When I presented my paper to the class, the professors almost laughed me to scorn. “How could a computer ever be used to do art or write great literature?” they asked. They were wrong; that paper predicted a major part of what I teach now: digital media. I am using a computer to write and distribute this very essay.

The Zen of Motorcycle Maintenance

Despite the poor reception of my prophetic paper, I did learn some useful things from that class that have defined my life as an educator. One of our first reading assignments was the book Zen and the Art of Motorcycle Maintenance by Robert Pirsig. This book sets out the dichotomy between Classical and Romantic ideals through a motorcycle trip across the American northwest, a kind of mobile philosophical Chautauqua. Pirsig defines the Romantic mode of thought through his friend John Sutherland’s approach to his Honda motorcycle: John is after the gestalt feeling of the open road, the experience of riding the motorcycle and living in the moment, and doesn’t know much about the nuts and bolts of keeping the bike maintained. If something goes wrong, he’ll hire a mechanic to solve it.

No Zen on a mountain top

Pirsig’s narrator, calling himself Phaedrus, was searching for the answers on his road trip through the Rocky Mountains. But the book concludes that there is no answer, no Zen to be found at the top of the mountain (the destination) but instead is found on the journey. It is the sides of the mountain as you climb, not the top, that sustain life. 

The Narrator, on the other hand, exemplifies the Classical mode. He drives an older Harley that he knows well and can troubleshoot. During the trip, while driving through Montana, he recognizes that his engine is running a bit rough, analyzes his spark plugs (which are sooty), and realizes that the high altitude is making the engine run too rich, which he easily corrects. The classical mode, therefore, gets into the nuts and bolts and mechanics of a process instead of appreciating the gestalt of the moment.

As we discussed this book in Colloquium, I came to see that it explained the two warring sides of my own personality. I had always considered myself a logical, rational, scientific kind of person (I identified the most with Spock on Star Trek) and had discounted my emotional side, yet I was continually drawn to art and music and theater, which are all romantic modes of expression. Later in the year I got myself into an embarrassing situation by not seeing the irrationality of questionable actions, which were brought on by sleep deprivation. I was a bit surprised to find out I had strong emotions after all.

Pattern of life

I have always been pulled in two directions: towards the logic and reason of science and toward the creativity and self-expression inherent in the arts. I can see these two forces clearly as I look back on my life.

I am still pulled in both directions, and this is why computer art appeals to me – both classical and romantic at the same time. I can tell you how the Color Picker in Adobe Photoshop uses 24 bit graphics, meaning each primary additive color (red, green, or blue) can have 2^8 or 256 colors, or 2^24 total colors in an image. It is all very logical, digital, rational. But I can also tell you how to blend photos seamlessly, create any image desired as a form of self-expression, and visualize what has never been conceived before. This is all very romantic and artistic. Whenever I go for too long focusing on science, I start longing to work on a nice hand-drawn art project. I’m working on a mixed media painting of Utah’s Delicate Arch right now as an illustration for a book I’m writing.

Delicate Arch-s

This is a preliminary scan of my Delicate Arch illustration for a book series I am working on. It turned out fairly well, but I need to get myself re-motivated on this project.

Another way of looking at this that is more relevant to my career: the Romantics are the Apple Macintosh people – they are after the experience and the creativity and what they can do with the computer. I am very much this way, and love my Mac. The Classicists are the Windows people that custom build their own computers and know all the components and technical details such as how to overclock the CPU, etc. This is my oldest son, who is a technical expert on video cameras and audio systems for a camera rental house in California.

Now, after more years than I care to think about, I realize that the dichotomy between Classical and Romantic is false. I find that I can both love the technical/classical aspects of a subject (such as the process of doing science, analyzing data, working with numbers, and rational reasoning) and the artistic or romantic side of education, the satisfaction of a well-taught lesson where students are moved. This is why I am a major proponent of STEAM education – to bring the arts, history, and humanities into STEM fields to ignite the creative spark and provide the context or gestalt viewpoint necessary for STEM. It is possible to be both classical and romantic at the same time; therefore, it is not really a dichotomy.

The Resolution: Quality

The Narrator of Zen and the Art, calling himself Phaedrus, tried to reconcile the two sides of this dichotomy through the concept of Quality. I never understood, at that time, exactly what he meant by Quality. I realize now that he deliberately left it undefined, except to compare it with the ancient Greek concept of arête (the Good or the Truth). The needs of the situation define what Quality must be and how to measure it. However, it must blend the technical requirements of a project (the mechanics or nuts and bolts emplaced by the grading rubric or teacher expectations) and the romantic aspects: What did the students learn, how deeply, and how have they applied their knowledge or skills? What are their overall feelings about the project, including their enthusiasm for it? What level of professionalism was achieved? These aspects are not measurable and can’t be tested at the end of the school year, but are every bit as important as the technical knowledge component. As teachers, we tend to do well at teaching the mechanics but not well at the gestalt, or overall quality of a project.

Blue-orange Jupiter-s

A sample from my current STEAM class. My students have marbled paper using oil paints diluted with mineral spirits and floated on water. These colors are swirled, then lifted off the water on paper and dried.

An Example

Let’s look at the idea of quality through an example that my STEAM students are currently completing. I will describe this course in more detail in my next post and the types of art-infused science we are attempting, but for now I will describe the central project. Each student has chosen a topic related to the history of science and the science of art, including dyes and pigments, the iron age, weaving, Native American petroglyphs, Chinese pottery, iatrochemistry (alchemical medicine), and more. It is a five-week course during this summer, and they are writing a 1500-2000 word essay on their chosen topic. This essay will become a chapter for a book we are putting together and will add to in subsequent years and perhaps even publish through an online print-on-demand service. I will publish the essays on this blogsite.

In addition to the basic essays, they are creating illustrations on their topics using a variety of art forms including pen and ink drawings using homemade iron-tannate ink, watercolors using pigments we created ourselves (we finally managed to made good red out of cochineal), copper etchings, marbled paper, tie dye, and batik. I will pick each student’s three best illustrations for the final book. They are also writing at least three sidebar articles.

Katie weaving illustration-s

This is a student’s illustration of a Navajo lady weaving a blanket, drawn using homemade iron-tannate inks. The brown ink was made using normal brown tea for the source of tannins and the black ink was made using green tea. This is a good example of the type of quality these students are achieving.

This is a high expectation for a five-week class, and to turn these essays into a professional quality book that we can publish is by no means an easy task. Many of my students have never written an essay of this length before. To ensure quality, I have set up a series of strict deadlines and checkpoints with frequent feedback and revisions. Most of the students have just turned in their rough drafts. Some will lose points for being late. These drafts were copied for two peers to go through this weekend and proofread (I’ve taught them how to use proofreading symbols) and assess for interest level and readability. Our history teacher and I are also going through the rough drafts looking for scientific and historic accuracy. The students will receive the rough drafts back next week and will make revisions. Ideally they will then be reviewed by other students who are not in our class and final revisions will be written, but that will have to happen during our second summer term when we have English classes. By the time I include the final essays in the book, they will have been reviewed by three or more people and revised twice.

This process of formative assessment and revision is essential for any quality work, be it in school or in professional life. Engineers create prototypes and test and revise them until design specifications are exceeded. School work should follow the same process. Instead of school assignments that are done once, given a final grade, and forgotten, student work should go through formative assessments, revisions, and reworking until a desired outcome of quality is reached. Perhaps not every assignment, but at least one major project per unit or at least per term should require this level of quality. This means fewer assignments but deeper learning. There should also be a public outcome – a blog post, a book, a performance or presentation before parents and peers, etc. that emphasizes the level of professionalism required.

Jazmine Canopic Jar painting-s

A painting of an Egyptian canopic jar using homemade watercolor pigments. The gray is made from soot, the red-brown from cochineal and gray mixed, the blue is Prussian blue, and the purple is a cobalt compound.

To gain professional excellence in student work, they must understand that the amount of effort needed to gain excellent quality is not a linear function.

The Quality Curve

As my diagram shows, the relationship between quality and effort is not linear. It’s exponential. Doubling the effort does not double the quality – it takes twice as much effort to get a project from good quality to excellence as it does to get it to good in the first place, but excellence is not twice as much quality as good. Achieving excellence may require a quadrupling of effort. There is a rule in business called the 80-20 Rule: it takes 80% of the effort to achieve the last 20% of quality, to get a project from good to excellent. In the real world, good isn’t good enough, only professionalism and excellence are acceptable and get your ideas noticed. But that extra bit of polish comes at a high cost in effort and time.

Quality Curve-s

This diagram represents that the relationship between effort and quality is not linear. It takes twice as much effort to get from good to excellent quality than it does to get to good quality in the first place, and perfection takes infinite effort.

At the same time, some people can be perfectionists and not know when to let go of a project and say, “It is done!” As my diagram shows, put into mathematical terms, effort is asymptotic to perfection; perfection can only be reached through infinite effort (meaning never in this mortal world). As teachers we should expect excellence, but not perfection.

I’ve seen too much of the negative side of perfectionism. In fact, is there even a positive side? I’ve seen students who show high levels of stress and anxiety because they expect (or their parents expect) too much of them; students who refuse to try anything hard because they fear to fail, or who give up after even a small setback. People who can’t let go of any mistakes but have to relive them over and over instead of moving on and learning.

As teachers, we need to build revisions into our projects, or, in other words, embrace and plan for the probability of initial failure (although failure is too strong of a word – I prefer to refer to it as “partial success” or “emerging excellence”). We should encourage students to make every project an iterative learning experience through frequent formative feedback with plenty of time for fixing mistakes. We need to help them build, test, and revise prototypes of their projects, always returning to the specifications/rubric until all expectations are met.

Mucker illustration color-s

An illustration of a mucker, a machine used to “muck” or dig up shattered rock after the face of the mine has been blasted. I started this illustration using what I thought was waterproof ink for the lines, then adding watercolor washes over the top, but the dark lines bled all over the place. I had scanned the non-colored version, so I layered the clean lines over the color image, set the blending mode to darken, and used the Clone tool to clean up the mess. I also fixed a few crooked lines. Hopefully it doesn’t look too digitized.

There is more that can be said about teaching quality, but this post is already overlong. This will be a major part of my doctoral program, which I am starting in three weeks. I will come back to this idea in future posts. In the meantime, I think its time to re-read Zen and the Art of Motorcycle Maintenance. I’m old enough and have enough experience now that I can finally understand what Phaedrus was trying to say.

Read Full Post »

Education as Pollock painting

I found this quote on a TeachThought website. It captures the spontaneity, engagement, and creativity of extraordinary education.

Several years ago I attended the closing banquet of our state science teacher conference and overheard two teachers comparing notes in a friendly competition. They had apparently gone through the same teacher development program together. One bragged that 86% of his students had passed the state science standards test at the end of the year. The other claimed that his students had a 93% pass rate, with the implication that having more students pass the test meant that he was the better teacher.

They were both new teachers and I can forgive them their misunderstanding. I felt like jumping into the conversation to remind them that having most of their students pass the standards aligned test only proved that they were standard teachers, when what our children deserve is extraordinary teachers. Unfortunately, there is no state test for extraordinary education.

school nurse

Is our public education system ailing and in need of reform? Yes, in that it insists on treating each child like a cookie-cutter clone using a one-size-fits-all set of standards.

Would any of us recognize extraordinary education if we saw it? Can we even agree on the characteristics of extraordinary education? For my own definition, I say that students must be deeply engaged in the learning process, with memorable learning opportunities that invite active participation and critical thinking, creative problem solving, collaboration, and communication. In the end, education should have a lasting impact on their lives. And it should be fun, meaningful, and inherently interesting for them!

I learned during my third year of teaching that Project-Based Learning (PBL) can be a powerful route to extraordinary education. I’m not trying to say that I am an extraordinary educator, but I have tried with some success to bring meaningful opportunities to my students. To do this, I have had to look at my course standards in a different way.

Ed guidelines

There is a great need to change how we do education, but the forces that resist changes are the teachers and administrators and communities that need them the most. The bureaucracy of our school system is the very thing that holds us back. As one individual teacher, I have to accept that I may not be able to change everything, but I can at least change the way I do things.

The push for standards in education is simple to understand. We don’t want students with gaps in their understanding of the world, nor do we want teachers who are incapable of bridging those gaps. Society needs well-educated people in order for them to make informed decisions. Educational standards were developed to achieve a minimum level of essential literacy and knowledge across all students.

This brings up a deeper question: what constitutes essential knowledge? As one of my college professors put it, is there any knowledge (or skills) that a person must have? Every subject expert has a list of what he or she considers to be the essential concepts of the subject, and the list tends to multiply in any committee put together to consider new educational standards. Heaven forbid that even one math student would not understand the quadratic equation. The world might very well collapse if that happened! So we have to create a standard to address that concern, even if only a minority of teachers hold this opinion.

As a result of this drive toward comprehensiveness, all states have far too many educational standards than are truly necessary for each discipline. In chemistry, is it critically important for students to understand Le Chatelier’s Principle of Reaction Equilibrium? You’ll find it in all the state standards. But is this really necessary for what the student and society need? If taught well, it might help them understand some aspects of everyday chemistry, such as why the Haber process works to produce ammonia or why shaking a warm soda bottle causes the carbon dioxide to spray out. But can they become productive citizens without knowing this? Probably. Why force them to learn what they can easily live without? This has bothered me for years.

do what I say

All the shareholders in the education system (parents, children, teachers, administrators, state officials, communities) point the fingers of blame at the others and expect them to be innovative, but are unwilling to change their own viewpoint of what education should be.

What I finally recognized is that standards are meant as a guide to the lowest acceptable level of understanding in a class, not as the final target. Anyone who teaches to the standards alone (especially to the end of year test) will succeed in creating a standard class, an average class, but not an extraordinary one. If we want all of our students to graduate as identical cookie-cutter clones of some “standard” citizen, then standards-based education and the factory model of education will suffice. But if I want students who are strong individuals, creative problem solvers, and innovators, I must go beyond the standards and teach for excellence and quality, not mediocrity. The standards are supposed to be a means to that end, not an end in themselves.

Deeper into Theory

Many of our vaunted education theories support this reductionist view of a subject. For example, Bloom’s Taxonomy is widely used and quoted in educational circles. It poses that there is a hierarchy of understanding and learning; that remembering facts and content details comes first as the foundation of all learning and then leads to understanding, then to application, then analysis, then evaluation, and finally to creativity. The implication is that we need to move our educational activities toward creativity and higher-order thinking skills. The problem with this pedagogical model is that too many teachers never get to the higher-order levels; they get stuck on remembering and regurgitating facts with little real understanding and even less application, analysis, evaluation, or creativity.

Flipping Bloom

Bloom’s Taxonomy, often quoted but poorly understood. Instead of starting at the lowest level (remembering facts) and working our way up, we should start with creativity and work down to facts. Think of this pyramid as flipped upside down, or of creativity being the ground level but the other levels being roots underneath, reaching down to the facts. Students will learn the facts they need if they start with the requirement to create.

So many educational theorists are beginning to propose that Bloom’s Taxonomy should be stood on its head. Creativity should come first, not last. As students create, they can be taught to evaluate the effectiveness and even the aesthetics of their work (more on this in my next post). To do this, they will need to learn to analyze their work in the same way that engineers analyze the effectiveness of their prototypes and models. To analyze the prototype, they have to build it first, which involves the application and understanding of scientific theory. To gain that understanding, students will have to look up and remember the scientific facts and theories involved. In other words, teaching creativity first and insisting on quality work provides the impetus and motivation for students to find the information they need, understand and apply that information well enough to build prototypes, then analyze and evaluate the effectiveness of that prototype against specifications. Students will look up what they need to know because it is necessary for them to solve the problems that occur as they create, build, test, and analyze prototypes. We call this the engineering or design process.

This is where Project-Based Learning (PBL) comes in. Only through extended projects can students have the time, independence, and creativity to deeply explore and understand a subject by following their own curiosity. Projects are the only way to ensure that the intent for having standards is met and that we reach extraordinary education. This happens through what I call “standards overreach.”

Shorten the pole vault

It doesn’t make sense to raise standards while lowering the resources available to schools to reach those standards. There’s nothing quite like an unfunded mandate.

Standards Overreach:

Let me start with an example. During the first week in my first year biology classes, I introduced the concept of the characteristics of life and the abiotic factors necessary to sustain it. This is a common biology standard in most states. Now if I were a standards-obsessed teacher, I would teach to this point as my target for student understanding. I might put up a list of terms and have students write down definitions in the hope that they will understand them. This is a low-level activity without much student mental engagement. They’ll forget these definitions as soon as the test is over, if they retain them even that long. I might write the terms on a worksheet and have them look up definitions. Slightly better but still boring for everyone concerned, although it does meet the standard. I could show them a video about it and have them take notes. A bit better but still teacher-centered and passive for students. I could have students brainstorm the characteristics of life, then ask them to provide examples, or do a lab activity, etc. Getting better but still not entirely effective.

What all of these activities have in common is that they are targeted specifically to this one standard alone, and on the end of unit test, only some of the students will show understanding (or at least regurgitation). I have only partially succeeded.

Exoplanets

What kind of life forms could exist on an exoplanet or exomoon, such as shown here? As students ask and answer such questions, they come to understand the characteristics of life and the abiotic factors that support it.

Or I could do this in a completely different way through a student-centered, engaging project. I could have them go beyond the standard (overreach it) knowing that at minimum they will understand the standard and possibly much more. So I use my passion for astrobiology and experience conducting field research studies of extremophiles in the Mojave Desert to create a project for my students. We’ll collect halophilic bacteria from the Great Salt Lake and let them grow in a Winogradsky column then analyze the pink floaters under a microscope. We’ll extend this to research on other extremophiles and use real examples of how they are adapted to their environments, with students developing posters or presentations or other summary products of their choice. Do all forms of life on Earth need oxygen, or even air? No – there are lithoautotrophs that live in rocks and get carbon dioxide from minerals, not air. Does all life require light and plants at the bottom of the food chain? No. Look at the chemosynthetic bacteria that are at the bottom of the food chain near deep ocean hydrothermal vents.

Square test in round head

How can one test measure the quality or extent of knowledge for every student, even if the tests are adaptive? How can a single measure determine the effectiveness of every teacher?

Then they’ll look at potentially habitable exoplanets (and learn a bit of astronomy and physics on the way) and choose an actual planet, then develop a drawing or clay model of an alien life form they envision, complete with descriptions of how it is able to survive in that environment, the abiotic factors that exist there, and the ecosystem it is part of. How does it eat or get energy? How does it move around, reproduce, adapt to changes, grow and develop, etc.? How would we detect it and know that it is alive?

As a capstone event or product, they produce posters or other products on their research into and present them at a science showcase night, just as if they were professional scientists at a conference. At the end of the evening we can watch and analyze the realism of the movie “The Andromeda Strain.” In the process of thinking all of this through, the students will deeply understand the characteristics and factors necessary for life. They will all easily meet the standard because we shot way beyond the standard.

Relax and take the test

With high stakes testing supposedly measuring the effectiveness of teachers and schools based on how students take the test, its no wonder teachers are teaching to the test. Their jobs are on the line. Yeah. No pressure . . .

You will argue that this type of project will take days to complete, when you can cover that standard in just one day. Maybe so, but we haven’t just covered that one standard. Without my having to lecture them, my students have learned about evolution and classification, microbiology and using a microscope, physics and astronomy, and even developed artistic skills. They have learned about scientific communication, which is part of one dimension of the Next Generation Science Standards. We have therefore touched on about ten other standards from multiple disciplines in the five days of this project. If I tried to teach each one of those standards one at a time, it would take far longer than our project did. My students’ understanding will be deeper and more permanent than any lower-level unengaging assignments can achieve.

The test to test us for the test

No Child Left Untested . . . How can teachers possibly meet education standards when they have to spend all of their teaching time administrating tests to measure how well they are meeting education standards?

Meeting Standards through PBL:

Here is another example that we completed just two weeks ago. We had moved into our units on human anatomy in my biology classes. I wanted students to learn the function of muscles and bones and how they provide support and movement. Now the “standard” way of doing this would be to provide diagrams of the skeleton and muscles and have students label all the names of all the part. Tibia. Fibula. Patella. Femur. Pelvis. Clavicle. Sternum. Latisimus Dorsi, Deltoid, etc, etc, ad nauseum. And many teachers leave it at that, with no understanding of how it all works together. Some will go on to teach (or more likely have the students read in the textbook) how flexor and extensor muscles must be paired, how they are anchored to the fixed bone with tendons reaching across the joint to the mobile bone. But only a few teachers will have students apply this knowledge, or design experiments to collect data that can be analyzed, or have students think critically to evaluate the quality of their knowledge, or do something creative with it.

So I turned the process on its head. I did draw a diagram of the elbow joint on my whiteboard as an example, showing and labeling the parts of everything. I explained how the bicep and tricep work in tandem to flex and extend the joint, and how ligaments, cartilage, and all the other parts hold it all together and allow it to move. That was all I did, and I didn’t really need to do that. It was just a quick 15-minute introduction. Then I gave them a challenge: using the materials I provided, they had to build a mechanical arm that would duplicate the movement of the elbow joint. As teams, they would need to use my diagram as a guide, look up whatever other information they needed, then design and build their own arm. It had to meet certain specifications: It had to have the same range of motion as a regular arm, not bending too far or extending too far (it could not be double-jointed). It had to have a way of both flexing and extending the forearm. And that was it.

I provided lots of cardboard, wooden skewers, beads, string, hot glue guns and glue sticks, etc. I divided the students into three-person teams, and required them to show me a sketch of their plan before they were allowed to collect materials. Then they set to work. In every case, their first attempts didn’t work very well. Some of the students wanted to quit at that point, saying that this task was “impossible,” but I provided encouragement and hinted that they should look more closely at how the actual human arm does this; obviously, it isn’t impossible if our arms can do this. They tore parts off their models, reglued, tried again, and eventually all the teams succeeded. They were all different, but all mimicked the construction of the human arm in important ways.

Round head in square hole

Standards imply that every student is the same, and that one size fits all in education.

With that project done, the same teams went on to create working models of the human hand. These models had to be able to create several gestures of my choice to show control of individual fingers, be able to pick up and move small objects to show dexterity, and be able to grasp and lift a cup full of water (added slowly) to demonstrate strength. This was a much harder task, and the same students again tried to give up. They wanted me to provide step-by-step instructions, but I refused. I repeated that there were no right answers, no one right way to do this. Some had to redesign from scratch, which was frustrating, but they overcame this frustration and eventually all succeeded.

It took seven class periods to accomplish these two projects. I could have easily taught the basic concepts about the arm and hand in a day using traditional activities, and they might have remembered the details long enough to pass the unit test (with some repetition and review). This would have sufficed for the requirements of the state standards. But it doesn’t meet my own standards, which are much higher. And it meets those other two pesky dimensions of the Next Generation Science Standards: Scientific and Engineering Practices (engineering design process) and Cross-Cutting Concepts (modeling). We’ll look at teaching through building models in a future post.

So how did they do upon assessment? On the unit test, the students who completed these models showed a thorough understanding of how the arm and the hand work; not just the parts, but how they are shaped, how they operate and fit together, and even the importance of having opposable thumbs. Those teams that didn’t have effective thumbs had great difficulty lifting their cup of water.

All students received 100% on the essay questions related to these projects and all passed the test. They could repeat the facts, and they thoroughly understood the concepts. They will remember their learning far longer than traditional methods because they have applied their knowledge. They have analyzed problems that occurred with their models and evaluated their effectiveness against the specifications. They have revised, fixed, redesigned, and in short, they have created. They fulfilled all of the requirements for the state and the three dimensions of the NGSS, as well as all of Bloom’s levels. In addition, they learned resilience, teamwork, collaboration, and communication skills. Not all of the teams got along perfectly, and I had to work with them on how to communicate effectively to listen to all ideas and make a solid group decision instead of one person trying to run the show. Was it worth the extra time? Absolutely!

Tower of Education Babel

There are a lot of education buzzwords out there, a veritable Tower of Educational Babel that obscures instead of clarifying the problems of education and the need for reform.

Conclusions:

When administrators and parents and everyone else gets bent out of shape about standards and you feel a pressure to “teach to the test,” just remember that state education standards are the minimum expectation, and we should hope that you are a better teacher than that. Yes, you must meet the standards. You can get fired if you don’t. But state standards are not the end we are after, only one means to the better end of extraordinary education. So overreach the expectations forced upon you by your state, principle, or community and dare to teach to a higher standard. Mentor your students to deeper understanding, higher engagement, and further creativity. Dare to be extraordinary!

Read Full Post »

Starting out at a new school, I decided it was time to re-examine my personal philosophy of teaching and education.

Over the last several years, as I have been reporting my experiences in these blogs, I have paid attention to how effective I am as a teacher and what sorts of activities and lessons seem to resonate with students and provide memorable learning opportunities for them. From this I have developed my own model of education, which I have shared at conferences and workshop sessions. I will be starting a Doctorate of Education (EdD) program this fall at the University of Northern Colorado, specializing in Innovation and Education Reform. This will be a means for backing my theories up with empirical research, not just the anecdotal evidence I have now. I already know what I want to do for my doctoral thesis.

This is my revised model so far, with examples from my teaching experiences:

Creative Classroom Diagram v3-s

This is my revised model of education, what could also be called the Levels of Engagement model. The purpose of education, in my experience, is to move students from ignorance (no knowledge of a subject) through passive learning (sitting and watching or listening) to active learning (hands-on, experiential) and beyond to creative learning (students as explorers, teachers, and innovators). Students move from being consumers of educational content to interacting with content to creating new educational content or new science, engineering, art, math, or technology. The students become makers, designers, programmers, engineers, scientists, artists, and problem solvers.

I call this the Creative Classroom model, as the goal is to move students from Ignorance (lack of knowledge or experience with a subject) through the stages of being a Passive Learner (sitting and listening to the teacher or a video and consuming content) through being an Active Learner (students interacting with content through cookbook style labs) to becoming a Creative Learner (students creating new content as innovators: teachers, makers, programmers, designers, engineers, and scientists). Let’s look at these levels in more detail. It could also be titled the Levels of Engagement model, as moving to the right in my model signifies deeper student engagement with their learning.

Level 0: Ignorance

Ignorance is the state of not having basic knowledge of a subject. This isn’t a bad thing, as we all start out in this state, as long as we recognize our ignorance and do something about it. What our society needs are more creative and innovative people, not people who are passive or even willfully ignorant.

Ignorance is not bliss. What a person doesn’t know may indeed hurt him or her – if, for example, you don’t know that mixing bleach with ammonia will produce chlorine gas, you could wind up with severe respiratory problems. A basic literacy for science and engineering concepts is necessary for any informed citizen, since we live in a technological age with problems that need solving and can only be solved through science and technology.

If you do not understand science and technology, you can be controlled by those who do. How many people actually understand the technology behind the cell phones they use every day? They leave themselves vulnerable to control by the telecom companies that do understand and control this technology. If you don’t understand the importance of Internet privacy and share personal information on a website or Facebook page, you leave yourself vulnerable to people or corporations that can track your web searches or even stalk you online (or worse). I am fairly ignorant of the basic techniques for repairing my car. This leaves me vulnerable to paying the high prices (and the possible poor service) of a local mechanic, when I could save lots of money and ensure quality if I only knew how to do it myself.

As teachers our first responsibility is to lead students away from a state of ignorance. This seems simple enough, but anyone who teachers teenagers (and even some so-called adults) will know that some of them insist on remaining willfully ignorant, usually because they mistakenly think that they already know everything they need to know, which is never true of anyone. As the Tao Te Ching says: “To know what you know, and what you do not know, is the foundation of true wisdom.” So the first step to becoming a creative learner is to delineate, define, and accept our areas of ignorance.

Most Likely to Succeed quote

A quote from the introduction of “Most Likely to Succeed” by Toni Wagner and Ted Dintersmith. How long will it take before education systems realize that the old factory model of education is no longer working?

Level 1: Passive Learning

When people start learning a subject they are usually not sufficiently self-motivated to learn it on their own – but we hope they will reach that point eventually. Most inexperienced learners are passive. They wait for their teachers to lead the lesson, sitting in their seats listening to lectures or watching a movie or otherwise absorbing and consuming educational content. The focus in such classes is to complete individual assignments that usually involve only lower order thinking skills such as recall and identification. This is the level described in the quote above from Most Likely to Succeed by Toni Wagner and Ted Dintersmith.

At this level, teachers emphasize mastering the facts and basic concepts of a subject. Students are consumers of educational content, but do not interact with it or create new content. Common classroom activities include listening to lectures and taking notes or answering basic questions, watching a video or demonstration, completing worksheets, or reading a text. Student motivation is usually external, based on the desires of parents or teachers and the fear of negative consequences (poor grades, etc.).

Education at this level is all about efficiency but isn’t very effective, since less than 10% of what teachers share in lectures is retained by students beyond the next test. Evaluation is based on standards, not skills. There is always a need for students to learn facts and concepts, but it is better to provide engaging projects where the students will find out the facts on their own as a natural part of completing the project.

Level 2: Active Learning

At this phase, students start developing internal motivation as they engage and interact with content. Students are beginning to explore, but usually through activities that are fairly structured although more student centered than before. These activities are hands-on; students are doing and acting, not sitting and listening.

Common classroom activities would be “cook-book” style labs, with step-by-step instructions and pre-determined outcomes. Students begin to learn observation and inquiry skills, with some data collection in a controlled environment along with data analysis. Teachers still determine if the student has the “right” answer. They start to practice the 21st Century skills of collaboration, communication, and critical thinking. Unfortunately, most science classes stop at this level without moving beyond hands-on to the deepest level.

reasons for using inquiry

Inquiry-based learning shares many of the features of project or problem-based learning, in that it is student centered and empowers student voice and choice, allows a high level of engagement and meaningfulness as students take responsibility and ownership for their learning, and teaches resilience, grit, and perseverance.

Level 3: Creative and Innovative Learning

If the purpose of STEAM education is to teach students how to become scientists, technology experts, engineers, artists, and mathematicians then they must learn the final stages of inquiry: to ask and answer questions, to solve problems, or to design products. The purpose of science is to answer questions whereas engineering has the goal of solving problems through designing and testing prototypes. Both are creative endeavors as the result of learning is something new for society – new knowledge or new products.

In the Creative Classroom, the environment is completely open, without predigested data or predetermined conclusions. Students work on projects where they research a question important to them, develop a methodology, decide how to control variables, make observations, determine methods of analysis, and draw and communicate conclusions. At this level, students become innovators or inventors. They synthesize knowledge and apply it to themselves and teach others through writing blog posts, creating posters or infographics, presenting lessons and demonstrations, and filming and editing videos or other educational media. They become makers and programmers, building products of their own design. The students are creating and contributing to society by making new content, knowledge, and solutions.

Learning at this level is never forgotten but is difficult to evaluate with a multiple-choice test, as the focus is on skill mastery and competency instead of easily regurgitated facts. Overall, this deepest (and most fulfilling, motivational, and engaging) level is entirely student centered and driven, with instructors as mentors. Ultimately, once a student has practiced learning at this level, the teacher is no longer necessary; the students will continue to learn on their own, because they are now entirely internally motivated. These are the people that society will always need.

How This Impacts My Teaching:

As an educator, my goal is to move students toward Level 3 activities and projects. Where I succeed, the projects my students work on are meaningful to them, demand professional excellence, use authentic data, involve real-world applications, are open-ended, and are student-driven. The students are required to create, make, program, build, test, question, teach, and design. They are innovators and engineers; they are creative students.

To give some examples from previous blog posts on my two sites:

Rachmaninoff 430-630-1000-s

Representative color image of the Rachmaninoff Basin area of Mercury, created by my students using narrow band image data from the MESSENGER space probe at 430, 630, and 1000 nm. We stretched the color saturation and image contrast so that we could see differences between volcanic (yellow-orange) and impact (blue-violet) features.

My chemistry and STEAM students created an inquiry lab to study the variables involved in dyeing cloth, including the history, ancient processes, types of cloth, mordants (binders), types of dyes, and other factors. We also explored tie dyeing, ice dyeing, and batik and developed a collection of dyed swatches that we will turn into a school quilt. We also experimented with dyeing yarn with cochineal, indigo, rabbit brush, sandalwood, logwood, etc. and my wife crocheted a sweater from it.

2. My chemistry and STEAM students did a similar inquiry lab to test the variables involved in making iron-gall ink using modern equivalents. We studied the history and artistry of this type of ink (used by Sir Isaac Newton, Leonardo DaVinci, and many more) and tried to determine the ideal formula for making the blackest possible ink. We also created our own watercolor and ink pigments such as Prussian blue, etc. We used the inks/watercolors to make drawings and paintings of the history of chemistry.

3. My astronomy students used accurate data to build a 3D model of the nearby stars out to 13 light years. This lesson was featured in an article in The Science Teacher magazine, including a video of me describing the process.

4. My astronomy students created a video for the MIT BLOSSOMS project showing a lesson plan on how to measure the distance to nearby stars using trigonometric parallax. It is on the BLOSSOMS website and has been translated into Malay, Chinese, and other languages.

5. My earth science students learned how to use Mars MOLA 3D altitude data to create and print out 3D terrains of Mars.

6. My chemistry students created a 12-minute documentary (chocumentary?) on the history and process of making chocolate.

7. My 6th grade Creative Computing class built and animated a 3D model of the SOFIA aircraft prior to my flying on her as an Airborne Astronomy Ambassador.

Kasei_Valles-Mars-2

A 3D render of the Kasei Valles area of Mars, created by students as part of the Mars Exploration Student Data Team project. They learned how to download Mars MOLA data from the NASA PDS website and convert it into 3D models and animations, then created an interactive program on Mars Exploration which they presented at a student symposium at Arizona State University.

8. My science research class collected soil samples from the mining town of Eureka, Utah to see if a Superfund project had truly cleaned up the lead contamination in the soil.

9. My chemistry and media design students toured Novatek in south Provo, Utah and learned about the history and current process for making synthetic diamond drill bits. Another group videotaped a tour of a bronze casting foundry, while others took tours of a glass blowing workshop, a beryllium refinery, and a cement plant.

10. My astronomy students used infrared data from the WISE and Spitzer missions to determine if certain K-giant stars may be consuming their own planets. This was done as part of the NITARP program. They developed a poster of their findings and presented it at the American Astronomical Society conference in 2015 in Seattle.

11. My biology students build working models of the circulatory system, the lungs, the arm, and create stop motion animations of mitosis and meiosis. As I write this, they are learning the engineering design cycle by acting as biomechanical engineers to design and build artificial hands that must have fingers that move independently, an opposable thumb, can pick up small objects, make hand gestures, and grasp and pick up cups with varying amounts of water in them.

12. My computer science students, in order to learn the logic of game design, had to invent their own board games and build a prototype game board and pieces, write up the rules, and have the other teams play the game and make suggestions, then they made revisions. This was an application of the engineering design cycle.

13. My STEAM students designed and built a model of a future Mars colony using repurposed materials (junk), including space port, communications systems, agriculture and air recycling, power production, manufacturing, transportation, and living quarters. They presented this and other Mars related projects at the NASA Lunar and Planetary Science Conference in Houston.

These are just a small sampling of all the projects my students have done over the years. I have reported at greater length in this blog about these and other projects. My intent has always been to move students away from passive learning to active learning to inquiry/innovation. They often create models, build prototypes, collect data, or design a product and it is always open ended and student centered; even if I choose the topic of the project, they have a great deal of freedom to determine their approach and direction. There is never one right answer or a set “cookbook” series of steps, nor a focus on memorizing facts. They learn the facts they need as a natural consequence of learning about their project topics; by completing the project, they automatically demonstrate the required knowledge.

Mars Exploration main interface-s

My students designed, animated, and programmed this interface for their Mars Exploration project, then presented it at a student symposium at Arizona State University as part of the Mars Exploration Student Data Team program. They build 3D models and animations of Mars probes, such as the one of the MER rovers shown. In this interface, the Mars globe spins, and as the main buttons are rolled over, side menus slide out and space probes rotate in the window.

Some groups require considerable training and experience to get to this level of self-motivation and innovation, and some team building, communication, and creativity training may be required. Other groups move along more rapidly and have the motivation to jump right in. This means that managing such projects as a teacher can be challenging because every team is different. I find myself moving from being a teacher at the center of the classroom (a sage on a stage) where all students move along in a lock-step fashion to becoming a mentor or facilitator of learning (a guide on the side) as students move toward higher levels of engagement at their own pace and in their own way.

As classroom activities become more student-centered, I find it natural to tie in the Next Generation Science Standards. If I do an inquiry lab to test the variables that affect dyeing cloth, the answer is not known before nor the methodology. Students have to work out the scientific method or steps needed by asking the right questions and determining how to find the answers, or to design, build, and test a prototype product. Through this method they learn the science and engineering processes that are one dimension of the 3D standards.

Crosscutting concepts can also be explored more effectively through this method. Inquiry leads to observations, which should show patterns, processes, models, scale, proportion, and other such concepts, which are the second dimension of 3D science education.

This leaves the third dimension, which is to teach subject Core Concepts. This is where most of the misguided opposition to Project Based Learning comes from. Teachers feel that projects somehow take time away from “covering” all the standards. But if we want deep learning of the core concepts of a subject, we can’t expect students to learn them by using surface level teaching techniques that emphasize facts without going any deeper. If I do it right, I can involve many standards at once in the same project and not only meet but exceed the standards in all cases. I call this “standards overreach” and I will talk about this in more detail in my next post.

Element posters and virus models

Projects don’t have to be a elaborate and complex as the Mars project shown above. Here, my New HAven students have created models of viruses and mini-posters of chemical elements. The green plastic bottle to the left is a model of a human lung.

Read Full Post »

Jakarta Day 2: Sunday, July 16, 2017

Me doing batik

David Black working on a batik design of Ondel-Ondel at the Museum Tekstil Jakarta.

After our morning sessions at the hotel, we ate lunch at the buffet (the desserts were amazing) and boarded out Whitehorse bus to visit the Museum Tekstil Jakarta, or the Textile Museum of Jakarta. Sarah Sever had set up a class for all of use to learn how to make batik. I was very excited by this, as learning how to do batik is one of my main goals for what to learn in Indonesia.

In my STEAM it Up class, we tried batik at the end of the school year. I ordered a kit from Dharma Trading Company with wax, a canting (the wax pen), and other materials. The instructions were not detailed enough on how to heat the wax, how hot to keep it, or how to hold the canting. The wax was very difficult to keep molten without burning it, and it kept plugging the canting’s tip or not penetrating the cloth. We tried silk and linen, and our results were less than ideal. Then we had trouble getting the wax out of the cloth.

Attempted batik-triangle patterns

One of my STEAM it Up student’s attempts at doing batik. The wax kept clogging the canting and wouldn’t penetrate into the cloth. And it kept dripping.

We walked to the workshop room, which had seats arranged around a series of small burners with wax melted in a bowl on top and cantings for each person. We chose pre-drawn patterns already in embroidery hoops, and a lady showed us how to dip and use the canting to trace the patterns. Where the wax soaks in to the cloth, the dyes won’t penetrate and the cloth is left white. It is a wax resist process.

My own attempt at batik in STEAM

My own attempt at doing batik in the STEAM it Up class. I had the students create a tessellation, such as these arrows, by drawing around a stencil on a pre-died piece of linen. Then we applied wax using a canting. But it kept dripping and clogging.

My pattern was rather complicated, a pair of figures called ondel-ondel with elaborate costumes and headdresses. I saw two things immediately: the wax used here melts at a lower temperature and stays liquid longer that the wax I got from Dharma, which has too much paraffin in it. Here, the wax (or malam) has more beeswax and other ingredients and is more of a brown color.

Craig-Matt-Nikki batik

Craig, Matt, and Nikki working on their batik patterns using canting (wax pens).

You dip the canting into the wax to fill the small reservoir, then hold it at a 45° angle against the cloth, which is held on your left knee (if right handed). I had some trouble with the wax dripping and making splotches on the cloth, but found if I rubbed off any excess wax from the dipping process, this problem would minimize. It felt much like using a traditional pen to do pen and ink drawings; you have to rub off the excess to keep it from dripping there, too.

At Tekstil Museum

Teachers for Global Classrooms educators at the Museum Tekstil Jakarta.

All the teachers enjoyed the process. I was one of the last ones done, and had to rush through waxing the opposite side of the cloth. The next step was to hand the cloth to the man doing the dyeing. We could do red or blue or a combined purple. I chose purple and videotaped him dyeing my cloth as well as others. The wax was then melted out in boiling water and the clothes hung up to dry.

Anu doing batik

Anu working on the same pattern I had: the traditional Ondel-Ondel dolls. Notice how she is holding the cloth at a 45° angle and tipping the canting at the same angle to avoid spilling wax (malam).

While they were drying, we stopped at the gift shop and I purchased some cantings and wax, using money borrowed from Nikki as I had not yet tried to exchange my U.S. dollars for Indonesian rupiah yet. I’ll talk about the exchange rate in a later post. We then took a tour through the museum, where they had examples of batiks from all over Indonesia. A wide variety of plants and animals are used to make the colors of the dyes. We then walked over to the separate museum on weaving techniques and styles.

Kate and Wendy see batik

A master batik artist shows Kate and Wendy her work. She later gave Wendy one of her pieces.

After these tours, I went outside because it was stuffy in the non-airconditioned buildings. It was very humid outside, but at least there was some air moving in a slight breeze. It will be a challenge to adjust to the humidity.

Professional batik

A master artist applying the malam wax using a canting pen. Notice the delicate hand work and how she is not dripping any wax. It is similar to learning how to do hand-dipped pen and ink. I just have to practice.

As I was walking around the grounds trying to find the restroom, the afternoon call to prayer (salat) rang out from several nearby mosques. This is not the first time I had heard the prayer call. In 1984, I traveled with my family to parts of Europe and Israel, and while in Jerusalem I visited the Dome of the Rock and heard the calls to prayer. The calls ring out loudly so that all people can hear wherever they are and whatever they are doing. These prayers are done five times per day, and begin with the Kalimah, a statement of belief that there is only one God and Muhammad was his prophet. This is one of the five Pillars of Islam. The imam for each mosque then decides a passage from the Quran to read, and the muezzin calls out the passage as a song, which is quite beautiful to listen to and rather haunting. I recorded some of it.

Everyones batik drying

Teacher batik hanging up to dry. We could choose red or blue or a combination. The border was painted on and cracked by one of the museum teachers.

Sarah collected our dried batiks. Mine wasn’t exactly a work of art, but it was much better than my earlier attempts in my STEAM it Up class. We re-boarded the Whitehorse bus and traveled gradually toward our next destination. I took photos of bougainvillea and other flowering plants along the way. I have missed the colorful flowers of the tropics.

Batik sample

Batik sample in the Museum Tekstil Jakarta.

Batik sample 2

Other batik samples in the museum.

Me with ondel ondel

David Black with Ondel-Ondel statues. I bought some canting at the museum store for use in my classes at school.

Flowering bushes

Flowering bushes, mostly bougainvillea. Although native to Mexico, this bush is now found throughout the tropics in Asia.

Read Full Post »

Further Adventures in Dyeing

Me in sweater - 7-4-17

Sweater crocheted from 100% wool yarn dyed with natural dyes, including rabbitbrush, madder root, cochineal, indigo, walnut shells, sandalwood, and logwood.

Part I: Woad is Me

In my STEAM it Up class at American Academy of Innovation we have been inquiring into the best formulas for dyeing cloth using natural dyes. I’ve reported on this several time in this blog before, and this will be my last post about it (at least for now). I wanted to describe our follow up efforts and present our final results.

Not woad - but pretty

What I thought was woad – but now plainly isn’t. Woad has yellow flowers. This is quite pretty, though.

The first note I have to make is that I was mistaken in my post about woad. The plant that I had accidentally found and identified as woad is NOT woad. I’ve been keeping an eye on the plants as I drive past the spot on Mountain View Corridor in the southwest corner of Salt Lake Valley, and waiting for them to bloom in May so that I could make a final positive identification. But, alas, woad is me, the blossoms were red and pink – and quite pretty, hanging on long stems in small pendular bell shapes. However, woad has yellow flowers. This is not woad, but a closely related species (the leaves and other features are identical).

Real woad

This is real woad. Notice the yellow flowers and green leaves with white vein clustered at the bottom.

That led me to go on a hunt for true woad, and I soon found it – just five miles further south along Redwood Road across from Camp Williams, by the Herriman Pit. There were plenty of other yellow flowered plants, but these I knew were clover. Then, at this site, along the fence, I saw some plants with larger yellow flowers. I stopped and looked and sure enough, it was truly woad. I am including some photos so you can see it, and I will add a retraction to my previous post about woad (A Woad Twip).

Real woad 2

Real woad, again. This was located near Camp Williams on the other side of Redwood Road in Utah. It is a Class 3 Invasive Weed and has gotten out of control in northern Utah.

I did not have the time left in the school year to go through the difficult extraction process, so I merely noted where the plants were. Two of my 8th Grade Science students had written a report for their Environmental Science Project about invasive species. The project required an action plan, and for their action they travelled down to this spot several days later and pulled up all the woad plants they could reach on the road side of the fence. There are still many more further in that I will harvest in September when the indigotin is the highest and have my chemistry students do the extraction. I still have the extracted powder from the non-woad plants – we will experiment with it this fall to see if it, too, is a dye since the plants appear to be related.

Part II: Born to be Purple

Purple everywhere

Our experiments with logwood yielded this beautiful variegated yarn – and lots of purple dye.

We received our money for the Classroom Grant from the Utah STEM Action Center in early May and sent off our order, which included additional yarn skeins (Kona sports yarn, 100% Merino wool). It also contained bolts of silk and linen as additional fabrics to experiment with (more on these results later). We also ordered a package of a new dyestuff: logwood.

We looked up instructions for basic dyeing with logwood and followed them as our first experiment. It called to pre-mordant the wool in alum, which we did, and to use about the same weight of logwood chips as the yard we were to dye. This seemed excessive, so we used have as much logwood by weight as the yarn. We added about 750 mL of boiling water to the logwood chips as per instructions and soaked them overnight, then simmered the chips and solution for two hours. After filtering out the solution, we placed half the skein in the solution so that we could variegate the yarn for more interest and boiled it. After an hour, the yarn had turned a very dark purple. We turned the skein around (a messy process – do these sorts of things in a sink if you can, or in a waterproof container) and boiled the other end for only 15 minutes, which provided a nice lavender, moving the boundary between the colors in and out to get a gradient of color. After rinsing and washing, the dark end was still very intense purple, as you can see in the photos.

Logwood comes from Central America and was highly prized because, with its dark purple color, all it took was an overdye with a yellow color to produce black, which is a hard color to come by for natural dyes. Keep in mind that in Europe, the only reliable purple dye (more of a burgundy) was the famous Tyrian purple made from the Murex sea snail, which was very expensive. Now we have a reliable (and powerful) New World purple.

We were left with a lot of dye solution. I even collected the rinse water from the sink and saved it in an aluminum foil pan, which was still intense purple. Unfortunately, I left the pan over the weekend and discovered that logwood solution is acidic and reacts with aluminum. I came back on Monday to find purple solution all over the cabinet and the tile floor (Note: Never have carpet in a science classroom). It was quite a clean up job and involved lots of paper towels and bleach. I added more water to the logwood chips and boiled it some more and still got a deep purple. This stuff just won’t quit. Now I have about 1.5 L of logwood dye solution left even after using it for several other experiments.

LInen and silk-rabbitbrush

Silk (left) and linen (right) dyed with rabbitbrush. In this case, the dried blossoms were used, which I collected and dried last fall. You can see that both fabrics accept the rabbitbrush well using alum for a mordant.

We experimented with using silk and linen, and both accepted the logwood well. We tried overdyeing with rabbitbrush (our free go-to yellow dye) and it created a kind of sickly purplish grey color – not my favorite, but interesting if you’re into grey. We did not experiment with saddening or gladdening the color. The literature says that adding even a small bit of an iron compound to logwood will turn it a dark grey. That’s an experiment for another time.


Sandalwood results

Sandalwood dyed on cotton with modifiers added. On the top right, it is plain sandalwood using an alum mordant. On bottom right, tartaric acid (cream of tartar) has been added to lighten (gladden) the color. On top left, tin has been added as a gladdener. On bottom left, iron (II) sulfate has been added to sadden (darken) the color to an interesting reddish grey.

Part III: Modifying Sandalwood

Sandalwood was another natural dye we did some experiments with before we ran out of yarn several months ago, and a team of students had experimented with saddening and gladdening the sandalwood using iron (II) sulfate and cream of tartar, respectively. Iron turned the sandalwood from brick red to grayish brown, and cream of tartar lightened the brick red to more of an orange. Now that we had more wool, I wanted to dye a skein of it with sandalwood. I had read that copper compounds also make an interesting modifier for sandalwood, so we dyed one end of a skein in a 500 mL beaker with un-modified sandalwood (after pre-mordanting the yarn with alum) and the other end in a 500 mL beaker with sandalwood modified with a small amount of copper (II) nitrate. It turned the brick red into a pleasant reddish brown, a bit nicer than our experiments with walnut shells had produced.

Sandalwood process

Skein of yarn being dyed with sandalwood. The yarn is first boiled in an alum solution as a mordant (a metal salt that helps the dye molecule bind with the fabric), then we added copper (II) nitrate to the sandalwood at left, which saddened the color from brick red (right) to red-brown. The sandalwood had been filtered to remove the dye chips, then the solution boiled with the yarn dipped in it for about one hour.

Sandalwood skein

100% Merino wool dyed with sandalwood after it has been rinsed. The yarn was then washed in a machine on gentle cycle and allowed to dry in the air. I like the brick red and the brown-orange hues.

Part IV: Making a Sweater from Our Results

One of the points of this STEAM it Up class is to create final works of art from our investigations and projects. I now had eight different skeins of yarn, each dyed with a different natural dye using a variety of processes. My wife is excellent at crochet, and she volunteered (with some strong hinting from me) to crochet these skeins of dyed yarn into a sweater. She had never attempted a sweater before, and looked up patterns, made careful measurements of me (this was tricky because I have been losing weight), and set to work. First, she had to untangle the washed yarn and roll it into balls for more convenience in crocheting. Then she built the front and back pieces, counting carefully to make sure there were the same number of rows of each color. She completed these parts by March as a birthday present. Once we had the new colors, she completed the sleeves and sewed the pieces together as a Father’s Day gift.

David Black in sweater

David Black in the finished sweater. It is very comfortable. I have enough yarn left for my wife to crochet a beanie and maybe a scarf . . .

I presented our project at the STEAM Action Center’s Best Practices conference on June 21 at the Utah Valley Convention Center and had about 40 teachers attending. I wore one of my ice-dyed shirts, then the sweater over the top, then my Tie-dyed lab coat over the sweater. It was a bit warm, but during the presentation I did a little strip tease to show them the results. I also displayed other shirts, the yarn balls, and cloth swatches we’d made in the class for our experiments. The presentation went over well, and several teachers complemented my wife on her sweater design. It fits perfectly, and is a very comfortable sweater. Here is a photo showing what the different bands are dyed with.

Part V: A Quilt and Some Viking Dye Ideas

I had students in the STEAM it Up class who were experienced at making quilts – two of them even had their own quilting frames. Quilting is quite a big thing in Utah. As part of these continuing experiments, we have amassed quite a few swatches of cotton, silk, and linen fabric dyes various colors. I have the idea to create a patchwork quilt in the form of our school logo, with correct colors. We haven’t pursued the quilt project yet – too little time left in the semester. Another project for next year. We still haven’t gotten a good green, which is one of the colors in our logo. We’ve overdyed rabbitbrush yellow with indigo blue and gotten kind of a mottled olive green, but nothing really bright.

Stack of swatches

A stack of dyed cloth swatches – the results of our experiments. I hope to have them made into a patchwork quilt in the form of our school logo. On the right are our experiments with pyrography (wood burning), which the students got pretty good at.

Then I had a meeting at the Natural History Museum of Utah to plan out some professional development workshops in the fall (incidentally, one of them will include parts of our dye lab) and was allowed to browse through the museum on my way out. There was an interesting display of Navajo and Ancestral Puebloan fabrics and dyes, and a visiting exhibit on the Vikings that was fascinating. They had one display showing green dyed wool fabric, which was made from woad overdyed with weld (a yellow dye) and was bright green. Or maybe the other way around – the display was vague on that. So now we need to get some weld and use it with our own woad and see what we get. Another experiment for another time.

Sweater with labels

The finished sweater: The yellow at the top is rabbitbrush, the light orange is madder root, the deep red is cochineal in its natural color, the light purple is cochineal with some baking soda added (a base), the light blue is indigo, the yellow-tan to brown at the top of the sleeves is walnut shells mixed with rabbitbrush (in two separate beakers), the brick red is sandalwood, the bright red is cochineal again, and the deep purple at the bottom of the sleeves is logwood.

Part VI: More to Come

This is the fun part about STEAM education, project-based learning, and inquiry science: there is always more to learn, more variables to test, more experiments to refine. I’ve spent a great deal of blog space here just describing one continuing lab on dyeing cloth, but there are so many more ideas for combining the arts and history with STEM.

This post is overlong already, so I will wait for a later post to reveal our final results from the entire year’s worth of dyeing. I still need to talk about our year-end STEAM Showcase, which I will do tomorrow in my next post. Then it’s off to Indonesia on Thursday, which will require a long series of posts, if all goes as planned, so you may have to wait until September before I can return to give the dye lab results. I’ll write up a complete PDF you can use.

Read Full Post »

I’m taking a break from reporting on my preparations for my Teachers for Global Classrooms trip to Indonesia to bring you up to date on activities in my STEAM it Up and Chemistry classes, so that I can maintain some semblance of chronologic continuity.

Ice dye shirts 1

Ice dyeing creates intense, random colors.

Once we finished our unit on steampunk sculpture and cosplay costume creation, we began ramping up for the concluding section of our dyeing cloth lab in the STEAM it Up class. To get the students back in the mood, I introduced them to tie-dye and all of its STEAM applications. I’ve reported on how to do tie-dye in previous posts, so I won’t describe what we did again here. We did add a new wrinkle to the process by trying out a different type of dyeing using ice to randomize the colors. This is called ice dyeing, and you can find many beautiful examples online. The colors tend to be much more intense (because the dye powder is less diluted by the ice).

Here’s how to do it:

Adding dye powder

My STEAM it Up students adding tie-dye powder over the ice layer. The T-shirts and other cloth items are scrunched up on a tray under the ice.

First, you find a tray or grate or sieve of some kind that can fit inside a waterproof container, such as a plastic storage box. The grate must have holes to let water through and be raised a few inches above the bottom of the container so that the cloth won’t be sitting in the melted ice water.

Second, you need white or near-white cloth such as T-shirts or aprons or socks. These need to be pre-soaked in washing soda (sodium carbonate) dissolved in warm water. I use about a cup (250 mL) of washing soda to a sink full of warm water. Soak the cloth for at least 15 minutes, then wring out most of the water so that the cloth is wet but not dripping The cloth pieces or T-shirts then need to be wadded or scrunched up randomly and laid in the tray next to each other tightly enough so that they will remain somewhat folded up.

Ice with dye powder

The ice with a completed layer of dye powder. I demonstrated the process at the bottom with a spectrum of colors (and two shirts underneath). Students die the middle and top. Where complimentary colors are mixed, as in the top right, the results were more muddy. Yellow needs to be given more room since any other color will mix in and darken it.

Third, ice or snow is layered on top of the cloth or shirts. We simply raided the faculty lounge refrigerator’s icemaker and poured the ice on top of the cloth. It needs to make a fairly complete and even layer with no holes. We did this in May or we would have gone outside and gathered snow for a finer, more complete layer.

Fourth, tie-dye powder (we used Procion MX dye powder ordered from Dharma Trading Company) is spooned onto the ice or snow. This will use a lot of dye powder, so go sparingly and try to make a rainbow or spectrum pattern, with analogous colors next to each other instead of complimentary colors. Otherwise, the opposite colors will mix and you’ll get muddy results. There is some good color theory that can be taught here.

After the ice melts

To keep the T-shirts from sitting in the muddy melt water, the tray they are sitting in must be raised out of the water. I placed this tray on top of some funnels I use for tie dyeing. This is what the shirts look like after the ice melts. The shirts must sit for 24 hours with a lid on the container before rinsing. By scrunching up the cloth, and by the mixing of colors as the ice or snow melts, the final shirts have bright, random colors.

Finally, put a cover on the container and let it sit overnight undisturbed. It must be airproof, as the dyes need wet cloth and about 24 hours to set in. The colors will mix in the melt water to make a dark olive or brown color that can be saved for other dyeing. The shirts are then rinsed out in a sink with running cool water until no more color rinses out of them. They can then be washed with non-bleach detergent on gentle cycle and dried normally.

Ice Dye shirts 2

Ice dyed shirts.

Here is a photo of the results. Since some of my students forgot to bring their own T-shirts, I brought in all the old T-shirts I could find. Some of them had paint on them or were buried at the bottom of my drawer and hadn’t been worn in years. Now they have a new lease on life and are my favorite tie-dye shirts. Over the years, I’ve built up quite a collection, but these have the most intense colors.

Me in ice dye shirt

Here I am wearing my favorite ice dyed shirt. Notice how bright the colors are, but it does use up a lot of dye powder.


Read Full Post »

dyed-yarn-balls

Dyed merino wool yarn using natural dyes. Top left: Rabbitbrush. Top right: Cochineal treated with ammonia. Bottom right: Indigo. Bottom center: Cochineal treated with citric acid. Bottom left: Madder root.

As a follow up to our inquiry lab to develop the best formulas for dyeing cloth with natural dyestuffs, I ordered some Kona 100% merino wool yarn and several yards of untreated cotton fabric from Dharma Trading Company along with indigo, cochineal, sandalwood, and madder root dye powders, and some mordants and other chemicals needed for these dyes.

As we finished up before Winter Break, I started testing these dyes and experimenting with variables to get an initial feel for how well the yarn and cotton work. My first test was rabbitbrush, as I had collected boxes of flowers before the color completely faded in October. I simmered a skein of yarn in aluminum sulfate (alum) powder as a mordant for an hour while boiling the rabbitbrush blossoms, then transferred the hot yarn into the dye bath. It accepted the color nicely.

Next came madder root. I used the same mordant bath and prepared a dye bath by soaking the madder root bits directly in hot water and letting it simmer while the yarn was in the mordant bath, then filtered the madder solution through a sieve before dyeing the yarn. The color did transfer, but was lighter than I had expected but a very nice light salmon orange. I used the same solution for about two feet of the cotton, but it turned out even lighter. Increasing the concentration of the dye bath didn’t seem to help.

cochineal-dyeing

Dyeing With Cochineal: The dye bath is bottom left. I crushed the cochineal shells in a mortar and pestle, then placed them in the sieve (top center) and boiled in the hot water. The yarn is simmered in the mordant (alum powder – to the right), then simmered in the dye bath, then rinsed out (in the sink in center).

With some confidence that the wool yarn was working well, I crushed some cochineal shells in a mortar and pestle and placed them in a sieve and the sieve into boiling water to make the dye bath. This was to prevent the shells from sticking to the yarn, which would have been hard to get off. I wanted to make a multi-colored skein, so I dyed part of the skein in plain cochineal, then added citric acid to the dye bath which made it turn bright red – the citric acid worked much better than the vinegar or tartaric acids had. It made a skein that varied from deep red to burgundy color. The color stuck to the yarn extremely well.

orange-cochineal

Dyeing cotton cloth in cochineal treated with citric acid (orange) and ammonia (red to purple). Unfortunately, these colors were not colorfast. Upon rinsing, they changed back to neutral pink.

I then took the same cochineal bath (it was quite strong) and added ammonia to turn it from red to purple, again making a variegated skein. I divided the bath in two and had part of the skein simmer in the purple, part in a pot with more citric acid added back. I think I diluted it too much. Part of the skein between the two pots didn’t get much dye and remained a lavender color. The final skein varied nicely from lavender to burgundy to magenta to purple. The cotton swatch I tried was left in the citric acid side (which was now orange) over a weekend and it looked nicely orange when I took it out, but the differences in color washed out when I rinsed them – the pH neutralized. I need to figure out a way to set the color in cotton, maybe by not rinsing it before placing it in a drier. The wool yarn retained the varied colors nicely upon rinsing and washing in the laundry.

dyed-skeins-2

Skeins of dyed yarn before untangling. Some skeins were dyed a solid color, others were variegated.

Then I tried the tricky one – indigo. I had purchased the sodium hydrosulfite, used to reduce the blue indigo to the leuco state where it dissolves and penetrates the cloth. I followed the suggested steps from my research, but ran out of time to finish the process as a fire system sprinkler pipe burst outside the school and we had to evacuate while the fire department came to fix it. I turned off the hot plate quickly and grabbed my stuff, because it was the end of the day before Winter Break. I didn’t want to wait for the all clear, so I just went home. It took me a few days to get back to school, what with preparing for Christmas and shopping, cleaning, and cooking sugar cookies with my sons, etc. The yarn and cotton had been soaking for days. By the time I rinsed everything out, the cloth and yarn were a deep blue. I think I used to much indigo powder – this stuff is strong. The cloth washed out to a light blue and after washing the yarn, it faded as well but had a nice variegated color scheme.

After Winter Break and during the start of my second semester STEAM class, we tried out one more skein dyed with walnut shells and marigold flowers. I had some marigold blossoms I picked off my flower patch right after the first deep freeze in December and had dried them out. It died the wool a golden yellow, but I tried variegating the skein using walnut shells and hulls, but the brown color washed out to an ugly tan in both the cotton and the wool yarn. A student brought in black walnuts, but the result was the same after several attempts. I tried concentrated madder dye on part of the skein, but it didn’t work well, either. I think the marigold prevents other dyes from overdyeing. Perhaps other mordants would work for the walnut. It never got as dark as I expected. So the marigold skein is my least favorite – kind of a dirty yellow. More experimentation is needed here.

failed-experiment

Experimenting with marigold dye (middle), madder root (right), and walnut shells (left). If the colors had remained this intense, it would have been OK. But the walnut shell and madder rinsed out and were much lighter upon washing.

I met Katie Wirthin, an education specialist from the Natural History Museum of Utah, when I was presenting my STEAM session at the NSTA STEM Forum in Denver last summer, and she asked if I was interested in teaching a workshop at the museum this year. We had communicated back and forth all fall, and once I finally had my Teachers for Global Classrooms online class done (more on this in a later series of posts), I was able to teach a workshop at NHMU. The week I was scheduled to teach it to about 23 teachers, they had a power outage and had to postpone the class for a week. The next week only eight people came, but it turned out well. Katie had gotten all the materials and as usual I tried to do too much in the two hours. We did marbled paper, iron gall ink (except I forgot to bring the tea bags – they were able to scrounge some green tea in their cafeteria which actually worked far better than the regular brown tea – you could really see the black pigment form). The final activity was dyeing cloth – we used terry cloth swatches, and it worked well but we ran out of time. She still has much of the supplies left, as it was designed for more people. We will probably run the workshop again on a Saturday for three hours.

dyeing-with-sandalwod

A student dyeing a swatch with sandalwood dye using a tin (II) chloride mordant. Notice the dark orange color.

Now that I have six skeins of yarn dyed, my wife has untangled it all and rolled it into balls so she can crochet a sweater from it. I’m not sure if I want the marigold color or not, but experimentation is part of this process. It might be an epically ugly sweater, but I don’t care. I will wear it proudly.

spinach-dye

Some green dye extracted from spinach leaves.

My STEAM students are beginning the lab again, and one student is using sandalwood for the first time. She used tin (II) chloride as a mordant, and the color turned a deep orangish brown, so as soon as I get more skeins of merino wool yarn, I will dye one with sandalwood. Another one is using spinach leaves for a green dye, and we’ll see how that goes. We need to order elderberry plants or leaves for another green color (it might take a while to grow the trees), and logwood for purple to black. There is still so much to experiment on before I post the final recipes. We still have to figure out how to improve the walnut shell dye. But we’ve learned a great deal so far, and I’ll report on my second semester class in a few weeks as we continue to experiment. This is what inquiry is all about.

yarn-balls-2

The skeins untangled and rolled into balls for crochet. My wife will make me a sweater from these. The cotton swatches will be turned into a patchwork quilt of our school logo.

dyed-skeins-of-yarn

Skeins of dyed merino wool yarn. Clockwise from top left: Cochineal treated with citric acid (red), rabbitbrush (yellow), indigo (blue), cochineal treated with ammonia (purples), and madder root (orange).

Read Full Post »

final-flowers-2

Glass flowers made by AAI students at Holdman Studios.

During the 2016 fall semester at American Academy of Innovation, I started out in a bare science classroom without any lab stations or sinks. This was a challenge, but also an opportunity as I got the chance to design my own lab. Once I had finished the design and the architects rendered their version of it and the bids came back, it was late October. By the time the cabinet makers were ready to install, it was the week before Thanksgiving. I moved everything into the center of the room and covered it all with a large green tarp for the duration of the construction. I moved my classes into the school library for three weeks.

final-flowers-3

Glass flowers made by students at AAI. Mine is the red one with blue edges at the bottom right.

Since my STEAM it Up class couldn’t build sculptures or do tie dyed shirts or other such projects in the library, we took the three weeks to learn video filming techniques. I also set up a tour of a local glass studio. We researched the processes of glass blowing and the students wrote up a basic script and filmed the narration.

gathering-glass-from-crucible

First step: Gathering molten glass onto the puntil rod from the crucible.

Now I have done this before, as reported previously. I took a group of students from Mountainland Applied Technology College to Holdman Studios in 2009 to document the processes of glass blowing and stained glass artistry. The blown glass video was edited into a short description of the process which can be found here on YouTube (https://youtu.be/0TyDqZCGkpI ) and on my video page in this blog.

shaping-the-gather

Step 2: The molten glass is shaped on a metal shelf next to the crucible.

This time I wanted to get additional footage and give my new students a fun experience, so I set up a class for them to learn how to make glass flowers. These are simpler because they only involve stretching the glass, not blowing, so each student who wanted to pay the fee could make their own.

cullet-for-first-gather

Step 3: The glass is rolled in colored cullet or frit to produce the interior stem color.

We traveled down to Thanksgiving Point to Holdman Studios on November 30, 2016. We signed up and chose our colors. I set up some video cameras to record the process and explanation. A puntil rod is used and not a blowpipe since no blowing is needed.

Here are the steps for making a glass flower: A pre-heated puntil rod is used to gather the molten glass from the crucible, where it is shaped into a cone on a metal shelf.

rolling-first-gather-brielle

Step 4: The first gather is balanced by rolling it at the rolling station.

Colored cullet or frit is added to the molten glass by rolling it through the frit on the marver table. The rod is rolled to get the glass to the desired balance. A second layer of glass is gathered at the crucible and a second color added at the marver table. The first color will be the interior or stem of the flower, the second will be the outside edge or petals of the flower.

second-gather-cullet

Step 5: A second layer of molten glass is added and shaped, then rolled in a second color of cullet to create the flower petal color.

The student at the rolling station then uses forceps to pull out the molten glass into a flower shape. If the student is too cautious or takes too long (like me) the glass may cool too much to be pulled and must be reheated in the glory hole.

flattening-the-glass-me

Step 6: A flat paddle is used to flatten the molten glass agains the puntil rod, to allow for a hollow stem in the flower. I am wearing gloves and a fireproof sleeve to prevent my arm from getting burned. The glass is very hot.

pulling-out-flower-drew

Step 7: The student begins to pull out flower petals from the molten glass.

Once the flower shape is done, the flower is pulled out along the axis of the puntil rod to form a stem, which is either kept straight or twisted up depending on what the student wants. The glass is scored and knocked off the puntil, then fire polished with a blowtorch and placed in an annealing oven for 24 hours to gradually cool down.

pulling-flower-3-sterling

Step 8: Working quickly around the flower, the student continues to pull out the glass to make the flower larger. It feels like pulling taffy.

Six students and two adults, including myself, made flowers. They turned out very well. I had to return two days later to pick them up, and the colors were amazing as seen in these photos. Mine is the flower with a red stem with blue petals, which I gave to my wife as a Christmas present. The process was tricky but fun. I had to wear gloves and a fireproof sleeve to prevent my arm hairs from singing. The glass felt like pulling taffy. I highly recommend that you try this out if you get a chance.

glory-hole

Step 9: If the glass begins to cool (as mine did because I took too much time to pull it), the piece must be re-heated in the glory hole.

We got some good photos and video, even though lighting conditions in the studio are challenging (there is a strong backlight). Audio is also a problem as the glory hole and fans are noisy. But I can hear the explanations well enough to at least transcribe the footage, and record new narration over the top when I finally edit all of this together into a longer video.

pulling-out-stem

Step 10: Once the flower shape is done, the flower is pulled away from the puntil along its axis to create a stem for the flower. The first color of cullet becomes the stem color.

If you want to schedule your own lessons to learn to make glass flowers or even blow your own Christmas ornaments, here is the link to the Holdman Studios page:

https://www.holdmanstudios.com/hotshop-classes/

spinning-the-stem-noah

Step 11: If the student desires, the puntil rod can be rolled to twist up the stem.

fire-polish-me

Step 12: The glass is scored with forceps, knocked off the puntil rod, then placed on fireproof cloth and fire polished with a blowtorch, as I am doing here. The flower is then placed in the annealing oven (at left) to slowly cool down over 24 hours.

students-with-flowers

Some of the students at American Academy of Innovation who made glass flowers at Holdman Studios.

glass-display

Displays of glass at Holdman Studios. In addition to classes for making glass flowers, the staff also holds classes for traditional glass blowing including making Christmas ornaments.

Read Full Post »

Older Posts »