Feeds:
Posts
Comments

Posts Tagged ‘science activities’

I’m taking a break from reporting on my preparations for my Teachers for Global Classrooms trip to Indonesia to bring you up to date on activities in my STEAM it Up and Chemistry classes, so that I can maintain some semblance of chronologic continuity.

Ice dye shirts 1

Ice dyeing creates intense, random colors.

Once we finished our unit on steampunk sculpture and cosplay costume creation, we began ramping up for the concluding section of our dyeing cloth lab in the STEAM it Up class. To get the students back in the mood, I introduced them to tie-dye and all of its STEAM applications. I’ve reported on how to do tie-dye in previous posts, so I won’t describe what we did again here. We did add a new wrinkle to the process by trying out a different type of dyeing using ice to randomize the colors. This is called ice dyeing, and you can find many beautiful examples online. The colors tend to be much more intense (because the dye powder is less diluted by the ice).

Here’s how to do it:

Adding dye powder

My STEAM it Up students adding tie-dye powder over the ice layer. The T-shirts and other cloth items are scrunched up on a tray under the ice.

First, you find a tray or grate or sieve of some kind that can fit inside a waterproof container, such as a plastic storage box. The grate must have holes to let water through and be raised a few inches above the bottom of the container so that the cloth won’t be sitting in the melted ice water.

Second, you need white or near-white cloth such as T-shirts or aprons or socks. These need to be pre-soaked in washing soda (sodium carbonate) dissolved in warm water. I use about a cup (250 mL) of washing soda to a sink full of warm water. Soak the cloth for at least 15 minutes, then wring out most of the water so that the cloth is wet but not dripping The cloth pieces or T-shirts then need to be wadded or scrunched up randomly and laid in the tray next to each other tightly enough so that they will remain somewhat folded up.

Ice with dye powder

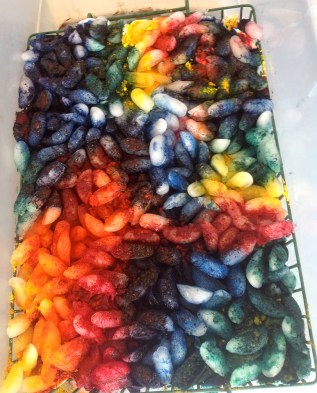
The ice with a completed layer of dye powder. I demonstrated the process at the bottom with a spectrum of colors (and two shirts underneath). Students die the middle and top. Where complimentary colors are mixed, as in the top right, the results were more muddy. Yellow needs to be given more room since any other color will mix in and darken it.

Third, ice or snow is layered on top of the cloth or shirts. We simply raided the faculty lounge refrigerator’s icemaker and poured the ice on top of the cloth. It needs to make a fairly complete and even layer with no holes. We did this in May or we would have gone outside and gathered snow for a finer, more complete layer.

Fourth, tie-dye powder (we used Procion MX dye powder ordered from Dharma Trading Company) is spooned onto the ice or snow. This will use a lot of dye powder, so go sparingly and try to make a rainbow or spectrum pattern, with analogous colors next to each other instead of complimentary colors. Otherwise, the opposite colors will mix and you’ll get muddy results. There is some good color theory that can be taught here.

After the ice melts

To keep the T-shirts from sitting in the muddy melt water, the tray they are sitting in must be raised out of the water. I placed this tray on top of some funnels I use for tie dyeing. This is what the shirts look like after the ice melts. The shirts must sit for 24 hours with a lid on the container before rinsing. By scrunching up the cloth, and by the mixing of colors as the ice or snow melts, the final shirts have bright, random colors.

Finally, put a cover on the container and let it sit overnight undisturbed. It must be airproof, as the dyes need wet cloth and about 24 hours to set in. The colors will mix in the melt water to make a dark olive or brown color that can be saved for other dyeing. The shirts are then rinsed out in a sink with running cool water until no more color rinses out of them. They can then be washed with non-bleach detergent on gentle cycle and dried normally.
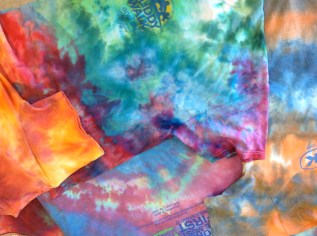
Ice Dye shirts 2

Ice dyed shirts.

Here is a photo of the results. Since some of my students forgot to bring their own T-shirts, I brought in all the old T-shirts I could find. Some of them had paint on them or were buried at the bottom of my drawer and hadn’t been worn in years. Now they have a new lease on life and are my favorite tie-dye shirts. Over the years, I’ve built up quite a collection, but these have the most intense colors.

Me in ice dye shirt

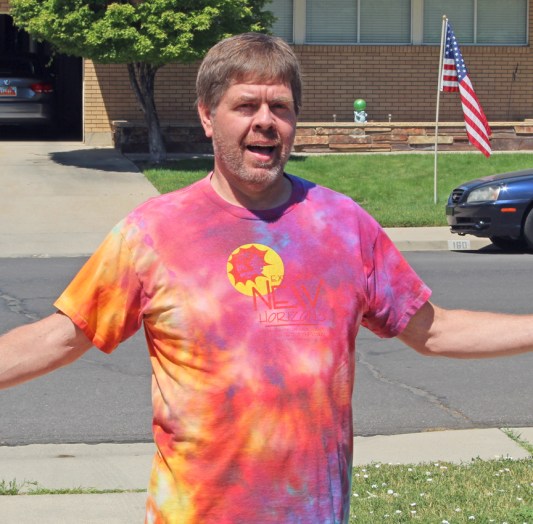
Here I am wearing my favorite ice dyed shirt. Notice how bright the colors are, but it does use up a lot of dye powder.


Read Full Post »

Foam demonstration

David Black presenting foam demonstration

Yes, I know this is late. The new school year is about to start and I am only just finishing up the last school year. This post will describe the Grand Finale of the school year for my science classes, which was our First Annual Science Showcase at Walden School.

We had been working toward this all year, as you have seen from previous posts. Students in my astronomy and chemistry classes joined into small groups (2-3 students) and chose topics based on what interested them and what materials and equipment I had available. Then during first term, they conducted background research. My chemistry students created posters and several of them contributed posts to this blog. During second term, the teams condensed their research into a script for a presentation or mini-lesson on their topic which was to include explanation, background, and some type of demonstration or hands-on activity. The teams practiced and refined their scripts, then I divided the teams in half. Half of each class presented their demonstrations/lessons to their peers in class, and I had their fellow classmates fill out an evaluation form with Likert-style point scales and room for comments. The other half presented to our elementary classes and wrote evaluations on themselves. In astronomy, the students merely presented for the elementary classes once.

science night assignments

Assignments for Science Showcase

During third term in chemistry, the teams went over their evaluations and improved their scripts. I had them start to create Powerpoint slide shows or add YouTube videos to increase the depth of their presentations. Then the teams presented again – those that presented to their peers now presented to the elementary classes and vice versa. Evaluations were again filled out, with even more detail. I also wrote up my own detailed suggestions for each team.

copper group presenting

Copper group presenting at Science Showcase

Finally, fourth term, we made our final preparations and practiced and set up our Science Showcase on May 16. I also asked the astronomy students to return and reprise their presentations, and had my geology students help out. Since our school is small, many students presented twice (and got extra credit for it). We set up an invitation for the parents and had it e-mailed out to the whole school mailing list. It took a lot of preparation, and wouldn’t have been possible without the support of the Air Force Association Educator Grant, which helped to pay for materials and supplies that were used up each time we presented (like plastic cups, red cabbage, white glue, etc.).

Schedule for science night

Schedule for Science Showcase

We set up the evening to be in three classrooms and outside on the school’s back patio (for the dangerous or messy presentations). The teams were assigned carefully so that those who were doing more than one session could make it to each one. Some students also got credit for helping film the sessions, making sure the refreshments were done (homemade root beer and ice cream, which were actually presented at two sessions), acting as hosts for each room, etc. For four sessions we had four presentations going at the same time, or about 16 topics altogether.

Dry ice group

Dry ice group presenting at Science Showcase

It was a bit frustrating to get the students all there on time (an hour early) and a few things I wanted to do didn’t get done, but overall the night was a huge success. I had about 30 students involved, and there were about 40-50 other people who attended, some other students, some parents, some siblings. A few of the sessions were too short, and the student hosts in each room didn’t watch the clock well enough, so the schedule got a bit messed up by the end, and we had to take a break for refreshments. The homemade root beer (we already had dry ice) and ice cream (another presentation) went over well. Some of the sessions only had a few in the audience, others were packed.

Flame test abstract

The last session was done by Jerry and Karl on properties of the elements and how fireworks are made, and in addition to the methanol flame test, Karl had made his own sparklers. He’d looked up a recipe online, but I didn’t have all the exact ingredients, so we substituted and experimented for a few days and came up with a viable recipe, one that actually works better than commercial sparklers. It was nice to have a grand finale, so to speak.

Homemade sparkler

Homemade sparkler demonstrated at Science Showcase

We videotaped and photographed everything, and I am still trying to capture and compile the video. I have only two weeks left until school starts, and my goal is to put together a final 15 minute video of all our presentations for the year before school begins so that I can show it to my next classes and post it here.

Solid rocket booster

Toasting the Runt: A solid rocket booster

As an assessment of the evening, I didn’t have any kind of feedback forms, but based on overheard comments, feedback from parents and other teachers, and general excitement of my students, I’d say the evening was a great success. Everyone had fun, most of the presentations worked well, the students came through very well, and I saw some genuine learning and expertise displayed by my students. Certainly they have come to feel comfortable using lab equipment and presenting to their peers and others. What they presented they have now learned deeply and will never forget, long after stoichiometry and thermochemistry have faded away. For our first year doing this, we have set up a good foundation. There are things that can be improved, of course, and I hope to get the other science teachers involved this coming year. At least now my students know what to expect.

Homemade root beer

Homemade root beer

I hope to have several students display their science experiments, where they designed, observed, and analyzed their own data for science fairs. My one science fair student displayed his computer game project and it was well attended and received. Next year, as we are involved in authentic NASA research, we’ll have more students doing the real thing. But more on that next post.

Moon craters

Moon formation and evolution demonstration

Josh shows game

Demonstrating the "Salt the Slug" game

Silver group presenting

Read Full Post »