Further Adventures in Dyeing
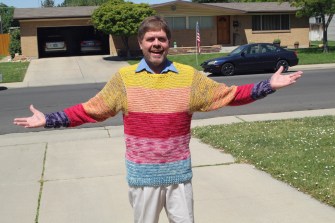
Sweater crocheted from 100% wool yarn dyed with natural dyes, including rabbitbrush, madder root, cochineal, indigo, walnut shells, sandalwood, and logwood.
Part I: Woad is Me
In my STEAM it Up class at American Academy of Innovation we have been inquiring into the best formulas for dyeing cloth using natural dyes. I’ve reported on this several time in this blog before, and this will be my last post about it (at least for now). I wanted to describe our follow up efforts and present our final results.
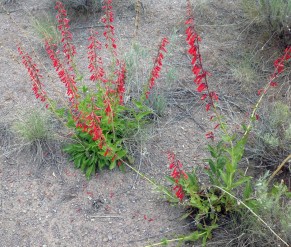
What I thought was woad – but now plainly isn’t. Woad has yellow flowers. This is quite pretty, though.
The first note I have to make is that I was mistaken in my post about woad. The plant that I had accidentally found and identified as woad is NOT woad. I’ve been keeping an eye on the plants as I drive past the spot on Mountain View Corridor in the southwest corner of Salt Lake Valley, and waiting for them to bloom in May so that I could make a final positive identification. But, alas, woad is me, the blossoms were red and pink – and quite pretty, hanging on long stems in small pendular bell shapes. However, woad has yellow flowers. This is not woad, but a closely related species (the leaves and other features are identical).
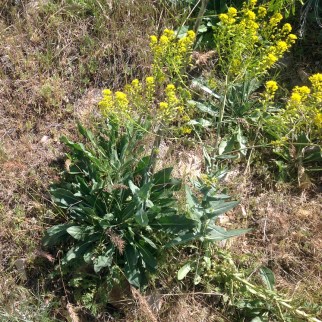
This is real woad. Notice the yellow flowers and green leaves with white vein clustered at the bottom.
That led me to go on a hunt for true woad, and I soon found it – just five miles further south along Redwood Road across from Camp Williams, by the Herriman Pit. There were plenty of other yellow flowered plants, but these I knew were clover. Then, at this site, along the fence, I saw some plants with larger yellow flowers. I stopped and looked and sure enough, it was truly woad. I am including some photos so you can see it, and I will add a retraction to my previous post about woad (A Woad Twip).
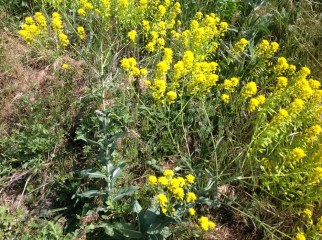
Real woad, again. This was located near Camp Williams on the other side of Redwood Road in Utah. It is a Class 3 Invasive Weed and has gotten out of control in northern Utah.
I did not have the time left in the school year to go through the difficult extraction process, so I merely noted where the plants were. Two of my 8th Grade Science students had written a report for their Environmental Science Project about invasive species. The project required an action plan, and for their action they travelled down to this spot several days later and pulled up all the woad plants they could reach on the road side of the fence. There are still many more further in that I will harvest in September when the indigotin is the highest and have my chemistry students do the extraction. I still have the extracted powder from the non-woad plants – we will experiment with it this fall to see if it, too, is a dye since the plants appear to be related.
Part II: Born to be Purple
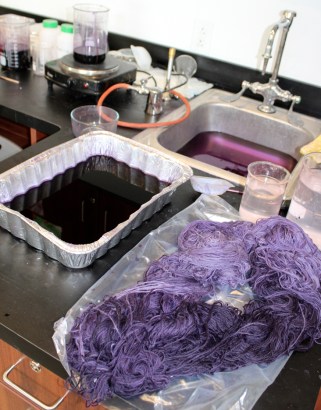
Our experiments with logwood yielded this beautiful variegated yarn – and lots of purple dye.
We received our money for the Classroom Grant from the Utah STEM Action Center in early May and sent off our order, which included additional yarn skeins (Kona sports yarn, 100% Merino wool). It also contained bolts of silk and linen as additional fabrics to experiment with (more on these results later). We also ordered a package of a new dyestuff: logwood.
We looked up instructions for basic dyeing with logwood and followed them as our first experiment. It called to pre-mordant the wool in alum, which we did, and to use about the same weight of logwood chips as the yard we were to dye. This seemed excessive, so we used have as much logwood by weight as the yarn. We added about 750 mL of boiling water to the logwood chips as per instructions and soaked them overnight, then simmered the chips and solution for two hours. After filtering out the solution, we placed half the skein in the solution so that we could variegate the yarn for more interest and boiled it. After an hour, the yarn had turned a very dark purple. We turned the skein around (a messy process – do these sorts of things in a sink if you can, or in a waterproof container) and boiled the other end for only 15 minutes, which provided a nice lavender, moving the boundary between the colors in and out to get a gradient of color. After rinsing and washing, the dark end was still very intense purple, as you can see in the photos.
Logwood comes from Central America and was highly prized because, with its dark purple color, all it took was an overdye with a yellow color to produce black, which is a hard color to come by for natural dyes. Keep in mind that in Europe, the only reliable purple dye (more of a burgundy) was the famous Tyrian purple made from the Murex sea snail, which was very expensive. Now we have a reliable (and powerful) New World purple.
We were left with a lot of dye solution. I even collected the rinse water from the sink and saved it in an aluminum foil pan, which was still intense purple. Unfortunately, I left the pan over the weekend and discovered that logwood solution is acidic and reacts with aluminum. I came back on Monday to find purple solution all over the cabinet and the tile floor (Note: Never have carpet in a science classroom). It was quite a clean up job and involved lots of paper towels and bleach. I added more water to the logwood chips and boiled it some more and still got a deep purple. This stuff just won’t quit. Now I have about 1.5 L of logwood dye solution left even after using it for several other experiments.
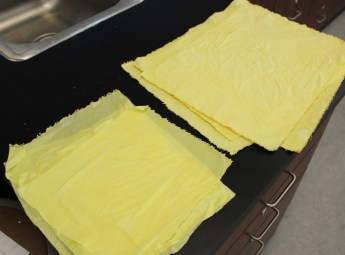
Silk (left) and linen (right) dyed with rabbitbrush. In this case, the dried blossoms were used, which I collected and dried last fall. You can see that both fabrics accept the rabbitbrush well using alum for a mordant.
We experimented with using silk and linen, and both accepted the logwood well. We tried overdyeing with rabbitbrush (our free go-to yellow dye) and it created a kind of sickly purplish grey color – not my favorite, but interesting if you’re into grey. We did not experiment with saddening or gladdening the color. The literature says that adding even a small bit of an iron compound to logwood will turn it a dark grey. That’s an experiment for another time.
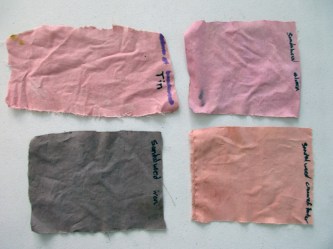
Sandalwood dyed on cotton with modifiers added. On the top right, it is plain sandalwood using an alum mordant. On bottom right, tartaric acid (cream of tartar) has been added to lighten (gladden) the color. On top left, tin has been added as a gladdener. On bottom left, iron (II) sulfate has been added to sadden (darken) the color to an interesting reddish grey.
Part III: Modifying Sandalwood
Sandalwood was another natural dye we did some experiments with before we ran out of yarn several months ago, and a team of students had experimented with saddening and gladdening the sandalwood using iron (II) sulfate and cream of tartar, respectively. Iron turned the sandalwood from brick red to grayish brown, and cream of tartar lightened the brick red to more of an orange. Now that we had more wool, I wanted to dye a skein of it with sandalwood. I had read that copper compounds also make an interesting modifier for sandalwood, so we dyed one end of a skein in a 500 mL beaker with un-modified sandalwood (after pre-mordanting the yarn with alum) and the other end in a 500 mL beaker with sandalwood modified with a small amount of copper (II) nitrate. It turned the brick red into a pleasant reddish brown, a bit nicer than our experiments with walnut shells had produced.
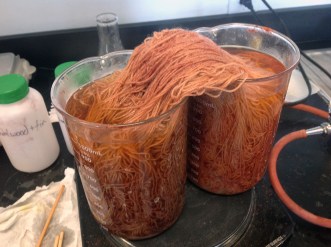
Skein of yarn being dyed with sandalwood. The yarn is first boiled in an alum solution as a mordant (a metal salt that helps the dye molecule bind with the fabric), then we added copper (II) nitrate to the sandalwood at left, which saddened the color from brick red (right) to red-brown. The sandalwood had been filtered to remove the dye chips, then the solution boiled with the yarn dipped in it for about one hour.
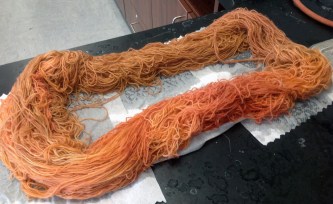
100% Merino wool dyed with sandalwood after it has been rinsed. The yarn was then washed in a machine on gentle cycle and allowed to dry in the air. I like the brick red and the brown-orange hues.
Part IV: Making a Sweater from Our Results
One of the points of this STEAM it Up class is to create final works of art from our investigations and projects. I now had eight different skeins of yarn, each dyed with a different natural dye using a variety of processes. My wife is excellent at crochet, and she volunteered (with some strong hinting from me) to crochet these skeins of dyed yarn into a sweater. She had never attempted a sweater before, and looked up patterns, made careful measurements of me (this was tricky because I have been losing weight), and set to work. First, she had to untangle the washed yarn and roll it into balls for more convenience in crocheting. Then she built the front and back pieces, counting carefully to make sure there were the same number of rows of each color. She completed these parts by March as a birthday present. Once we had the new colors, she completed the sleeves and sewed the pieces together as a Father’s Day gift.

David Black in the finished sweater. It is very comfortable. I have enough yarn left for my wife to crochet a beanie and maybe a scarf . . .
I presented our project at the STEAM Action Center’s Best Practices conference on June 21 at the Utah Valley Convention Center and had about 40 teachers attending. I wore one of my ice-dyed shirts, then the sweater over the top, then my Tie-dyed lab coat over the sweater. It was a bit warm, but during the presentation I did a little strip tease to show them the results. I also displayed other shirts, the yarn balls, and cloth swatches we’d made in the class for our experiments. The presentation went over well, and several teachers complemented my wife on her sweater design. It fits perfectly, and is a very comfortable sweater. Here is a photo showing what the different bands are dyed with.
Part V: A Quilt and Some Viking Dye Ideas
I had students in the STEAM it Up class who were experienced at making quilts – two of them even had their own quilting frames. Quilting is quite a big thing in Utah. As part of these continuing experiments, we have amassed quite a few swatches of cotton, silk, and linen fabric dyes various colors. I have the idea to create a patchwork quilt in the form of our school logo, with correct colors. We haven’t pursued the quilt project yet – too little time left in the semester. Another project for next year. We still haven’t gotten a good green, which is one of the colors in our logo. We’ve overdyed rabbitbrush yellow with indigo blue and gotten kind of a mottled olive green, but nothing really bright.
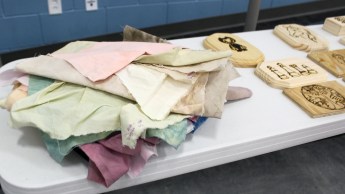
A stack of dyed cloth swatches – the results of our experiments. I hope to have them made into a patchwork quilt in the form of our school logo. On the right are our experiments with pyrography (wood burning), which the students got pretty good at.
Then I had a meeting at the Natural History Museum of Utah to plan out some professional development workshops in the fall (incidentally, one of them will include parts of our dye lab) and was allowed to browse through the museum on my way out. There was an interesting display of Navajo and Ancestral Puebloan fabrics and dyes, and a visiting exhibit on the Vikings that was fascinating. They had one display showing green dyed wool fabric, which was made from woad overdyed with weld (a yellow dye) and was bright green. Or maybe the other way around – the display was vague on that. So now we need to get some weld and use it with our own woad and see what we get. Another experiment for another time.
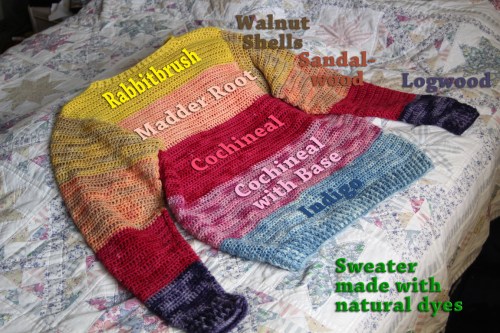
The finished sweater: The yellow at the top is rabbitbrush, the light orange is madder root, the deep red is cochineal in its natural color, the light purple is cochineal with some baking soda added (a base), the light blue is indigo, the yellow-tan to brown at the top of the sleeves is walnut shells mixed with rabbitbrush (in two separate beakers), the brick red is sandalwood, the bright red is cochineal again, and the deep purple at the bottom of the sleeves is logwood.
Part VI: More to Come
This is the fun part about STEAM education, project-based learning, and inquiry science: there is always more to learn, more variables to test, more experiments to refine. I’ve spent a great deal of blog space here just describing one continuing lab on dyeing cloth, but there are so many more ideas for combining the arts and history with STEM.
This post is overlong already, so I will wait for a later post to reveal our final results from the entire year’s worth of dyeing. I still need to talk about our year-end STEAM Showcase, which I will do tomorrow in my next post. Then it’s off to Indonesia on Thursday, which will require a long series of posts, if all goes as planned, so you may have to wait until September before I can return to give the dye lab results. I’ll write up a complete PDF you can use.
