Feeds:
Posts
Comments

Posts Tagged ‘students as teachers’

Starting out at a new school, I decided it was time to re-examine my personal philosophy of teaching and education.

Over the last several years, as I have been reporting my experiences in these blogs, I have paid attention to how effective I am as a teacher and what sorts of activities and lessons seem to resonate with students and provide memorable learning opportunities for them. From this I have developed my own model of education, which I have shared at conferences and workshop sessions. I will be starting a Doctorate of Education (EdD) program this fall at the University of Northern Colorado, specializing in Innovation and Education Reform. This will be a means for backing my theories up with empirical research, not just the anecdotal evidence I have now. I already know what I want to do for my doctoral thesis.

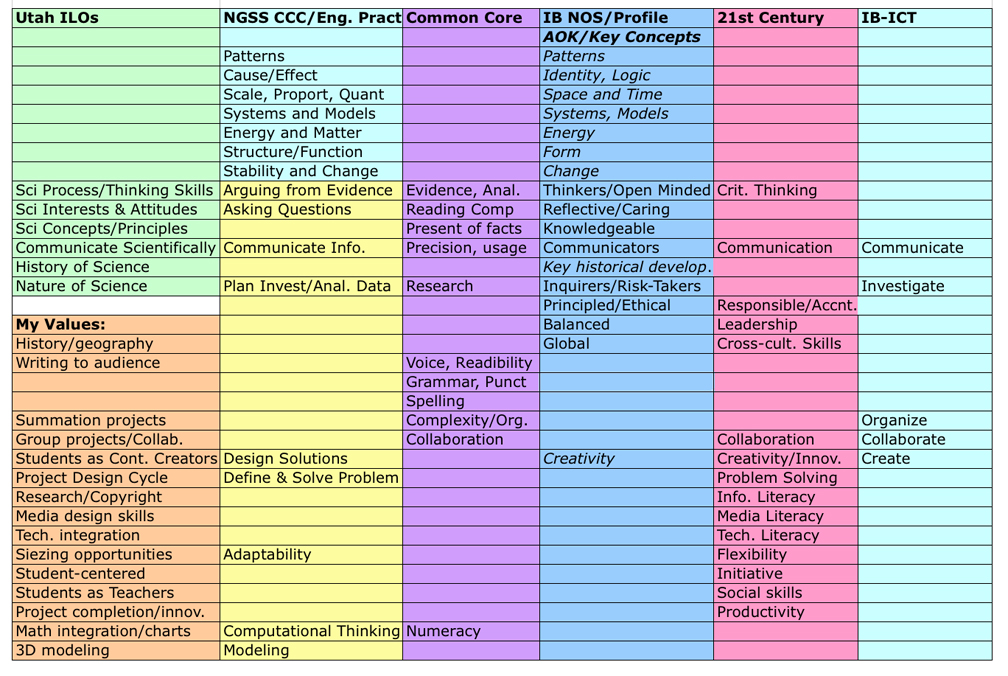
This is my revised model so far, with examples from my teaching experiences:

Creative Classroom Diagram v3-s

This is my revised model of education, what could also be called the Levels of Engagement model. The purpose of education, in my experience, is to move students from ignorance (no knowledge of a subject) through passive learning (sitting and watching or listening) to active learning (hands-on, experiential) and beyond to creative learning (students as explorers, teachers, and innovators). Students move from being consumers of educational content to interacting with content to creating new educational content or new science, engineering, art, math, or technology. The students become makers, designers, programmers, engineers, scientists, artists, and problem solvers.

I call this the Creative Classroom model, as the goal is to move students from Ignorance (lack of knowledge or experience with a subject) through the stages of being a Passive Learner (sitting and listening to the teacher or a video and consuming content) through being an Active Learner (students interacting with content through cookbook style labs) to becoming a Creative Learner (students creating new content as innovators: teachers, makers, programmers, designers, engineers, and scientists). Let’s look at these levels in more detail. It could also be titled the Levels of Engagement model, as moving to the right in my model signifies deeper student engagement with their learning.

Level 0: Ignorance

Ignorance is the state of not having basic knowledge of a subject. This isn’t a bad thing, as we all start out in this state, as long as we recognize our ignorance and do something about it. What our society needs are more creative and innovative people, not people who are passive or even willfully ignorant.

Ignorance is not bliss. What a person doesn’t know may indeed hurt him or her – if, for example, you don’t know that mixing bleach with ammonia will produce chlorine gas, you could wind up with severe respiratory problems. A basic literacy for science and engineering concepts is necessary for any informed citizen, since we live in a technological age with problems that need solving and can only be solved through science and technology.

If you do not understand science and technology, you can be controlled by those who do. How many people actually understand the technology behind the cell phones they use every day? They leave themselves vulnerable to control by the telecom companies that do understand and control this technology. If you don’t understand the importance of Internet privacy and share personal information on a website or Facebook page, you leave yourself vulnerable to people or corporations that can track your web searches or even stalk you online (or worse). I am fairly ignorant of the basic techniques for repairing my car. This leaves me vulnerable to paying the high prices (and the possible poor service) of a local mechanic, when I could save lots of money and ensure quality if I only knew how to do it myself.

As teachers our first responsibility is to lead students away from a state of ignorance. This seems simple enough, but anyone who teachers teenagers (and even some so-called adults) will know that some of them insist on remaining willfully ignorant, usually because they mistakenly think that they already know everything they need to know, which is never true of anyone. As the Tao Te Ching says: “To know what you know, and what you do not know, is the foundation of true wisdom.” So the first step to becoming a creative learner is to delineate, define, and accept our areas of ignorance.

Most Likely to Succeed quote

A quote from the introduction of “Most Likely to Succeed” by Toni Wagner and Ted Dintersmith. How long will it take before education systems realize that the old factory model of education is no longer working?

Level 1: Passive Learning

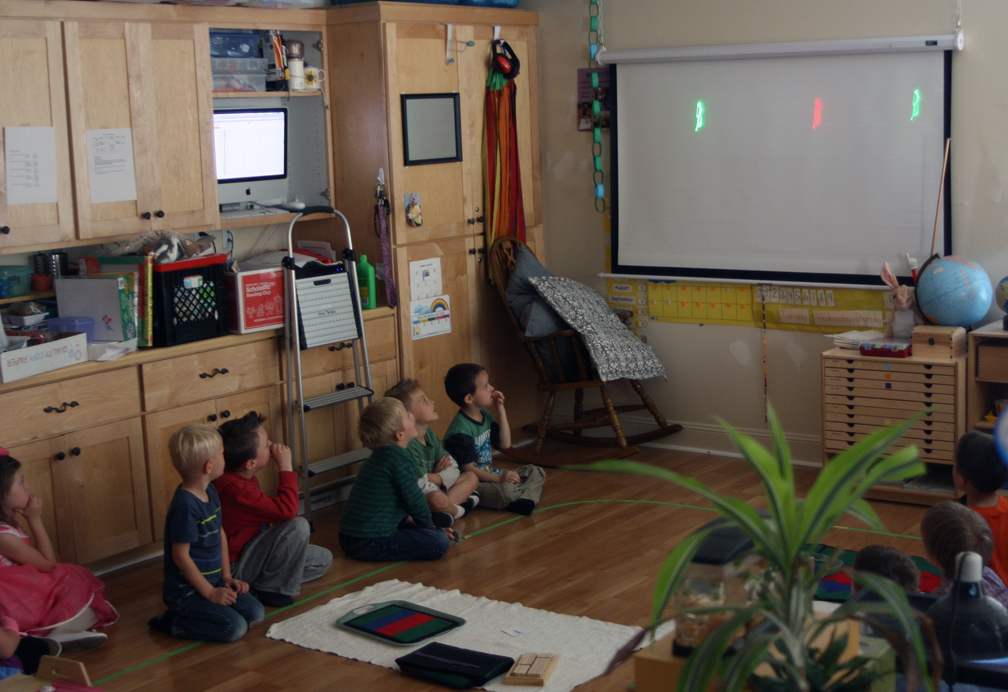
When people start learning a subject they are usually not sufficiently self-motivated to learn it on their own – but we hope they will reach that point eventually. Most inexperienced learners are passive. They wait for their teachers to lead the lesson, sitting in their seats listening to lectures or watching a movie or otherwise absorbing and consuming educational content. The focus in such classes is to complete individual assignments that usually involve only lower order thinking skills such as recall and identification. This is the level described in the quote above from Most Likely to Succeed by Toni Wagner and Ted Dintersmith.

At this level, teachers emphasize mastering the facts and basic concepts of a subject. Students are consumers of educational content, but do not interact with it or create new content. Common classroom activities include listening to lectures and taking notes or answering basic questions, watching a video or demonstration, completing worksheets, or reading a text. Student motivation is usually external, based on the desires of parents or teachers and the fear of negative consequences (poor grades, etc.).

Education at this level is all about efficiency but isn’t very effective, since less than 10% of what teachers share in lectures is retained by students beyond the next test. Evaluation is based on standards, not skills. There is always a need for students to learn facts and concepts, but it is better to provide engaging projects where the students will find out the facts on their own as a natural part of completing the project.

Level 2: Active Learning

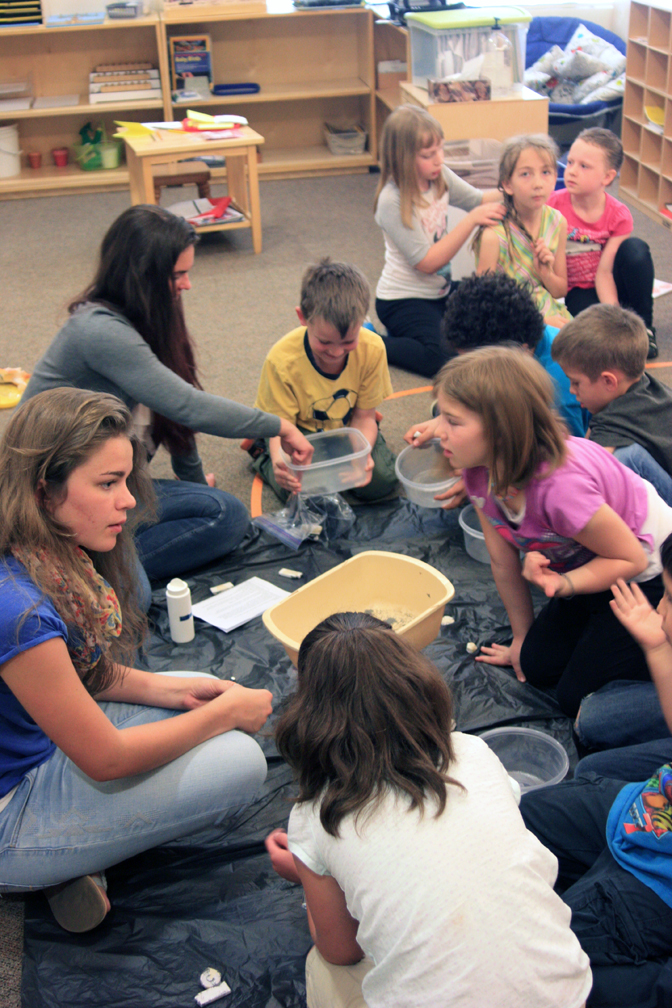
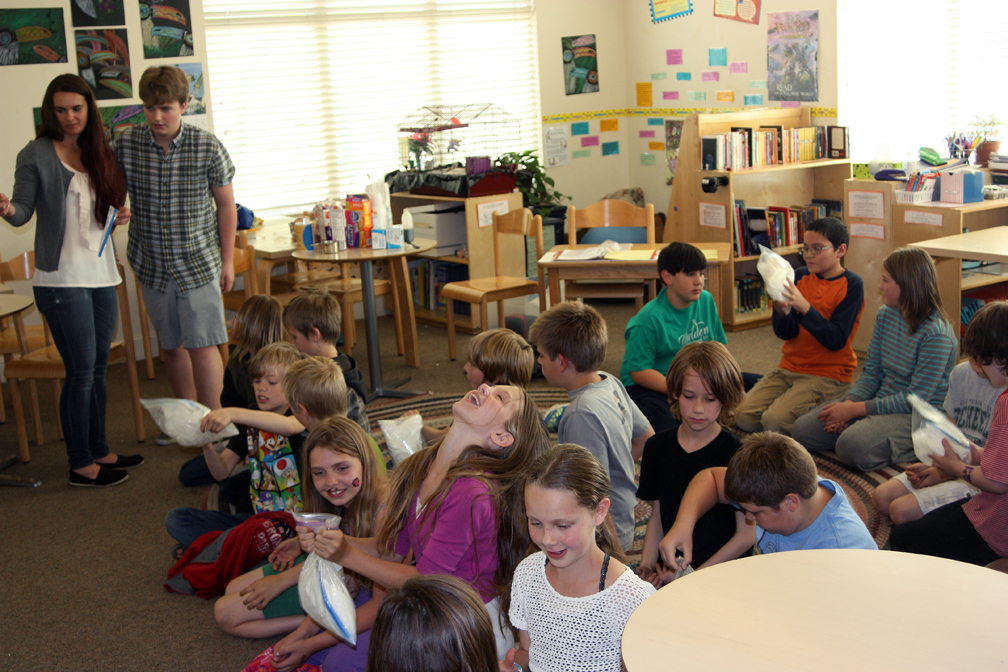
At this phase, students start developing internal motivation as they engage and interact with content. Students are beginning to explore, but usually through activities that are fairly structured although more student centered than before. These activities are hands-on; students are doing and acting, not sitting and listening.

Common classroom activities would be “cook-book” style labs, with step-by-step instructions and pre-determined outcomes. Students begin to learn observation and inquiry skills, with some data collection in a controlled environment along with data analysis. Teachers still determine if the student has the “right” answer. They start to practice the 21st Century skills of collaboration, communication, and critical thinking. Unfortunately, most science classes stop at this level without moving beyond hands-on to the deepest level.

reasons for using inquiry

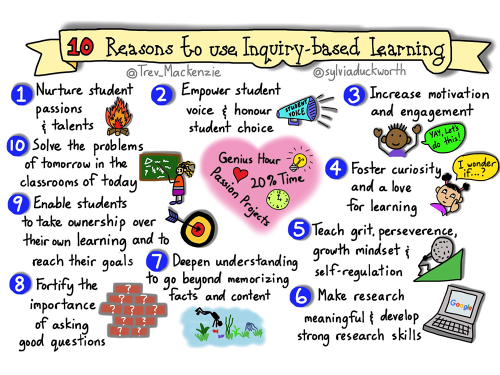
Inquiry-based learning shares many of the features of project or problem-based learning, in that it is student centered and empowers student voice and choice, allows a high level of engagement and meaningfulness as students take responsibility and ownership for their learning, and teaches resilience, grit, and perseverance.

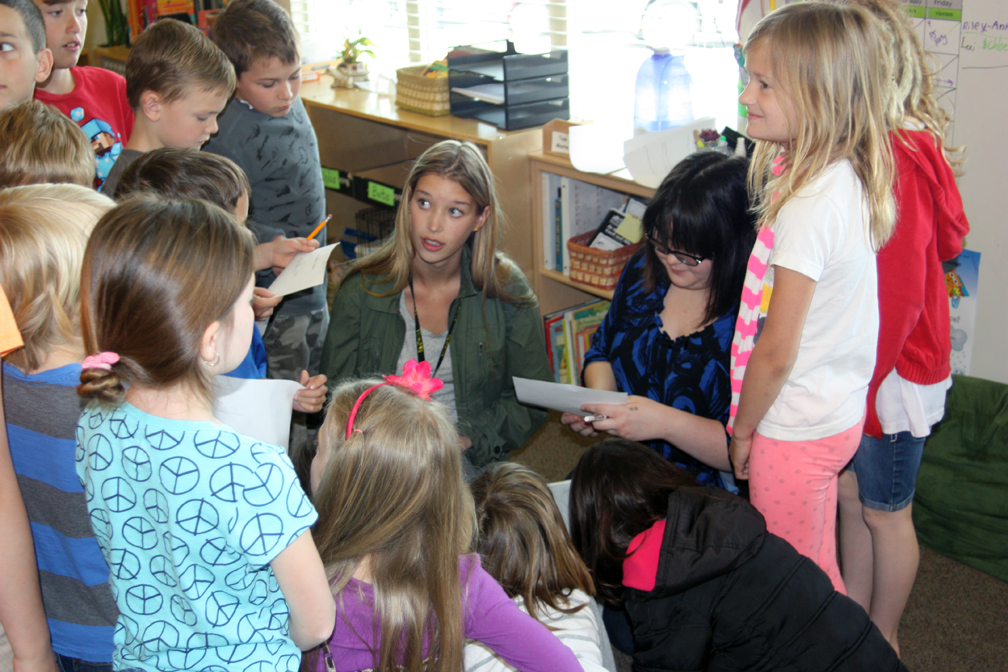
Level 3: Creative and Innovative Learning

If the purpose of STEAM education is to teach students how to become scientists, technology experts, engineers, artists, and mathematicians then they must learn the final stages of inquiry: to ask and answer questions, to solve problems, or to design products. The purpose of science is to answer questions whereas engineering has the goal of solving problems through designing and testing prototypes. Both are creative endeavors as the result of learning is something new for society – new knowledge or new products.

In the Creative Classroom, the environment is completely open, without predigested data or predetermined conclusions. Students work on projects where they research a question important to them, develop a methodology, decide how to control variables, make observations, determine methods of analysis, and draw and communicate conclusions. At this level, students become innovators or inventors. They synthesize knowledge and apply it to themselves and teach others through writing blog posts, creating posters or infographics, presenting lessons and demonstrations, and filming and editing videos or other educational media. They become makers and programmers, building products of their own design. The students are creating and contributing to society by making new content, knowledge, and solutions.

Learning at this level is never forgotten but is difficult to evaluate with a multiple-choice test, as the focus is on skill mastery and competency instead of easily regurgitated facts. Overall, this deepest (and most fulfilling, motivational, and engaging) level is entirely student centered and driven, with instructors as mentors. Ultimately, once a student has practiced learning at this level, the teacher is no longer necessary; the students will continue to learn on their own, because they are now entirely internally motivated. These are the people that society will always need.

How This Impacts My Teaching:

As an educator, my goal is to move students toward Level 3 activities and projects. Where I succeed, the projects my students work on are meaningful to them, demand professional excellence, use authentic data, involve real-world applications, are open-ended, and are student-driven. The students are required to create, make, program, build, test, question, teach, and design. They are innovators and engineers; they are creative students.

To give some examples from previous blog posts on my two sites:

Rachmaninoff 430-630-1000-s

Representative color image of the Rachmaninoff Basin area of Mercury, created by my students using narrow band image data from the MESSENGER space probe at 430, 630, and 1000 nm. We stretched the color saturation and image contrast so that we could see differences between volcanic (yellow-orange) and impact (blue-violet) features.

My chemistry and STEAM students created an inquiry lab to study the variables involved in dyeing cloth, including the history, ancient processes, types of cloth, mordants (binders), types of dyes, and other factors. We also explored tie dyeing, ice dyeing, and batik and developed a collection of dyed swatches that we will turn into a school quilt. We also experimented with dyeing yarn with cochineal, indigo, rabbit brush, sandalwood, logwood, etc. and my wife crocheted a sweater from it.

2. My chemistry and STEAM students did a similar inquiry lab to test the variables involved in making iron-gall ink using modern equivalents. We studied the history and artistry of this type of ink (used by Sir Isaac Newton, Leonardo DaVinci, and many more) and tried to determine the ideal formula for making the blackest possible ink. We also created our own watercolor and ink pigments such as Prussian blue, etc. We used the inks/watercolors to make drawings and paintings of the history of chemistry.

3. My astronomy students used accurate data to build a 3D model of the nearby stars out to 13 light years. This lesson was featured in an article in The Science Teacher magazine, including a video of me describing the process.

4. My astronomy students created a video for the MIT BLOSSOMS project showing a lesson plan on how to measure the distance to nearby stars using trigonometric parallax. It is on the BLOSSOMS website and has been translated into Malay, Chinese, and other languages.

5. My earth science students learned how to use Mars MOLA 3D altitude data to create and print out 3D terrains of Mars.

6. My chemistry students created a 12-minute documentary (chocumentary?) on the history and process of making chocolate.

7. My 6th grade Creative Computing class built and animated a 3D model of the SOFIA aircraft prior to my flying on her as an Airborne Astronomy Ambassador.

Kasei_Valles-Mars-2

A 3D render of the Kasei Valles area of Mars, created by students as part of the Mars Exploration Student Data Team project. They learned how to download Mars MOLA data from the NASA PDS website and convert it into 3D models and animations, then created an interactive program on Mars Exploration which they presented at a student symposium at Arizona State University.

8. My science research class collected soil samples from the mining town of Eureka, Utah to see if a Superfund project had truly cleaned up the lead contamination in the soil.

9. My chemistry and media design students toured Novatek in south Provo, Utah and learned about the history and current process for making synthetic diamond drill bits. Another group videotaped a tour of a bronze casting foundry, while others took tours of a glass blowing workshop, a beryllium refinery, and a cement plant.

10. My astronomy students used infrared data from the WISE and Spitzer missions to determine if certain K-giant stars may be consuming their own planets. This was done as part of the NITARP program. They developed a poster of their findings and presented it at the American Astronomical Society conference in 2015 in Seattle.

11. My biology students build working models of the circulatory system, the lungs, the arm, and create stop motion animations of mitosis and meiosis. As I write this, they are learning the engineering design cycle by acting as biomechanical engineers to design and build artificial hands that must have fingers that move independently, an opposable thumb, can pick up small objects, make hand gestures, and grasp and pick up cups with varying amounts of water in them.

12. My computer science students, in order to learn the logic of game design, had to invent their own board games and build a prototype game board and pieces, write up the rules, and have the other teams play the game and make suggestions, then they made revisions. This was an application of the engineering design cycle.

13. My STEAM students designed and built a model of a future Mars colony using repurposed materials (junk), including space port, communications systems, agriculture and air recycling, power production, manufacturing, transportation, and living quarters. They presented this and other Mars related projects at the NASA Lunar and Planetary Science Conference in Houston.

These are just a small sampling of all the projects my students have done over the years. I have reported at greater length in this blog about these and other projects. My intent has always been to move students away from passive learning to active learning to inquiry/innovation. They often create models, build prototypes, collect data, or design a product and it is always open ended and student centered; even if I choose the topic of the project, they have a great deal of freedom to determine their approach and direction. There is never one right answer or a set “cookbook” series of steps, nor a focus on memorizing facts. They learn the facts they need as a natural consequence of learning about their project topics; by completing the project, they automatically demonstrate the required knowledge.

Mars Exploration main interface-s

My students designed, animated, and programmed this interface for their Mars Exploration project, then presented it at a student symposium at Arizona State University as part of the Mars Exploration Student Data Team program. They build 3D models and animations of Mars probes, such as the one of the MER rovers shown. In this interface, the Mars globe spins, and as the main buttons are rolled over, side menus slide out and space probes rotate in the window.

Some groups require considerable training and experience to get to this level of self-motivation and innovation, and some team building, communication, and creativity training may be required. Other groups move along more rapidly and have the motivation to jump right in. This means that managing such projects as a teacher can be challenging because every team is different. I find myself moving from being a teacher at the center of the classroom (a sage on a stage) where all students move along in a lock-step fashion to becoming a mentor or facilitator of learning (a guide on the side) as students move toward higher levels of engagement at their own pace and in their own way.

As classroom activities become more student-centered, I find it natural to tie in the Next Generation Science Standards. If I do an inquiry lab to test the variables that affect dyeing cloth, the answer is not known before nor the methodology. Students have to work out the scientific method or steps needed by asking the right questions and determining how to find the answers, or to design, build, and test a prototype product. Through this method they learn the science and engineering processes that are one dimension of the 3D standards.

Crosscutting concepts can also be explored more effectively through this method. Inquiry leads to observations, which should show patterns, processes, models, scale, proportion, and other such concepts, which are the second dimension of 3D science education.

This leaves the third dimension, which is to teach subject Core Concepts. This is where most of the misguided opposition to Project Based Learning comes from. Teachers feel that projects somehow take time away from “covering” all the standards. But if we want deep learning of the core concepts of a subject, we can’t expect students to learn them by using surface level teaching techniques that emphasize facts without going any deeper. If I do it right, I can involve many standards at once in the same project and not only meet but exceed the standards in all cases. I call this “standards overreach” and I will talk about this in more detail in my next post.

Element posters and virus models

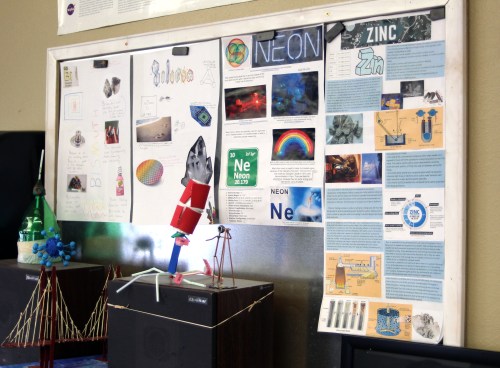
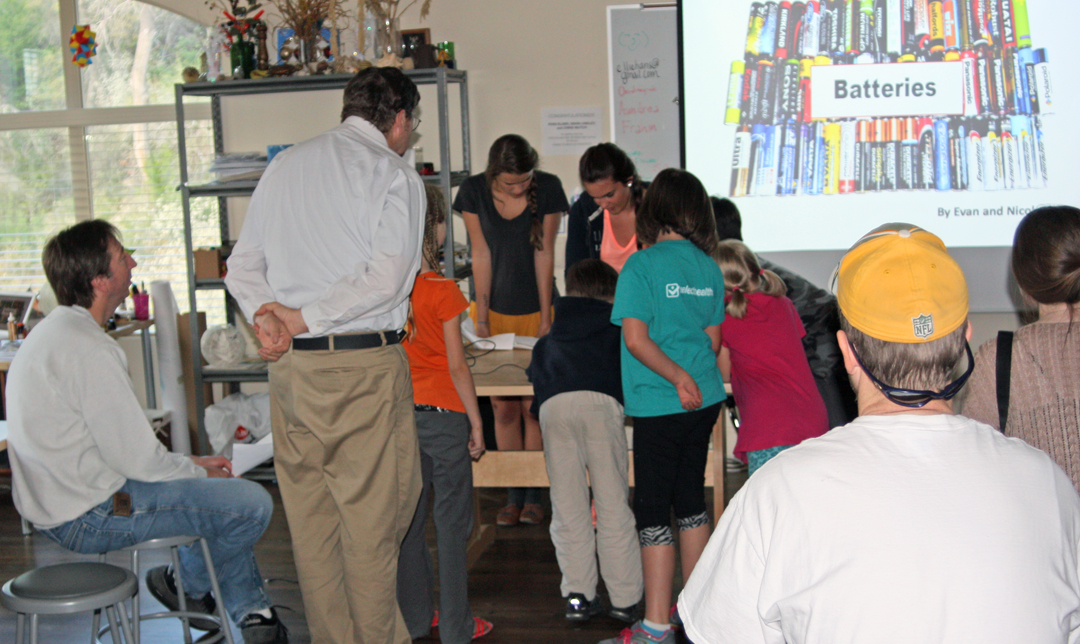
Projects don’t have to be a elaborate and complex as the Mars project shown above. Here, my New HAven students have created models of viruses and mini-posters of chemical elements. The green plastic bottle to the left is a model of a human lung.

Read Full Post »

Foam demonstration

David Black presenting foam demonstration

Yes, I know this is late. The new school year is about to start and I am only just finishing up the last school year. This post will describe the Grand Finale of the school year for my science classes, which was our First Annual Science Showcase at Walden School.

We had been working toward this all year, as you have seen from previous posts. Students in my astronomy and chemistry classes joined into small groups (2-3 students) and chose topics based on what interested them and what materials and equipment I had available. Then during first term, they conducted background research. My chemistry students created posters and several of them contributed posts to this blog. During second term, the teams condensed their research into a script for a presentation or mini-lesson on their topic which was to include explanation, background, and some type of demonstration or hands-on activity. The teams practiced and refined their scripts, then I divided the teams in half. Half of each class presented their demonstrations/lessons to their peers in class, and I had their fellow classmates fill out an evaluation form with Likert-style point scales and room for comments. The other half presented to our elementary classes and wrote evaluations on themselves. In astronomy, the students merely presented for the elementary classes once.

science night assignments

Assignments for Science Showcase

During third term in chemistry, the teams went over their evaluations and improved their scripts. I had them start to create Powerpoint slide shows or add YouTube videos to increase the depth of their presentations. Then the teams presented again – those that presented to their peers now presented to the elementary classes and vice versa. Evaluations were again filled out, with even more detail. I also wrote up my own detailed suggestions for each team.

copper group presenting

Copper group presenting at Science Showcase

Finally, fourth term, we made our final preparations and practiced and set up our Science Showcase on May 16. I also asked the astronomy students to return and reprise their presentations, and had my geology students help out. Since our school is small, many students presented twice (and got extra credit for it). We set up an invitation for the parents and had it e-mailed out to the whole school mailing list. It took a lot of preparation, and wouldn’t have been possible without the support of the Air Force Association Educator Grant, which helped to pay for materials and supplies that were used up each time we presented (like plastic cups, red cabbage, white glue, etc.).

Schedule for science night

Schedule for Science Showcase

We set up the evening to be in three classrooms and outside on the school’s back patio (for the dangerous or messy presentations). The teams were assigned carefully so that those who were doing more than one session could make it to each one. Some students also got credit for helping film the sessions, making sure the refreshments were done (homemade root beer and ice cream, which were actually presented at two sessions), acting as hosts for each room, etc. For four sessions we had four presentations going at the same time, or about 16 topics altogether.

Dry ice group

Dry ice group presenting at Science Showcase

It was a bit frustrating to get the students all there on time (an hour early) and a few things I wanted to do didn’t get done, but overall the night was a huge success. I had about 30 students involved, and there were about 40-50 other people who attended, some other students, some parents, some siblings. A few of the sessions were too short, and the student hosts in each room didn’t watch the clock well enough, so the schedule got a bit messed up by the end, and we had to take a break for refreshments. The homemade root beer (we already had dry ice) and ice cream (another presentation) went over well. Some of the sessions only had a few in the audience, others were packed.

Flame test abstract

The last session was done by Jerry and Karl on properties of the elements and how fireworks are made, and in addition to the methanol flame test, Karl had made his own sparklers. He’d looked up a recipe online, but I didn’t have all the exact ingredients, so we substituted and experimented for a few days and came up with a viable recipe, one that actually works better than commercial sparklers. It was nice to have a grand finale, so to speak.

Homemade sparkler

Homemade sparkler demonstrated at Science Showcase

We videotaped and photographed everything, and I am still trying to capture and compile the video. I have only two weeks left until school starts, and my goal is to put together a final 15 minute video of all our presentations for the year before school begins so that I can show it to my next classes and post it here.

Solid rocket booster

Toasting the Runt: A solid rocket booster

As an assessment of the evening, I didn’t have any kind of feedback forms, but based on overheard comments, feedback from parents and other teachers, and general excitement of my students, I’d say the evening was a great success. Everyone had fun, most of the presentations worked well, the students came through very well, and I saw some genuine learning and expertise displayed by my students. Certainly they have come to feel comfortable using lab equipment and presenting to their peers and others. What they presented they have now learned deeply and will never forget, long after stoichiometry and thermochemistry have faded away. For our first year doing this, we have set up a good foundation. There are things that can be improved, of course, and I hope to get the other science teachers involved this coming year. At least now my students know what to expect.

Homemade root beer

Homemade root beer

I hope to have several students display their science experiments, where they designed, observed, and analyzed their own data for science fairs. My one science fair student displayed his computer game project and it was well attended and received. Next year, as we are involved in authentic NASA research, we’ll have more students doing the real thing. But more on that next post.

Moon craters

Moon formation and evolution demonstration

Josh shows game

Demonstrating the "Salt the Slug" game

Silver group presenting

Read Full Post »

Blue gak

Blue gak, part of a student demonstration

Last December right before winter break, my chemistry students prepared demonstrations to present to each other and to the elementary classes here at Walden School. This was their first attempt at it, and they received evaluations from me and from their peers with suggestions on how to improve. Now we have just finished the second round of presentations, and each team has added new features and made improvements.

Green slime

Green Slime

I had each team improve their presentations in four areas: first, their presentation skills, such as speaking with good diction, showing enthusiasm, and having a smoothly scripted and rehearsed narrative. The second area was improving the visual appeal of their presentation by adding some sort of poster or handout that could be used as an activity for the audience while the team sets up. Some of the groups made posters, some made paper games such as word searches or worksheets. The third area to improve was to add a multimedia component, such as a powerpoint slide show, a video, or a game. The final area for improvement was to make their presentation more hands-on for the audience, such as having more audience participation, or some sort of kinesthetic activity, or turn the presentation into an inquiry-based lab.

Girl with pH samples

Girl with pH samples

The results were very good; all the presentations have improved. Their science content was already good, but is deeper and more engaging now. By adding slide shows, posters, games, activities, and participation, they have gotten their audiences much more involved and excited.

Here are some examples: One group presented on the properties and uses of silver, and their demonstration was how to untarnish silver. They not only had a good slide show, but created a kinesthetic activity where the elementary students linked arms to form first silver sulfide (tarnish) and aluminum, then reformed to create aluminum sulfide and pure silver. This demonstrated the idea of conservation of matter in chemical reactions.

Sofia activity

Sofia leads a kinesthetic activity

The cabbage pH group turned their presentation from a demonstration into an inquiry lab by pouring samples of many types of household chemicals and food (such as grapefruit juice) into small clear plastic cups, then having the elementary students predict whether the chemicals were acids or bases, then use the cabbage juice to prove their guesses.

Marni and kids

Testing the pH of household chemicals with cabbage juice

My favorite improvement was in the saltwater density group; they had some difficulty during their last presentation with not having practiced enough and having things not work out as planned. This time it went smoothly, and they even created a computer video game called Salt the Slug. Jess created the graphics and Josh did the programming. The purpose of the game is to use the trackpad of the computer to shake a salt shaker up and down, shaking out salt onto a slug that is crawling across the screen trying to steal food. If the player can kill the slug before it gets back to its home with the food, he or she wins. Yes, the concept sounds a a bit cruel but it taught the idea of osmosis and concentration of solutions and besides, the graphics were hilarious. The elementary students were jumping up and down for a chance to play, so the team had to ask them some review questions to decide who would get a chance to try the game out.

Slug game

"Salt the Slug" game by Jess and Josh

Josh has become an excellent game programmer and created another game, which he has been working on for a year, where the player places towers that then shoot into a maze to repel invaders. He presented this game at the Charter School Science Fair for all of central Utah, and now has qualified to go on to the regional science fair at BYU in late March. I was a judge at the fair last week, and it was amazing to see the caliber of some of the projects.

Josh at science fair

Josh at the Charter School District Science Fair, Feb. 24.

One of my favorite things about doing these presentations is that many of my high school students have younger siblings in the elementary classes; what better way for my students to show off what they’ve learned, and how they can do science, than in front of their younger brothers and sisters? Dallas, one of the students in the group that demonstrated gunpowder had his little sister in the class. They kidded each other a lot, and Dallas had to tell her, “Don’t get sarcastic with me, I taught you sarcasm!” This group also included a nice demonstration of the “toast the runt” reaction, where potassium chlorate is heated to start it decomposing and giving off oxygen, then a runt candy is rolled down the test tube as the fuel source, resulting in a stationary solid rocket motor.

Toast the runt

Toast the Runt: A Solid Rocket Engine

We had to reform some of the groups, since a few students had switched sections at the semester, but the same presentations continued. Those teams that presented to their peers last time presented to the elementary classes this time, and vice versa. Each team has now presented twice and received feedback. Now they will present one more time at the end of the year at our Mad Science Night, where their parents and siblings are invited and we will take over four classrooms and run simultaneous sessions. It will be a lot of fun, and their presentations will be amazing.

Carbon dioxide and magnesium

Burning magnesium in carbon dioxide gas

Meanwhile, it has been quite a bit of time since my last post. I haven’t been ignoring it; rather, I’ve been so busy teaching, grading, entering competitions (such as the Explore Mars competition I mentioned previously), creating some video projects on the side for clients, presenting at the Utah Science Teachers Association conference (the Mars lessons again), and preparing for my trip to the NSTA conference next week that I simply haven’t had a chance to do many blogs. However, I have quite a backlog of student written blog posts that I will be adding over the next week, then posting each day from San Francisco, so you’ll see quite a few posts this month.

Read Full Post »

Gay eyeballs

Making gak eyeballs at Walden School

This last week was our final week of Fall Semester at Walden School, and for their final test my chemistry students planned, practiced, and presented chemistry demonstrations to their peers and to Walden’s elementary classes. Altogether five groups of students presented to the elementary school on Wednesday, Dec. 15 and the rest of the student teams presented on Friday, Dec. 17.

I’ve discussed my rationale for doing this in previous posts: that this is an excellent method for generating excitement about STEM in elementary students as they see their older siblings and high school students working with and presenting science. Certainly the younger students were very excited and attentive; they were eager to participate and asked good questions.

Raising hands

Students at Walden School participating in chemistry demonstrations

For me, though, the real reason for doing anything in my classes is always how it will benefit my students. Taking 3-4 days out of our curriculum to practice and present these demonstrations is hard to justify unless it has strong pedagogical advantages. The justification is this: as my students write up their demonstration scripts and outlines, as they practice talking about the science they are presenting, and as they prepare to answer questions from the audience they are thoroughly learning the chemistry behind their demonstrations. They are going beyond hands-on labs to share what they have learned, and that learning will be indelible.

Karlie and Sofia

Karlie and Sofia demonstrate hand warmers

The topics of the demonstrations had to related to the individual element/materials research project of one of the group members, which they are continuing to work on. Here’s what was presented:

Sofia, Karlie, and Jerry demonstrated the principles behind hand warmers by showing the rapid crystallization of sodium thiosulfate crystals that had been heated and then cooled down. They also talked about crystals in general.

Making gak

Mari and Casey help students make gak

Ryan and Casey, with help from Chelise, Lindsey, and Mari, demonstrated how to make gak (a polymer made out of white glue and borax powder). This is an old standby demonstration, and the kids really enjoyed it.

Copper demonstration group

Genny, Rachel, Jared, and Morgan demonstrate copper's properties

Genny, Rachel, Morgan, and Jared demonstrated aspects of copper chemistry. They handed around samples of copper ore (Rachel’s uncle is an engineer at Rio Tinto’s Bingham Canyon Mine in Utah) and showed a methanol version of a flame test (including copper salts). Jared demonstrated the alchemist’s dream reaction: turning copper into gold (actually brass).

Kinesthetic activity

Sid and Sam use a kinesthetic activity to demonstrate magnetic induction

Sam and Sid, with help from Josh, presented the idea of magnetic induction and discussed how modern electrical generators work. Sam actually built her own alternator and induction coil, and Sid presented on his research about the use of wind power to generate electricity. They also created a fun kinesthetic activity to show induction.

Burning magnesium

Karl and Nicona demonstrate burning magnesium

Karl, Nicona, and Tanner presented on the properties of the elements; they did a flame test as well, and demonstrated what magnesium ribbon looks like when burned and how fireworks get their colors. They also had sparklers for each of the students to try out.

Cabbage pH

Sonora, Dallas, and Morgan demonstrate cabbage pH

In class on Friday, the other groups presented their demonstrations. Sonora, Morgan, and Dallas presented the red cabbage pH demonstration that is one of my favorites.

Untarnishing silver

Mari and Holly demonstrate how to un-tarnish silverware

Courtney, Holly, and Mari showed how to untarnish silver using baking soda and aluminum foil. They even included a correctly balanced chemical equation, although we won’t be learning about those until we return in January.

Dry ice group

Libby, Lindsey, and Chelise demonstrate the properties of carbon dioxide

Chelise, Lindsey, and Libby presented the properties of carbon dioxide gas and dry ice. They showed how regular matches go out in carbon dioxide, but that magnesium burns even brighter when placed in carbon dioxide.

Olivia and Jace

Jace and Olivia explain the ingredients of gunpowder

Jace and Olivia talked about gunpowder, how it is made, and why it is dangerous. Jace has experience working with black powder (he has his own muzzle loader – this is Utah, after all) and he created some raw gunpowder, which he burn outside. They also demonstrated the “fire writing” demonstration of drawing on a piece of paper with a saturated solution of potassium nitrate, then touching a wooden splint to the edges of the writing to see it burn letters through the paper.

Josh and Jess

Josh and Jess demonstrate the principle of density with salt solutions

Josh and Jess presented on salt solutions and how they can be used to determine the density of objects. They showed how an egg will sink in pure water but will float in salt water.

We also videotaped as much of the presentations as we could and took quite a few photos; those students that weren’t helping present helped with the photography.

Burning gunpowder

Burning gunpowder

When their demonstrations were done on Wednesday and Friday, my students were excited about what they had done and the feedback they’d gotten from the younger students. They still have to learn some showmanship and presentation skills (which we’ll continue to work on), but based on what I saw and what the elementary teachers reported, the science content was excellent. They and their peers filled out evaluation forms (and I will as well) so that they can improve on their presentations for the next round in January.

Golden pennies

Golden pennies

It was a lot of work to prepare for this. Now my lab room is a mess and I’ll need to take a day during Christmas break to clean up and re-organize (and I think I forgot to throw out the leftover red cabbage pulp that’s in my trash can, so I’d better go clean up tomorrow). But despite the work and the lost time, I’d say these demonstrations were well worth it. As we go through the second semester, the students will present at least twice more, including a final time at a back-to-school night for their parents. We’ll polish the delivery, add more science explanations, create slide shows and videos to supplement their demonstrations, and by the end of the year these will be incredibly well done.

Read Full Post »

Magnet activity

Shannon and Kenzie demonstrate magnets

I’ve written before about my views on student engagement and involvement in education; that students learn best when they are most engaged and involved in the educational process (here’s a link to a previous post on the subject). This is all based on 20 years of observation that I am usually the person who learns the most in my own classroom, simply because as I prepare materials to present to my students, I have to learn them very thoroughly myself, and as I teach these materials, I am making a type of commitment to the concepts; staking my own reputation that what I am teaching is correct. The gist of my philosophy is that if I can get students to become teachers themselves and fully commit to the concepts they are teaching then those concepts will never be forgotten. You could compare this to the old often-repeated adage:

Feed a man a fish, and you feed him for a day. Teach him how to fish, and you feed him for a lifetime.

To which I would add: Train a man how to teach others how to fish, and you feed a whole village for eternity.

A number of years ago, while teaching at Juab High School in Nephi, Utah, I began a program to take my advanced physics and Chem II students to the Nephi Elementary School once per month to present lessons to the classes. I worked with the teachers there to come up with lessons that fit into their curricula but also could be easily demonstrated. My students had to practice the demonstration, write up a brief 20-minute lesson plan with a handout, and receive feedback from their peers, myself, and the elementary teachers.

Cael and his vacuum pump

Cael demonstrates his vacuum pump

It wound up being one of the most effective projects I ever developed. My students were always a bit nervous the first time, but after seeing how excited the elementary kids were, they caught the same enthusiasm and soon were asking me when our next visit would be. They also presented these mini-lessons at a back-to-school night at the end of the year for their parents and other students to see. It was a definite win-win activity; both the elementary students and my students benefited greatly and it was worth all the effort we put into it.

Since teaching at Juab High School my teaching assignments have not allowed me to continue this program, although at Mountainland Applied Technology College my multimedia students did participate in the Mars Exploration Student Data Team program and presented at a symposium at Arizona State University in 2004. My students also created a two-hour documentary on the history of AM radio in Utah that aired on KUED, Salt Lake’s PBS station, in 2007. You could say that they were teachers and content creators from these experiences.

Now that I am back at a high school teaching science, I have reinstated the students-as-teachers concept through what I am calling the Walden Elementary Science Demonstration Program. I’ve even written a small grant for the Air Force Association last week to support this. On Friday, Nov. 12, I took my astronomy students down to the elementary classrooms at Walden to present lessons. Just as at Juab Elementary all those years ago, my students picked a topic and a demonstration, practiced it, wrote up a script or lesson outline, and then presented in the classes. I videotaped parts of the presentations and took photos. The elementary students were excited, engaged, actively getting their hands on materials, asking questions, and participating. My students did extremely well for our first time. Here are some of the presentations that they did:

Lunar Crater Activity

Annette and Olivia demonstrate lunar cratering

Shannon and Kenzie presented the properties of magnets and did a demonstration of a gravity assist maneuver using neodymium magnets and steel shot to represent planets and a space probe (I once got two neodymium magnets stuck up my nose while presenting this same demonstration to a group of teachers at the Jet Propulsion Laboratory. It’s a long story . . . .) Shannon and Kenzie had the challenge of adapting their lesson to be understandable for kindergarten students and for 4-6 graders (they presented twice). They demonstrated some large industrial strength iron horseshoe magnets I’ve had all these years and the kids had fun trying to pull them apart.

Cael and Koplin taught about how difficult it is for humans to survive in space, and demonstrated the properties of a vacuum by blowing up marshmallows. Cael’s father helped him construct a homemade vacuum chamber out of a Bell canning jar and a hand pump (very ingenious, actually, as you can see in the photo). Students had fun pumping out the chamber, seeing the marshmallows expand, and then releasing the valve and seeing them suddenly shrink again.

Olivia and Annette demonstrated how the surface of the moon formed using the lunar cratering activity (dropping rocks into a pan of flour and cocoa powder). They also tied it into a map of the moon, and had the kindergarten students repeat back what they had learned to win a prize – a piece of rice krispy treats coated with frosting to look like the moon’s surface.

Inertial scale activity

Scotty and Colman demonstrate the inertial scale

Scotty and Colman taught inertia and momentum by demonstrating the properties of an inertial scale I made a few years ago. It’s basically a metal ruler with a film canister at the end clamped down on a table’s edge. The more heavy a rock you place in the canister, the slower the ruler will vibrate due to the rock’s momentum. They also demonstrated dominoes, yanking a piece of silk out from under an object, etc.

Mars site selection activity

Maxson teaches about Mars landing sites

Maxson talked about the surface of Mars and how hard it is to find a good landing place. His partner wasn’t able to attend that day (he had an activity in another class that went unexpectedly long), but Maxson was able to fill in for his missing partner by having the 4-6 graders look for possible landing sites on maps of Mars.

Alexi and Erika presented the scale of the solar system to 1-3 grade students, showing them various balls that represented the sizes of the sun, Jupiter, Earth, Mars, etc. They also showed GoogleEarth. Then they took the students outside and had them stand in positions of relative distances for the planets. I didn’t get a chance to go outside and photograph that part of the activity, but I heard from the teachers that it went very well.

Scale of the solar system

Alexi and Erika demonstrate planetary scales

For me, the best part of doing these presentations is at the end of class when all my students gather back in my classroom to report on how it went. I wish I had had my camera running. They were telling each other what went right and wrong, what the elementary students had said and done, and I knew at that moment I had achieved my real purpose: my students were excited about science, and this was an experience they will never forget. As for the concepts they had to learn in order to make their presentations, I think it’s safe to say they will never forget them, either. I uploaded the photos I had taken to my laptop and did a slideshow at the end of class so that they could all see what the other teams had done. At the end of the year, we’ll do a video presentation as well.  Not bad considering I hadn’t told them about this until two days before their presentations, so that they had only two days to choose and prepare their lessons. They did great! Now in December my chemistry students get their turn.

Read Full Post »

The Five Elements

The Five Elements

As I teach chemistry and astronomy again for the first time in several years, I’m having a lot of fun getting back into the physical sciences with all of the lab experiences I’d collected and developed over the years before I started teaching multimedia exclusively. I’ve also added a number of excellent activities that I picked up from my experiences with NASA and from various conferences and presentations. It’s also a lot of fun to start incorporating my expertise in media design and technology in ways I never could before, as well as the materials I collected at Chemical Heritage Foundation in 2009. For example, I just finished teaching a Keynote presentation on Greek matter theories that I put together myself using photos, drawings, illustrations, and 3D animations (mostly my own) and information collected at CHF. I have all the files stored on various hard drives that all hook into my Mac Powerbook (about four terabytes total). Some of the images I pulled off the Internet at school using our wireless router and Airport technology, and once the Keynote was finished, all I had to do was hook my laptop up to a projector and give the presentation (complete with animations and audio clips) using an infrared remote. Here’s the presentation, in Powerpoint format. If you want to use it, be my guest:

Greek_Matter_Theories

To me, all of this seems remarkable, even miraculous. And here I am writing about it on a Blog, publishing my experiences instantaneously where anyone in the world can read them, and even sharing the presentation itself. Yet I feel as if I’m only just scratching the surface of what these new technologies can do. That’s part of why I’ve been working on this Elements Unearthed project for the past several years; there are so many connections between science practitioners and students that can still be made and which I hope to develop, so many innovative methods of teaching that no one’s thought of yet. I’m a digital immigrant; my students are natives. I’m always playing catch up to what they’re already using daily.

Engraving of Democritus

Engraving of Democritus

So far this blog has been written entirely by me (David Black) since it debuted in Oct., 2008. Now that I’m teaching chemistry again I am turning over much of the posting to my students, who will be taking turns once per week adding information about the research project they are pursuing. They have chosen between an element (such as copper), a material (such as cement), a method of generating energy (such as solar power), or a time period from the history of chemistry (such as medieval European alchemy) and are compiling notes into an MS Word document with references.

With each post, they are to include about 500-800 words of writing in their own words culled from all of their research notes and include relevant images or diagrams. They are also producing a nicely laid out document such as a newsletter, poster, or brochure that will be converted to PDF format and linked to this blog for download. It may take a week or two for the first few student posts to contain these linked files, but they will come. My hope is that any chemistry teachers or students out there who are reading this blog will be able to download these linked files and use them in your own classrooms.

Plato and Aristotle

Plato and Aristotle, Detail from The School of Athens by Raphael

During second term, the students will be developing and practicing a hands-on demonstration that involves some property or aspect of their topic. We’ll present these demonstrations to the elementary classes at Walden (I’ve already met with the teachers to plan this out) and the students will also present them to each other for feedback. During third term, we’ll create a more extensive project from their topic: a detailed Powerpoint or Keynote presentation or a three-minute video or a computer game. They’ll present these in class again, then fourth term put all of this together for a back-to-school science night for the public and their parents and siblings. We’ll videotape these presentations and share them with you as well.

I’ve done all of these things before in various multimedia or chemistry classes, but this is the first time that technology and opportunity have combined to allow me to put it all together. I am still looking to build partnerships with local organizations (museums, mining associations, etc.) that will combine my students’ media skills with their content. I’ll still visit mining towns, take tours of museums, and continue to post about how technology can be used in the science classroom. I also plan on writing more grants and professional articles. I’ll continue to create longer format videos to go with the student short videos (the Tintic Mining District is up next after I make some changes to the beryllium videos).

This blog has certainly been successful in what I’ve intended it to be. Last month (September) was the best month so far with over 2700 visitors to the site. I’ve had over 23,500 visitors total, most of them this year. I would love to hear from any science teachers or students that have found this site useful.

I look forward to seeing what my students come up with as they post about their topics. I’m encouraging them to do more than just a list of properties, to dig deeper and talk about the unusual stories and histories of each element or material. And now, I am pleased to introduce my chemistry students’ blog posts . . . .

Read Full Post »

Walden School

Walden School of Liberal Arts in Provo, Utah

The past month has been crazy busy as I’ve prepared for my new teaching job at Walden School of Liberal Arts in Provo, Utah. I had intended on writing at least six blog posts in August and interviewing at least one person, but didn’t do any of it; instead, I’ve been writing curricula, lesson plans, preparing my classroom, and going on a four-day backpacking trip with my students to the high Uintah Mountains, up past Mirror Lake to Naturalist Basin. My legs are still recovering. Now this week has begun our first week of classes: I am teaching two sections of Honors Chemistry and one section of Astronomy on Mondays, Wednesday, and Fridays and one section of Computer Technology and one of Multimedia on Tuesdays and Thursdays. I’ll probably also pick up a Video Production class afterschool as well on those days. So far we are three days into the school year and things are going well.

My chemistry and multimedia students will be helping with the Elements Unearthed project in much the same way as my Media Design students did at MATC, except I am now at a school that actually believes in expeditionary learning (field trips) and project-based learning (PBL). Plus having dedicated chemistry students will help improve the accuracy and relevance of the student videos. Here’s what they are going to do:

David Black classroom

My classroom at Walden School

During the first term, each student will select a topic from one of four categories: elements, materials, energy processes, or the history of chemistry. They will conduct background research and develop an extensive set of notes with references, which they will condense into some form of print media, such as a poster, newsletter, brochure, etc. which they will convert to .pdf format. They will act as guest hosts of this blog, each one taking a turn to write a post entry about their topic and attaching their .pdf file to it for all to see.

During second term, they will come up with some sort of demonstration that relates in some way to their chosen topic, and practice it in class, then on a Friday in November we’ll take the whole class downstairs to the elementary classrooms (Walden School is a K-12 Montessori school) and present their demonstrations to the students, as well as handing out a simple worksheet or activity the students can take home. The chemistry students will also present their demonstrations to each other just before winter break and receive feedback.

David Black's Classroom

My classroom again

During third term, the chemistry students will add a Powerpoint or Keynote presentation or a video to their topic, which will be presented to their peers and added to this blog site. They will also present again to a different elementary class.

During fourth term, they will present their demonstration, Powerpoint, video, etc. to the public and their parents at a Back-to-School Science Night at the end of April or start of May. We’ll videotape the proceedings and add the videos to this blog as well.

This may seem like a huge project (and it is) but I’ve done all of this before when I’ve taught chemistry at Juab High School in Nephi (except for the media elements – that comes from MATC). Those students who wish can utilize the footage and photos I’ve already gotten for the Elements Unearthed project to do their element or material reports. They can also compete in the Chemical Heritage Foundation’s “It’s Elemental” video competition. My multimedia students will help on the longer videos I’m creating for this blog, YouTube, and iTunes (we’ll set up the iTunes account in our Computer Tech. course).

So you see, I have landed in an ideal situation for classes that I love to teach coupled with a great group of students and an environment that works perfectly for this project. I’m very excited to see what will come out of it. At the very least, this blog should be quite a lively place.

Read Full Post »