Feeds:
Posts
Comments

Posts Tagged ‘tie-dye’

Borneo Day 6: Wednesday, July 26, 2017

Sasirangan hanging up

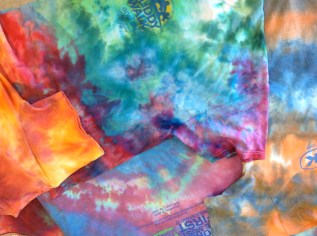
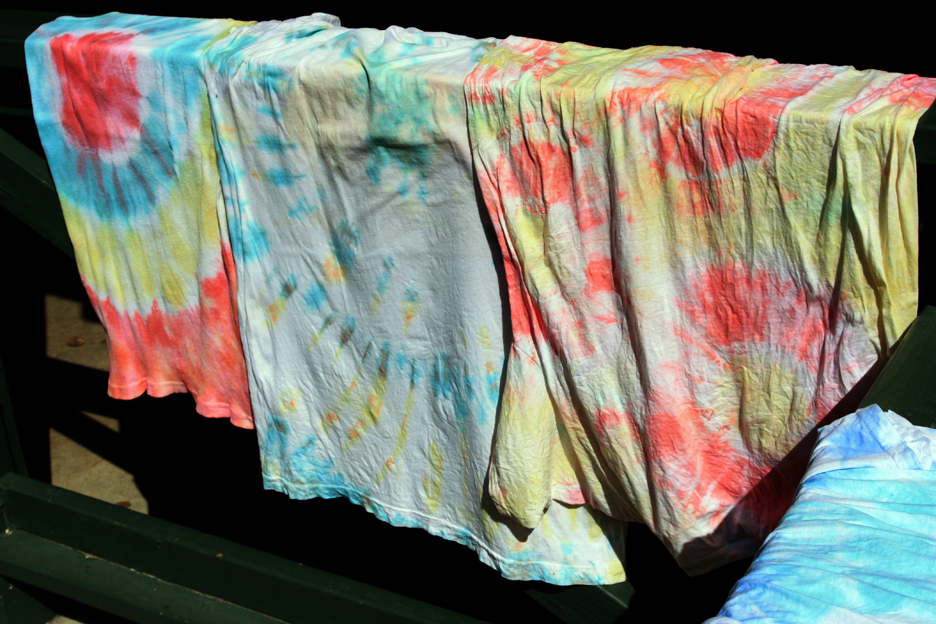
Sasirangan patterns hanging up to dry at the factory along the Martapura River in Banjarmasin.

After resting for a couple of hours, we met Nazar, his wife, and his older daughter in the lobby. He was taking us to see how sasirangan, the Banjarese form of tie-dye, is done. As we drove across the river the clouds that had been gathering all day were turning dark black and rain was immanent.

Threatening clouds

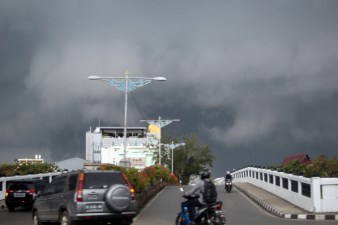
Threatening storm clouds over Banjarmasin. This is supposed to be the dry season.

We crossed the Martapura and traveled along a series of ever smaller roads leading us along the west bank. The dyeing process requires a lot of water, so the factories are located inside some of the Banjar style houses along the river we had seen on our trip to Lok Baintan. As we drove along the roadway just to the west of the river, the skies opened up and the rain began. Nazar commented that this wasn’t normal for the dry season. It came down in torrents and buckets, and before long it was impossible to tell where the rainflow ended and the river began – it was all just one sheet of water. We parked under and overhang at the factory outlet and watched the rain for a minute. I took some photos and video.

Rainstorm on river

The rain begins – it came down so fast it became hard to tell where the runoff ended and the river began.

This was quite a storm, but not the worst I’ve ever seen. I’ve been through the edge of a typhoon in Taiwan, and I was once in a downpour in Minneapolis in April 1986 that was beyond belief. The rain there came down so fast that the drainage system couldn’t handle it, even though the city is along the Mississippi River. The pressure in the drains was so great that manhole covers were being blown into the air and fountains of water eight feet high were geysering out of the holes. On my way to the airport a short time later, my shuttle van drove through what looked like a shallow puddle that wound up being five feet deep. The engine got wet and stalled. They had to call another shuttle van to come get us – it drove more carefully into the “puddle” and I had to climb out the window and over to the second van with my suitcase so they could take me on to the airport.

Sasirangan choices

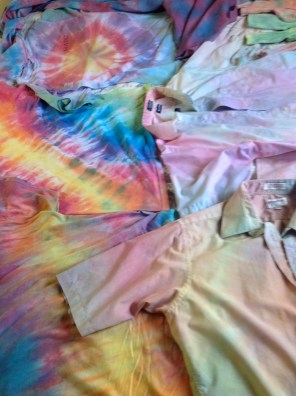
Sasirangan samples in the factory showroom. You can find all types of colors and patterns.

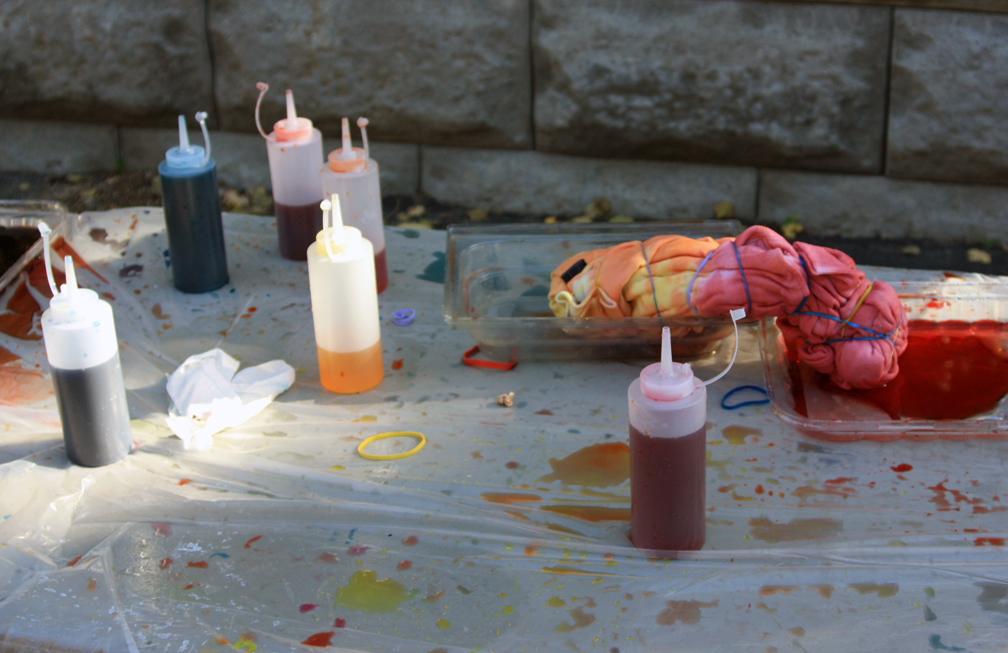
As we were looking at samples in the sasirangan store, a load thunderclap and lightning stroke boomed out and the power went out. I was able to use my flash for photos, but not for video. Craig got his cell phone out and set it to flashlight mode so that I would have some light. We crossed the road to the dye factory on the other side along the river. A man showed us how they use stencils to trace the traditional patterns onto white cloth. The cloth is then tied tightly with small ties to follow the pattern of the stencils. Parts that aren’t to be dyed in the first color are covered in plastic bags.

Tied green cloth

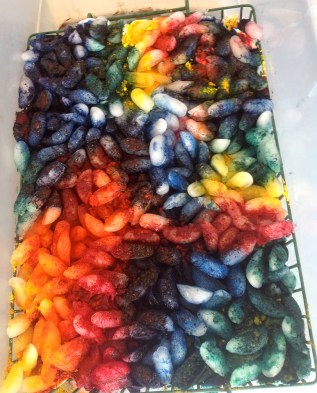
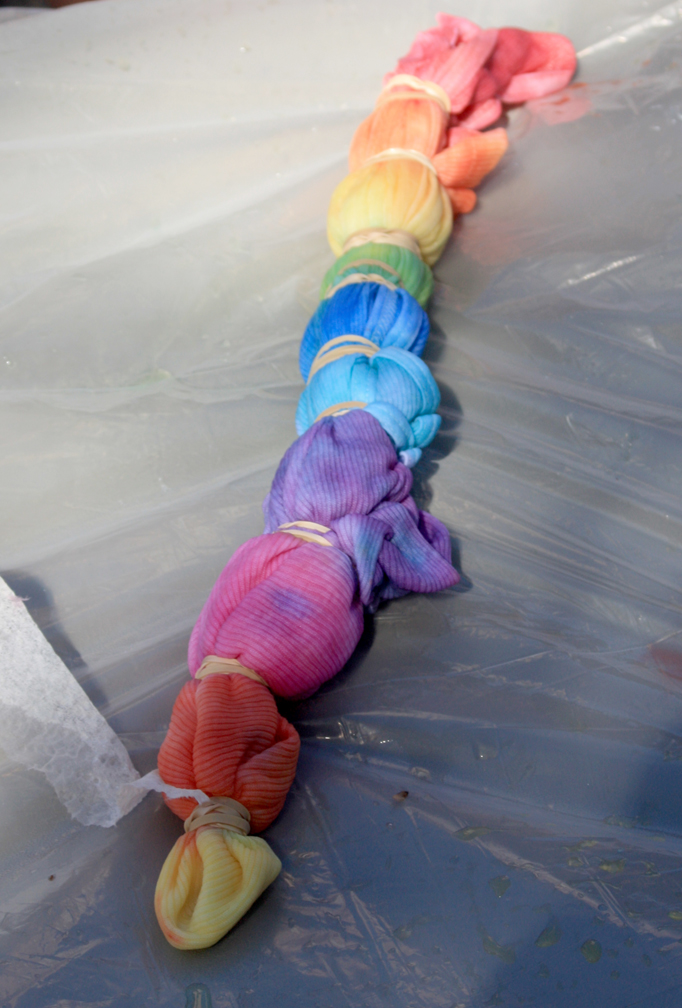
Died green cloth with the ties in place. Where the ties gather in the cloth, the dye won’t penetrate and will leave white places, just like western tie dye. This may be the origin of tie dye.

Next door were the dye vats. Since dye works better in hot water, the room was like a sauna with steaming vats of various colors. My camera wanted to fog up, but I did get some good photos and video. The men there were wearing gloves and dipping the cloth repeatedly into various colors. The bags are moved to the previously dyed areas so that other colors can be applied where the bags had been. The cloth is then rinsed and hung up to dry on railings between the two buildings, something a bit hard to do in this rain.

Plastic covered parts

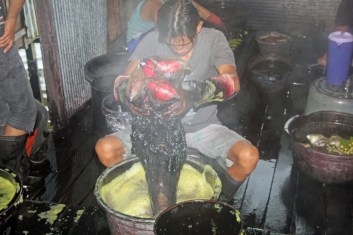
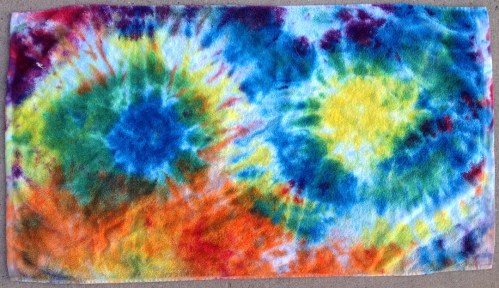
Dyeing the sasirangan cloth. The dye area was a sauna bath from the steaming hot dye vats. To protect color in areas, plastic bags are tied on to prevent the second color from reaching the first color.

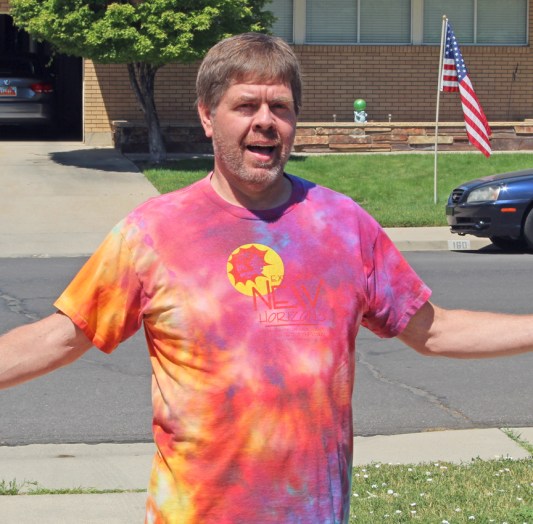
The rain soon let up, and we returned to the outlet store. We looked through the colors; there were many beautiful combinations, and I bought two different bolts of cloth. One was purples and magentas, the other oranges and brick red. These will be for gifts for my sister and daughter.

Dye vats 2

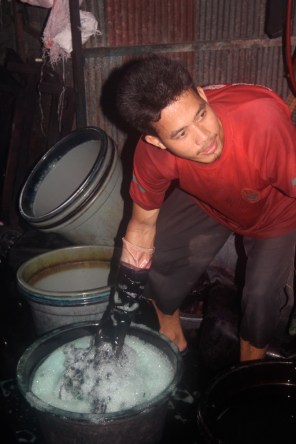
The dyers used rubber globes to repeatedly dip the fabric into the dye vats. The power was knocked out by a lightning strike nearby in the storm. Between the humidity from the rain and the steaming dye baths, this room was like a sauna. They had many types of dye powders and could do any combination of colors and patterns.

Now that the rain was ending, we got back in the car and drove through winding streets to find a restaurant for supper. Nazar knew an excellent place for bakso nearby, and we drove past alleyways and along narrow roads to get there. The late afternoon light after the storm provided a silvery golden cast to everything as it reflected off the wet pavement along the alleyways. It was extremely humid after the rain, but the air was cooler and quite comfortable, so I rolled down my window to get better photos. We passed a cemetery, including the memorial to a local hero. After a few minutes, we reached the restaurant. Nazar’s son rode a Gojek to the restaurant and met us there. I had beef bakso and chilled bottled water for supper, and it was excellent. I like bakso a great deal, and have had some good stuff, but this was the best I had anywhere in Indonesia.

Alley near bakso place

Alleyway near bakso kitchen after the rainstorm.

Bakso kitchen

Bakso kitchen in Banjarmasin where we ate after visiting the sasirangan factory.

Bakso soup

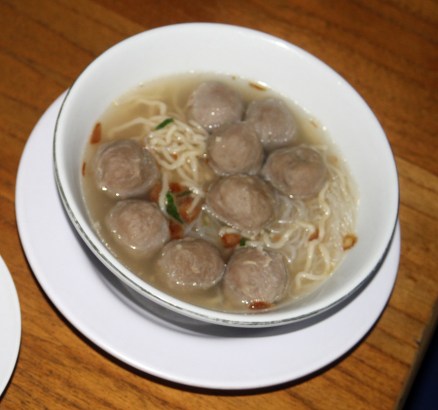
The best bakso in Banjarmasin.

Road after rain

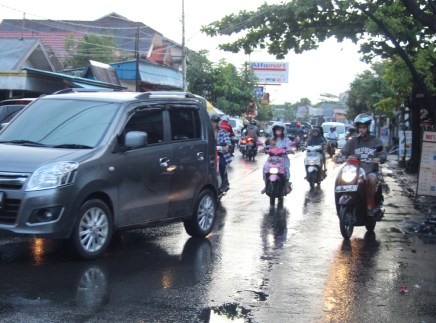
Traveling through the narrow streets of northern Banjarmasin after the rainstorm.

Read Full Post »

I’m taking a break from reporting on my preparations for my Teachers for Global Classrooms trip to Indonesia to bring you up to date on activities in my STEAM it Up and Chemistry classes, so that I can maintain some semblance of chronologic continuity.

Ice dye shirts 1

Ice dyeing creates intense, random colors.

Once we finished our unit on steampunk sculpture and cosplay costume creation, we began ramping up for the concluding section of our dyeing cloth lab in the STEAM it Up class. To get the students back in the mood, I introduced them to tie-dye and all of its STEAM applications. I’ve reported on how to do tie-dye in previous posts, so I won’t describe what we did again here. We did add a new wrinkle to the process by trying out a different type of dyeing using ice to randomize the colors. This is called ice dyeing, and you can find many beautiful examples online. The colors tend to be much more intense (because the dye powder is less diluted by the ice).

Here’s how to do it:

Adding dye powder

My STEAM it Up students adding tie-dye powder over the ice layer. The T-shirts and other cloth items are scrunched up on a tray under the ice.

First, you find a tray or grate or sieve of some kind that can fit inside a waterproof container, such as a plastic storage box. The grate must have holes to let water through and be raised a few inches above the bottom of the container so that the cloth won’t be sitting in the melted ice water.

Second, you need white or near-white cloth such as T-shirts or aprons or socks. These need to be pre-soaked in washing soda (sodium carbonate) dissolved in warm water. I use about a cup (250 mL) of washing soda to a sink full of warm water. Soak the cloth for at least 15 minutes, then wring out most of the water so that the cloth is wet but not dripping The cloth pieces or T-shirts then need to be wadded or scrunched up randomly and laid in the tray next to each other tightly enough so that they will remain somewhat folded up.

Ice with dye powder

The ice with a completed layer of dye powder. I demonstrated the process at the bottom with a spectrum of colors (and two shirts underneath). Students die the middle and top. Where complimentary colors are mixed, as in the top right, the results were more muddy. Yellow needs to be given more room since any other color will mix in and darken it.

Third, ice or snow is layered on top of the cloth or shirts. We simply raided the faculty lounge refrigerator’s icemaker and poured the ice on top of the cloth. It needs to make a fairly complete and even layer with no holes. We did this in May or we would have gone outside and gathered snow for a finer, more complete layer.

Fourth, tie-dye powder (we used Procion MX dye powder ordered from Dharma Trading Company) is spooned onto the ice or snow. This will use a lot of dye powder, so go sparingly and try to make a rainbow or spectrum pattern, with analogous colors next to each other instead of complimentary colors. Otherwise, the opposite colors will mix and you’ll get muddy results. There is some good color theory that can be taught here.

After the ice melts

To keep the T-shirts from sitting in the muddy melt water, the tray they are sitting in must be raised out of the water. I placed this tray on top of some funnels I use for tie dyeing. This is what the shirts look like after the ice melts. The shirts must sit for 24 hours with a lid on the container before rinsing. By scrunching up the cloth, and by the mixing of colors as the ice or snow melts, the final shirts have bright, random colors.

Finally, put a cover on the container and let it sit overnight undisturbed. It must be airproof, as the dyes need wet cloth and about 24 hours to set in. The colors will mix in the melt water to make a dark olive or brown color that can be saved for other dyeing. The shirts are then rinsed out in a sink with running cool water until no more color rinses out of them. They can then be washed with non-bleach detergent on gentle cycle and dried normally.

Ice Dye shirts 2

Ice dyed shirts.

Here is a photo of the results. Since some of my students forgot to bring their own T-shirts, I brought in all the old T-shirts I could find. Some of them had paint on them or were buried at the bottom of my drawer and hadn’t been worn in years. Now they have a new lease on life and are my favorite tie-dye shirts. Over the years, I’ve built up quite a collection, but these have the most intense colors.

Me in ice dye shirt

Here I am wearing my favorite ice dyed shirt. Notice how bright the colors are, but it does use up a lot of dye powder.


Read Full Post »

Walden School students at TImp Lodge near Sundance.

Walden School students at TImp Lodge near Sundance.

Each year in September we take all the students of Walden School of Liberal Arts up to Timp Lodge, a large cabin above Sundance Ski Resort owned and rented out by Brigham Young University. We rent it for a week and have the different grade levels take turns using it, with the high school using it for three days and two nights. We do this so that students can bond with teachers outside the regular classroom. By breaking up students in various workshops, we also hope to develop friendships between all the students and prevent cliques from forming. We do a variety of activities such as a 2-mile hike to Stewart Falls, workshops for the elementary students, a talent show, and a dance.

Walden School students inside Timp Lodge near Sundance.

Walden School students inside Timp Lodge near Sundance.

During our first day there, each teacher puts together a workshop that is both fun and educational. I had proposed to make Shrinky Dinks using the process I’d learned at the ASM materials science camp this summer, but not enough students signed up for it (I guess I need to come up with a better name . . .). One of our new part-time teachers, Austin, was trying to brainstorm some workshop ideas and I helped out, since he didn’t know what kinds of things would work. We came up with the idea of doing tie-dyed shirts. He had 30 students sign up, so I agreed to help out. Now why didn’t I think of that in the first place?

Wild turkeys at Timp Lodge near Sundance. And I'm not talking about students, either.

Wild turkeys at Timp Lodge near Sundance. And I’m not talking about students, either.

Since not all of the 30 could get around the tables and use the dye bottles at the same time, I came up with an additional idea to make marbled paper. I’ll describe this in my next post. But this time, lets talk tie-dye.

Hiking to Stewart Falls.

Hiking to Stewart Falls.

Austin purchased an assortment of standard Ritz dye colors and some plastic squirt bottles (such as used for catsup or mustard). We had the students bring their own shirts or other clothing items (some did socks, and one even did underwear), but we purchased extras for those who couldn’t bring their own. We also brought tubs and buckets for mixing the dye, plastic disposable tablecloths, large Ziploc bags, rubber bands, and washing soda as a mordant.

Squirt bottles full of fabric dye. We used yellow, orange, carmine, purple, blue, and cyan.

Squirt bottles full of fabric dye. We used yellow, orange, carmine, purple, blue, and cyan.

A mordant is a chemical that forms a coordination complex with the dye molecule so that it can attach permanently to the fabric substrate, such as wool or cotton fibers. As for any pigment, for the color to last, it must be insoluble in water, yet the dye itself must be soluble in water when first mixed. The mordant forms a “lake” (from the old Latin “lac” from which the word shellac is also derived) that makes the dye insoluble and permanent. The mordant is usually a metal ion salt that forms a base in solution, such as washing soda (sodium carbonate). Other common mordants used historically include urea, tannic acid, aluminum salts such as alum (aluminum phosphate), and even salt (sodium chloride). I would like to do this in a more controlled setting sometime to test the effectiveness of different types of mordants.

Method for making a bulls-eye pattern. The center is pulled up while the shirt is twisted slightly, then bound in sections by rubber bands and dyed.

Method for making a bulls-eye pattern. The center is pulled up while the shirt is twisted slightly, then bound in sections by rubber bands and dyed.

Our procedure was to mix the washing soda into a bucket of water and soak the T-shirts in it for several minutes. We then spread them out on the plastic tablecloths and folded them to produce one of several patterns. For example, you can make a spiral design by taking the center point and pinching the cloth, then twisting the whole shirt into a spiral and tying it together with rubber bands around the outside and across the center. The dyes are then squirted onto the rolled up shirt to form wedges of color, overlapping them to make gradients. We discovered that you get more color if you really saturate the dye in the wedges, going over them several times and even squirting some in between the cracks and ridges so that color gets down deep and leaves less white.

Ziploc bags full of dyed T-shirts. The dye was allowed to set before air drying.

Ziploc bags full of dyed T-shirts. The dye was allowed to set before air drying.

To make bulls-eyes, choose the center and pull it up while twisting to make a long rope, then attach rubber bands at intervals to hold the cloth together. Squirt different colors of dye between the rubber bands. Where the rubber bands are pinching the cloth together, less dye will penetrate and will leave white rings separating the bands of color.

Drying T-shirts at Timp Lodge.

Drying T-shirts at Timp Lodge.

To make tiger stripes, lay out the T-shirt face up, then drag your finger from one shoulder diagonally down to the opposite corner, creating a pleated fold that is then held together by rubber bands. Bands of dye color are squirted along it. To make a plaid pattern, take the tiger striped pattern and make a second set of accordion-style pleats.

Plaid, spots, and spiral patterns.

Plaid, spots, and spiral patterns.

We had enough T-shirts that I tried several different patterns to see which were best. I liked all the results, especially the tiger stripes. I think I would create a gradient of colors (say yellow through orange to red) across an unfolded shirt, then fold it and make a second set of colors (blues and greens). That way, interesting color combinations would result and there wouldn’t be any undyed white areas. Or I could do two different patterns on each shirt, letting them dry in between. I will have to do more experimentation.

Tie-dyed shirts showing different patterns.

Tie-dyed shirts showing different patterns.

After applying the dye, the students sealed the shirts in Ziploc bags for several hours to allow the dye to set, then gently washed the soda out. They then let the shirts dry completely in the sun. I told them the color would be fast (permanent) if they heat set it by running the shirt through a drier before washing it. It remains to be seen just how color fast our T-shirts are. The ones I’ve made have held up pretty well.

Fall 2014 tie dye samples

A sampler of shirts, socks, and scarves dyed in my 2014 Timp Lodge workshop.

We had T-shirts drying all over the place on the Lodge’s railings and many turned out quite well. For the next several days after we returned from Timp Lodge we had quite the tie-dye fashion show as students wore their shirts to school. We’ve had the reputation of being “that hippie school” in the past, so I suppose this helps verify our image.

Star shirt

Yours truly wearing a star patterned shirt. I’m running out of white T-shirts, so I’ve been using whatever I can for practice.

Update to Post for Fall, 2015: 

I have continued the tie dye class at our annual Timp Lodge retreat for three years now. Looking at the photos shown above, I can see we’ve made some progress. The main difference has been introducing a better type of dye. Instead of the Ritz dyes you buy at a grocery store, which create the weak colors seen above, I ordered Procion MX dyes from Dharma Trading Company and the results have been much more spectacular. I have even re-dyed some of the shirts from 2013 just to get better results.

Double spiral shirt

I found a nice long-sleeved white shirt at a local store and dyed it into a double-spiral pattern. It didn’t work as well as I’d hoped, but the colors are fun. You can see that the Procion MX dyes are much more intense than the standard Ritz colors.

I’ve learned how to make several advanced patterns, such as stars (you fold the shirt in an origami pattern similar to a paper airplane and tie it off using chopsticks and rubber bands), double spirals, and even Taoist Yin-Yang symbols, which involve sewing in lines of thread that can be pulled to gather the cloth in a specific pattern of S-curves and circles.

Dao shirt

I was attempting to make a Taoist Yin-Yang symbol by gathering the shirt along an S-shaped curve with two circles. It didn’t quite work, but the colors turned out well.

I have standardized the student samples by purchasing white wash cloths and towels for the students to use instead of relying on them to remember to bring T-shirts or whatever.

Becca spiral shirt

My wife, ‘Becca, wearing a standard spiral pattern I made for her. This one turned out nicely.

Towels

Some sample towels and dishcloths I did at Timp Lodge.

In other words, I have this fun art form down to practically a science. The only problem is that I now have so many tie dye items, its come to dominate my wardrobe! I even have tie-dyed socks and shorts.

Dao towell

This towel shows the Yin-Yang symbol pattern much more clearly, although I didn’t plan out the colors very well.

Spiral towell

A classic spiral pattern on a white towel.

Read Full Post »