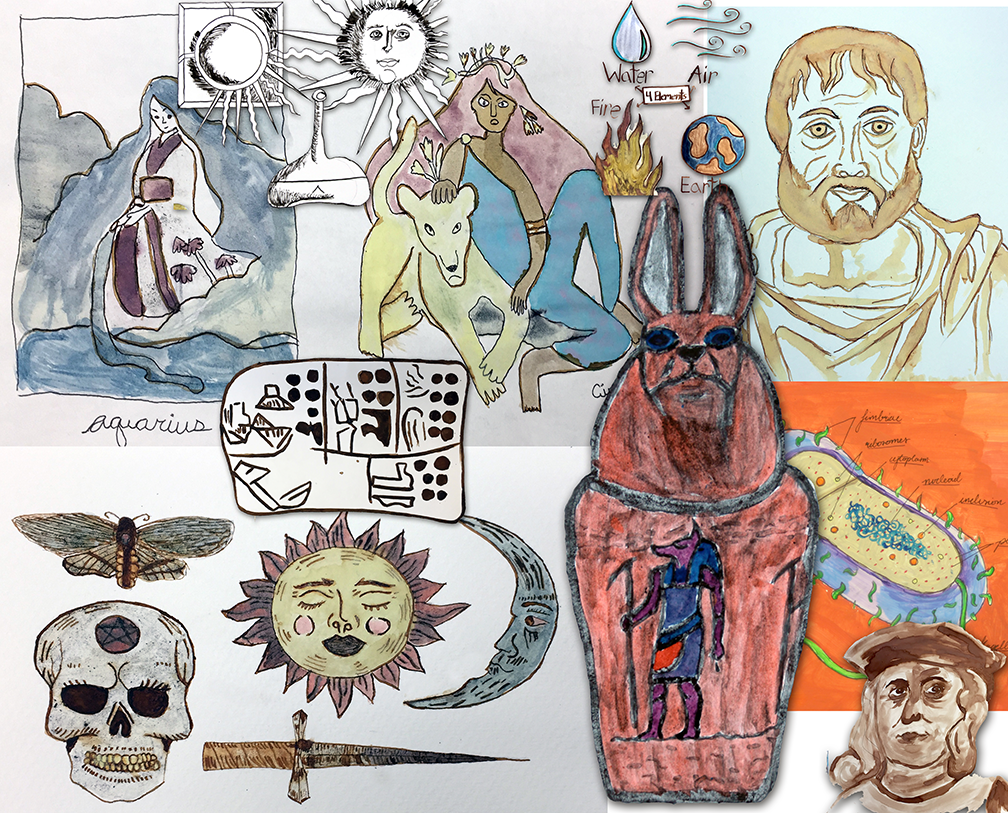
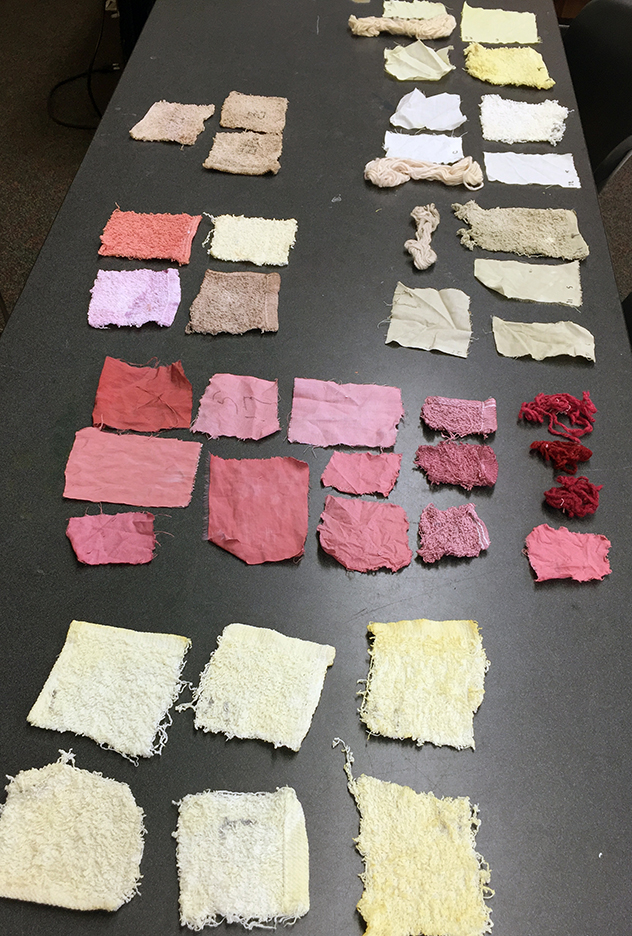
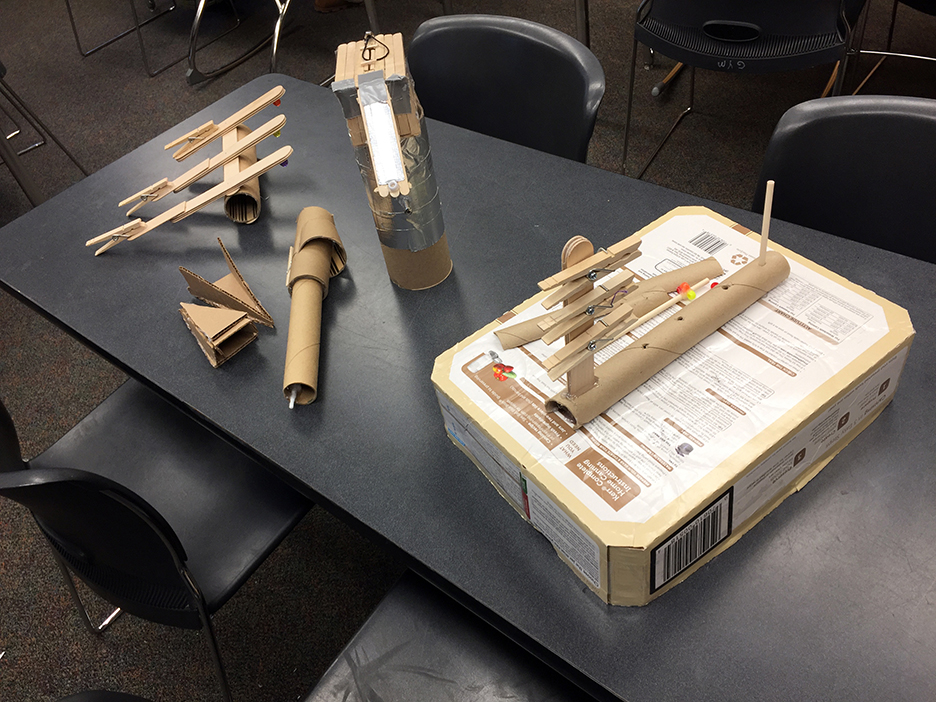
A collage of student-created illustrations using homemade ink and pigments, such as cochineal for the reds, Prussian blue for the blues, and iron-gall ink for the sepias.
It has been some time since I have written a blog post for this site. My work continues at Clark Planetarium, where I don’t get many opportunities these days to pursue the history, mineral sources, origins, properties, uses, extraction, refining, and hazards of the chemical elements. That is, after all, the main purpose of this blog site even if I have occasionally gone on tangents of global citizenship or science education in general. As a result of setting this site aside for several months, viewership has dropped off even if my passion has not.
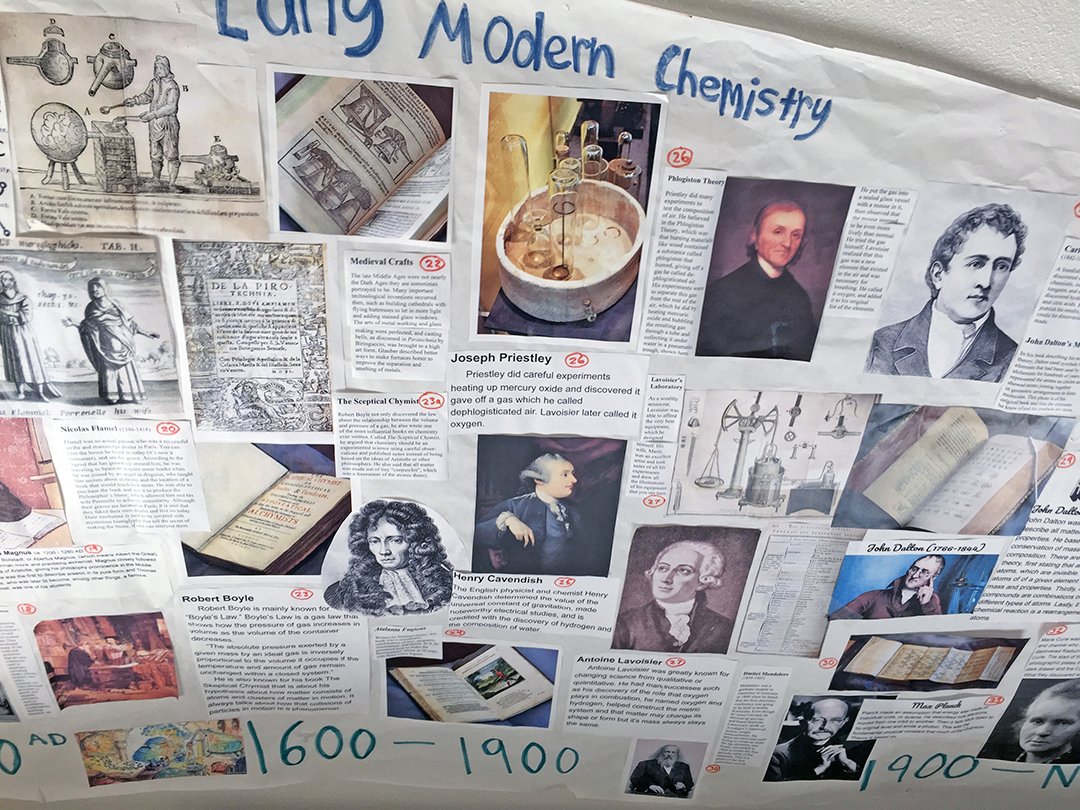
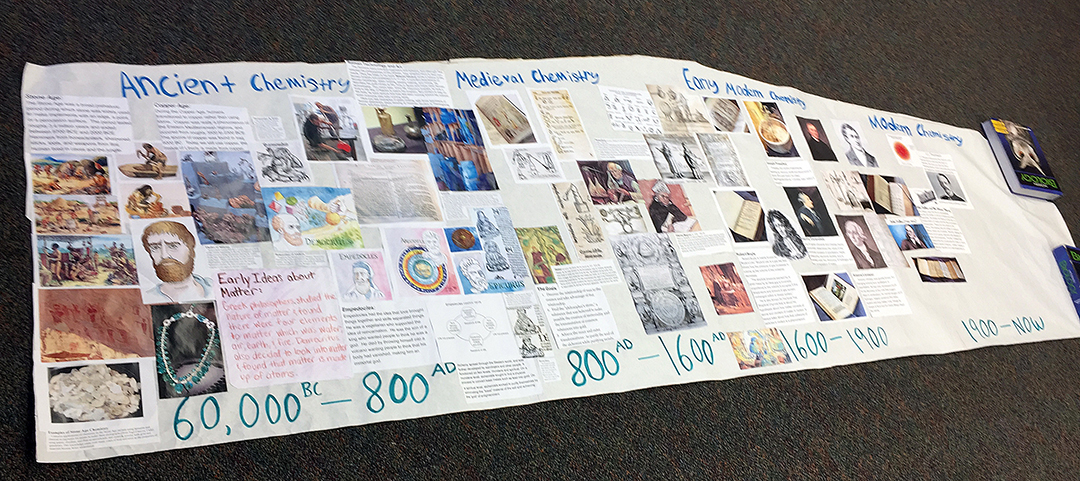
Part of a full-class banner on the history of chemistry, with each student assigned to do one image and caption.
I continue to work toward my doctorate, with my dissertation proposal going through several drafts this year. I wrote a longer version of the proposal (the first three chapters of the final dissertation, with chapter 3 in future tense) and sent it to my advisor in September. I wanted it to appeal to practicing teachers, but my advisor’s response was that it needed to be re-written in academic language and drastically shortened to less than 15 pages per chapter. Although I resist writing something that only a few Ivory Tower academicians will ever read, I know it must pass the Internal Review Board once it passes my committee, so I have done as he requested. I combined all three chapters together with my appendices, and my advisor has now completed a line-by-line edit. I am working through these suggestions over the next few days as schools shut down for Winter Break and our outreach schedule at the Planetarium eases off.
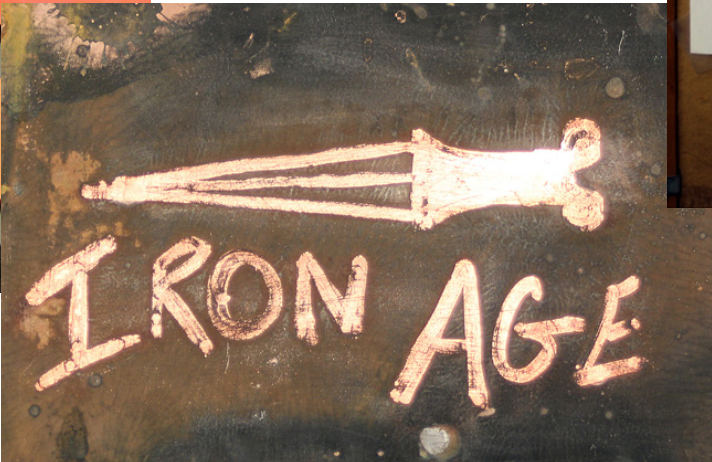
A copper etching done by painting fingernail polish on a copper sheet, then placing in a sealed container with salt and vinegar potato chips with a little extra salt and vinegar. Once corroded, the nail polish is removed with acetone. This was for a project on the iron age for the history of chemistry unit.
The core of my dissertation, as it is for any, are the research questions. These are mine:
RQ 1:To what extent can STEM teachers implement student-created digital media projects (SCDM) with three dimensions of choice to enhance student creativity, engagement, and content mastery?
RQ 2:To what extent can informal STEM education institutions develop and successfully implement a science communication contest to extend contact time and improve student motivation and science learning?
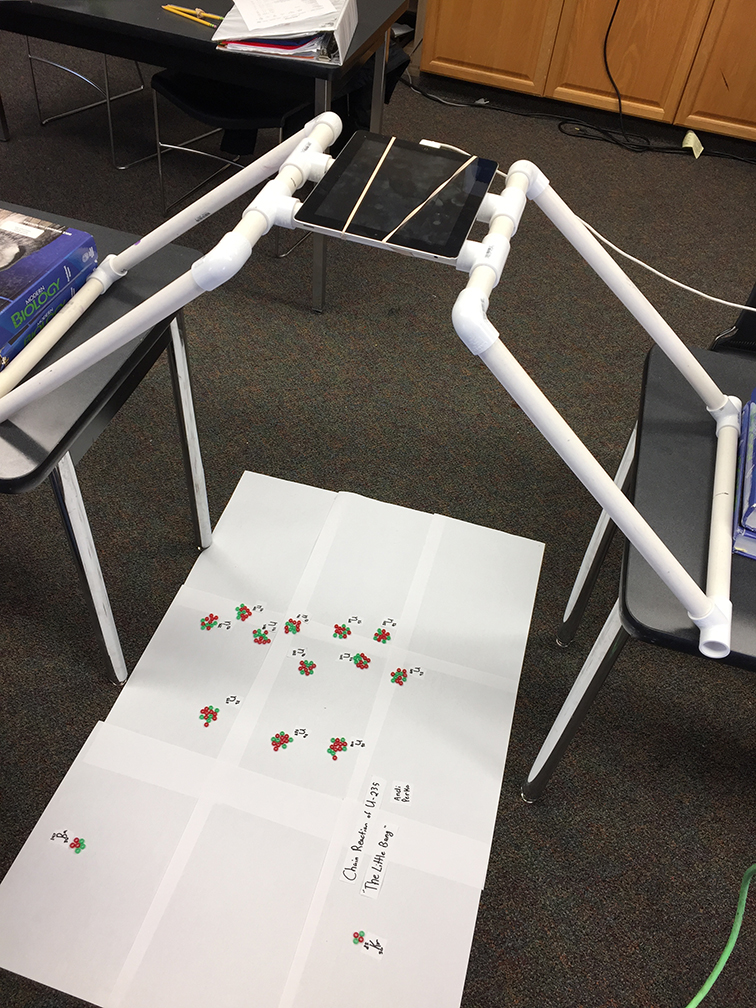
A stop-motion animation set-up for showing a chain reaction in a unit on nuclear chemistry. This frame shows three neutrons about to initiate the second order nucleus splitting.
As I see it, based on 33 years of classroom teaching experience, there are two problems of practice in STEM education (including chemistry). The first is the problem of student engagement, which I have talked about before on this site. I hope to see how student-created digital media projects can help enhance student engagement and lead to increased creativity, quality, and content mastery. This has been the main thrust of my research all along. As a planetarium educator now, I also see a problem of practice in how to increase our impact as an informal science education institution. We visit 6-8 schools per week (I average about two) and we can only teach one class at a time for about 45 or 60 minutes depending on the lesson, and can only visit a school once every two years (charter schools once every three years). That means we are missing over half of Utah’s sixth graders each year. We visited about 28,000 students this last year, and that is an exemplary task, but how much impact can we really have in so short and infrequent a time?
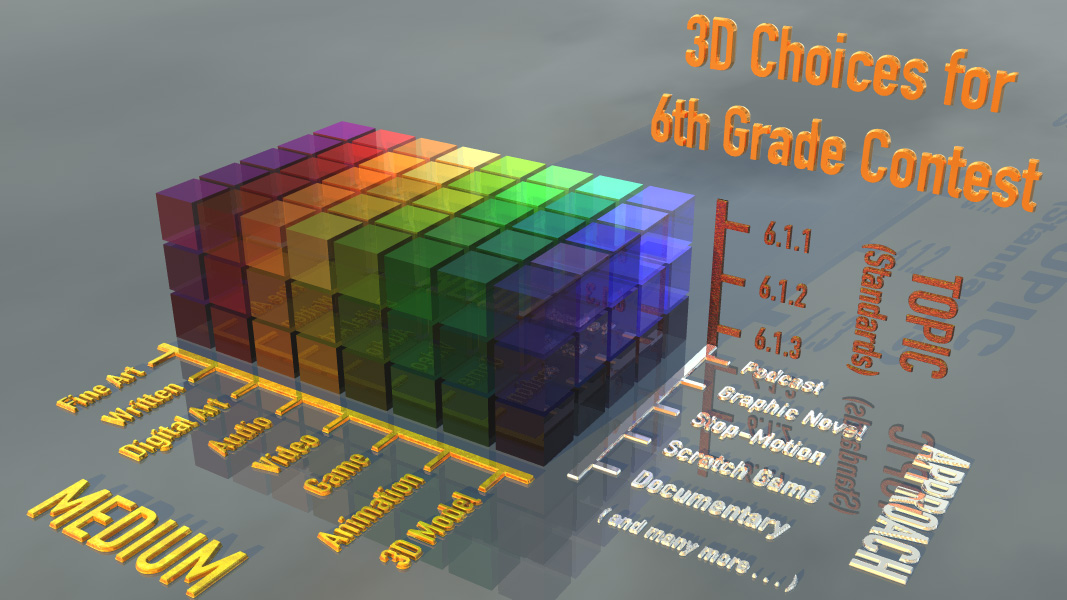
The second question implements the first through a science communication contest we are calling the Cosmic Creator Challenge, where students create their own digital media projects on the sixth-grade space science standards for Utah. You will notice in my first research question that I am using three-dimensional student choice as the experimental variable. I have not yet explained what 3D choice is on this website. Here goes:
Diagram showing 3D choice for sixth-grade space science standards. The choices are the individual standards (topics), the medium, and the approach.
When students are given digital media projects as a way of demonstrating their mastery of chemistry or other STEM concepts, they have three dimension of choice. The first is the choice of topic. Usually, in project-based learning, students are able to choose a specific topic for their projects from a teacher-delineated list or as specified by subject-area standards or objectives. This is the first dimension – choice of topic. The second dimension is usually choice of approach – that is, exactly what format the project will follow. The easiest way to explain this is through the example of a video project: students can choose different video formats, such as a public service announcement (PSA), a news report, a TV commercial, a documentary, or a narrative film (with script, props, and actors). These two dimensions are what are usually given to students for a project-based learning experience.
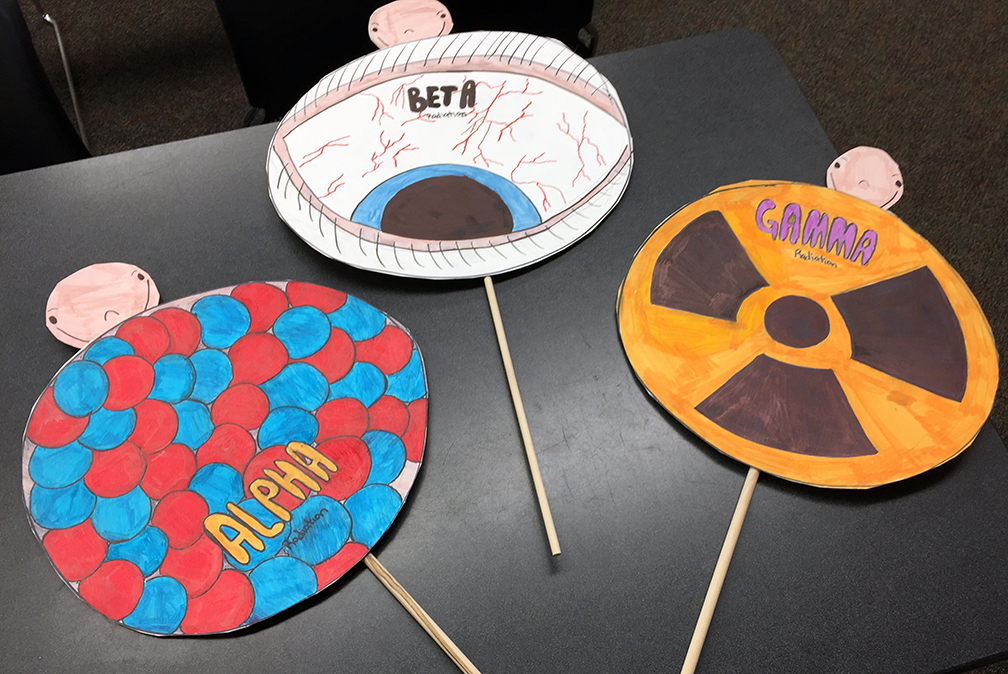
Puppets showing different types of radiations used in a student skit for a unit on nuclear chemistry.
But with digital media projects, there exists a third dimension. The choice of medium. Usually teachers choose this by having all students create a podcast or a video or a poster or a Scratch game. But what if we allow students to choose their own media type? There are many types of media now; the formats have proliferated and include digital images (pixel or vector-based); posters or infographics; desktop published documents; audio files; video files; presentations or slide shows; animations (several types, including stop motion); websites; games; and various types of augmented or virtual realities.
Once you combine all three dimensions, you have a huge number of possible choices for projects that can be based on students’ preferences, experiences, previous knowledge, and desires for learning. The potential for creativity is very high, with students coming up with projects that are unique, effective, fun, and communicate their chosen topic well. Here are just a few ideas for what my students have done in a first-year chemistry class:
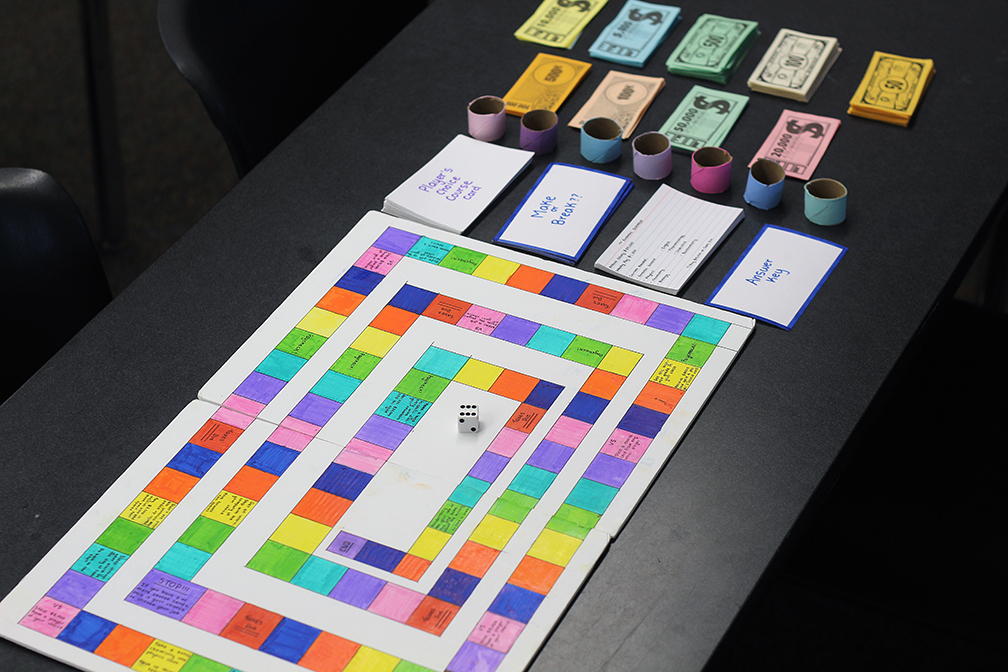
Chemistry careers game. Students start in college, pass chemistry classes, graduate, get a job, etc. similar to the Game of Life.
For our first unit on the nature of chemistry, I had a student who chose the topic of careers in chemistry and created a board game that combined aspects of several other games including the Game of Life. Students started the game in college and chose a chemistry specialty, had to pass classes with different life choices popping up, then graduate, find a job in their specialty, and work through to their first promotion while making choices along the way. In the process of playing the game, students learned about careers in chemistry. By creating the game, the student-creator had to research a great deal of information, and did so entirely through her own effort.
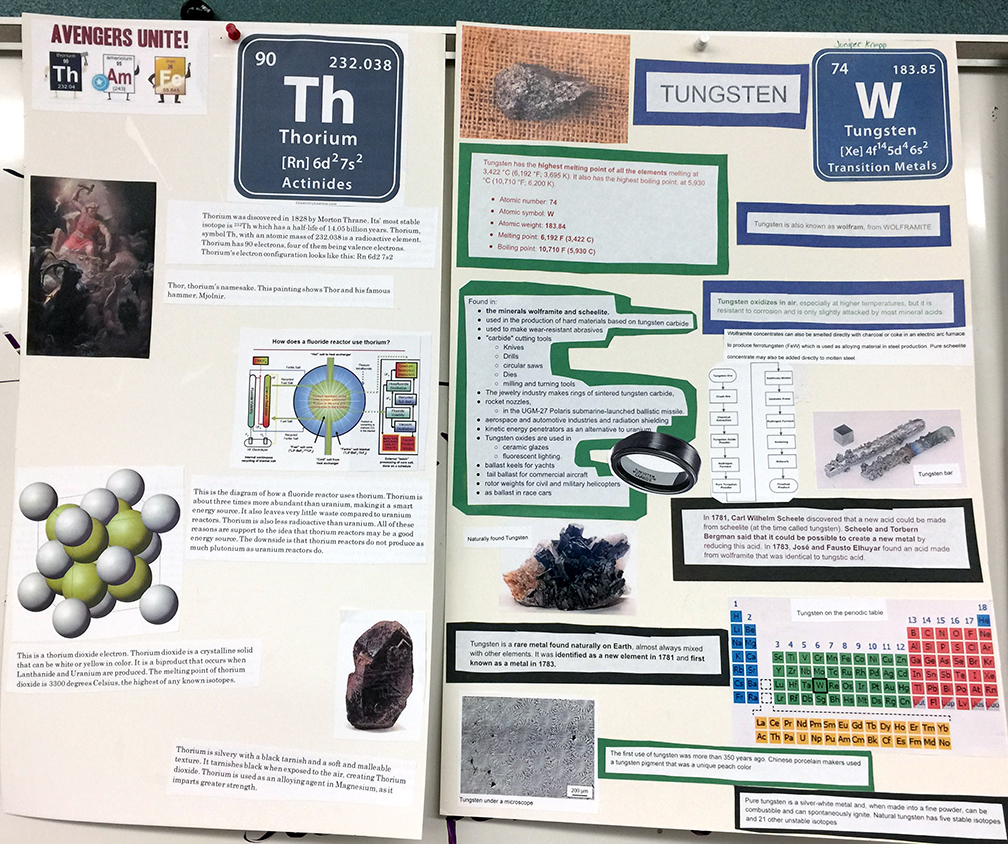
For a unit on the elements, students chose their favorite element (such as Thorium for an Avengers fan) and created a physical poster or infographic on the properties, uses, mining, refining, etc. of the element. They typed up text, inserted images and captions, and created a summary and crossword puzzle game for the back sides. Although the final posters were put together by hand with glue, it could have been laid out in desktop publishing or infographic software for easier editing. Other students were asked to use the poster and summary to play the crossword puzzle as their way of learning from the student-creators.
Student posters on thorium and tungsten. I especially like the Avengers Unite cartoon with Thor-ium, Captain Americium, and Iron Man.
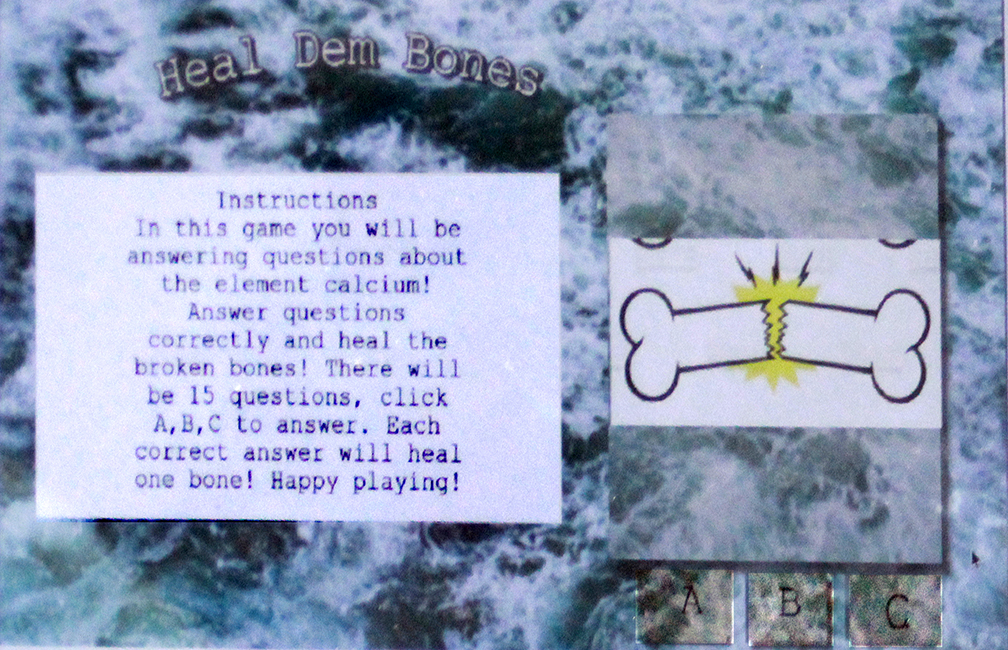
On the same unit on chemical elements, a student choose to create a Scratch game on the element Bismuth called Billy’s Bismuth Bellyache, where answering questions about bismuth correctly led to the gradual building of a bismuth subsalicylate molecule (the active ingredient in Pepto-Bismol). She designed her graphics, stage, costumes, and created all of the coding necessary to play the game. Another student used Scratch to create an interactive word-search puzzle on Strontium or a Heal Dem Bones game for calcium.
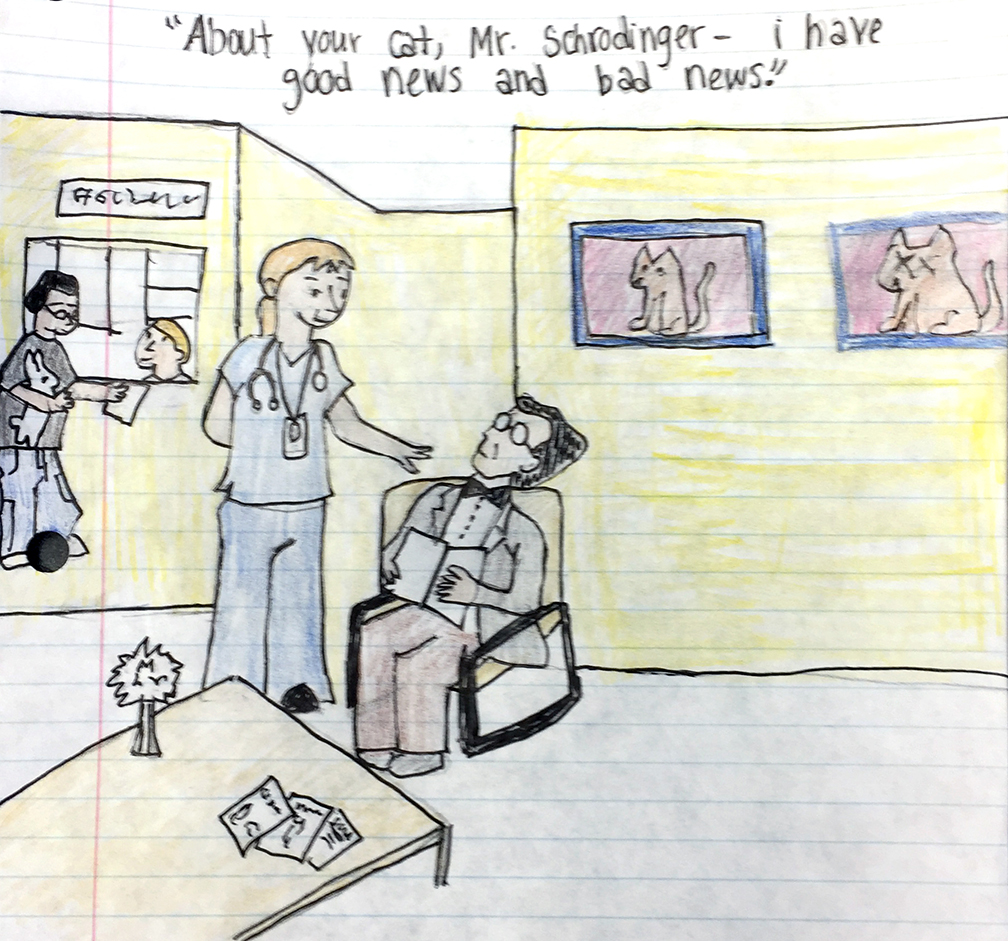
A group of students in an A.P. Chemistry class compiled a joke book with cartoons, puns, limericks, poems, and song lyrics related to quantum mechanics. This was based on an offhand comment in the Star Trek: The Next Generation episode where data tries to learn about humor by studying a stand-up comedian on the Holodeck. The computer mentions that the funniest comedian ever based their jokes upon quantum mechanics. So I wondered if we could do that. Eventually, this will become a whole animated cartoon hosted by Boson the Clown to a crowd of electrons as they laugh their way to higher orbitals.
One of the cartoons from the quantum joke book. The character in the chair is a pretty good Schrodinger!
I have had student groups build banners on the history of chemistry, design HyperCard stacks (there is an old one for you) on the elements and their compounds, create videos on elements, create 3D models of molecules and ancient Greek matter theorists, do interviews of experts on the history of chemistry, visited chemical manufacturing plants such as beryllium refineries, cement plants, bronze statuary workshops that use the lost wax technique, chocolate factories, and artificial diamond manufacturers. All of these projects are based on some form of media design. As time goes on, I have done more to encourage student choice of medium and have seen incredible results.
Yet all of these great examples are anecdotal – wonderful stories, but not constituting the type of proof needed by other chemistry teachers and science department chairs to adopt student-created digital media projects (SCDM). This is where my dissertation comes in – I hope to gather statistical evidence that other teachers can effectively adopt these same ideas for SCDM projects and 3D choice in their own classrooms, and that they will see enhanced student creativity, engagement, and learning. Once my proposal is approved, I will establish a science-communication contest at the planetarium for sixth-grade students to demonstrate their understanding of space science concepts (part of the sixth-grade science standards). I will gather data from their projects and student peer assessments to see if creating these projects leads to increased test scores as evidence of learning. By this time next year, this dissertation will be completed and defended and I will be a large part of the way to proving my hypothesis. Then I can return to exploring the elements once again and think of retirement and traveling to more mine sites.
The main interface for the Heal Dem Bones game on calcium. The student designed the graphics and buttons and programmed the game, so that by answering questions about calcium, you heal a set of broken bones.
In the meantime, I will report on the elements as much as possible, but my posts will continue to be sparse until then. Bear with me; the end will be worth the wait. I hope the examples shown here will inspire you to try out new ideas and use some student choice of what types of media projects they will create. For any unit, you can specific the topics (or your state standards can) and let students choose their specific topic, medium or software, and their approach. You will be amazed, as I have been.
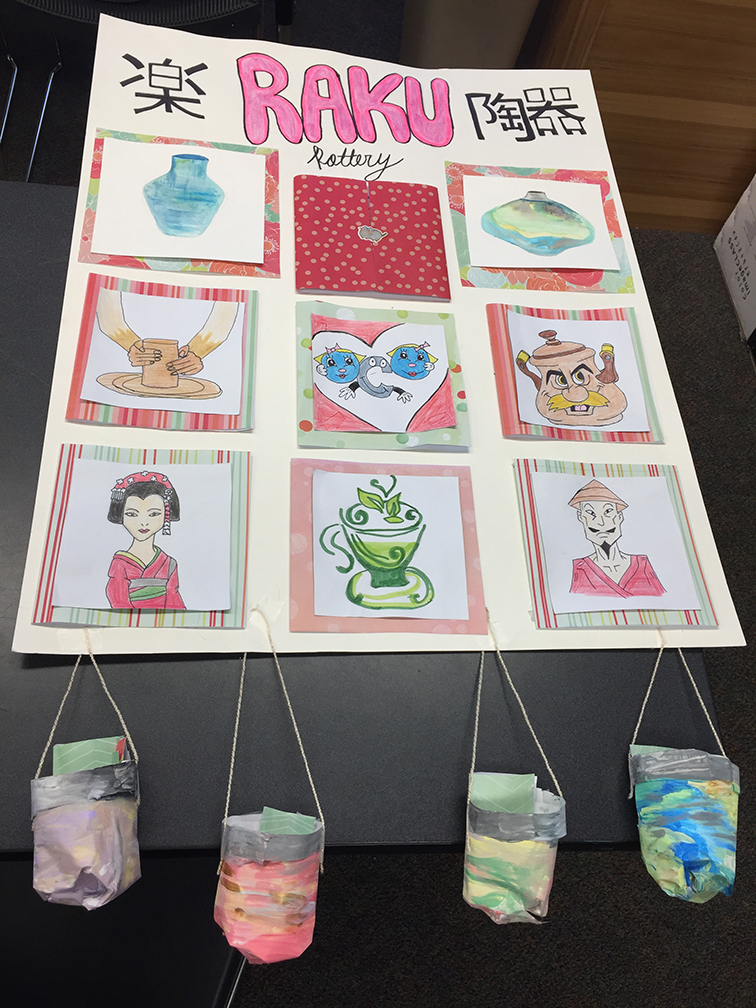
An interactive poster on Raku pottery for a unit on the history of chemistry. Even a standard project like a poster can be enhanced if you allow students to use their creativity. This poster has windows you can open to see questions, with answers in the pots below.
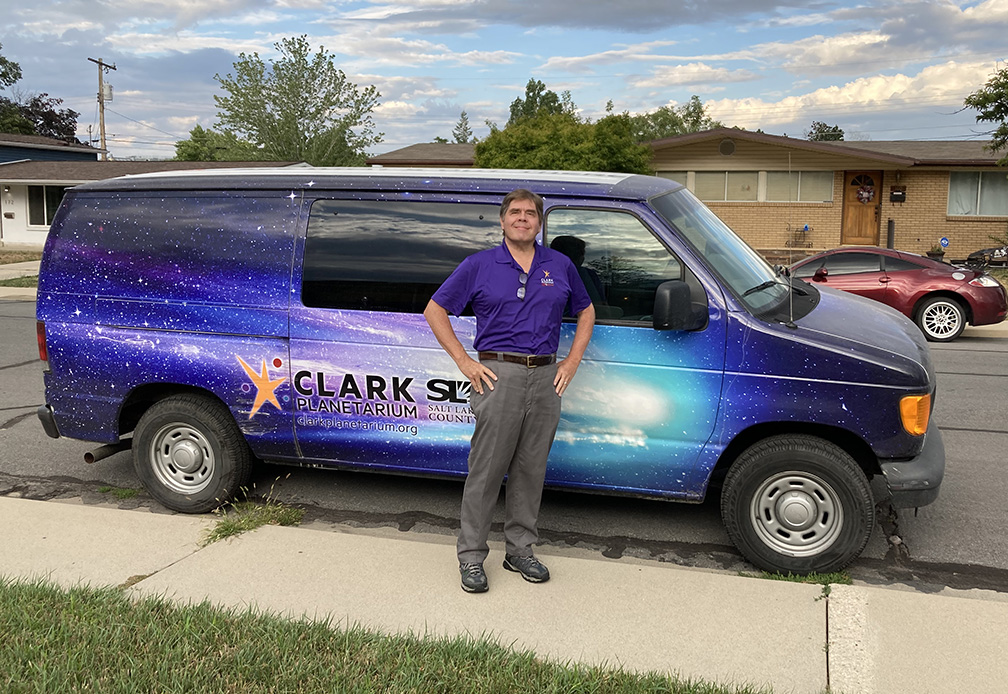
David Black next to the Clark Planetarium comet van, on the way to deliver solar eclipse glasses.
This site, elementsunearthed.com, has been down for a few months. I apologize for this; it came about due to unfortunate timing and a bad site certificate.
My wife’s credit card, which was being used for the auto payment on this site, was hacked and she needed to get a new card. Unfortunately, this happened just as the auto payment on the old card tried to go through with WordPress. Since the card had been cancelled, the autopayment failed and I didn’t realize this for over a month. In the meantime, the domain lapsed and Go Daddy hijacked the site. If you tried to visit between about last November, 2023 and the end of March, 2024, you would have seen the Go Daddy logo instead of my banner.
When I realized the problem, I corrected the credit card link and re-upped my payments. But the site did not autocorrect as the certificate was incorrect. Originally it was set up with my email from a school where I no longer work, so the certificate would not validate. It took several tries to finally correct that error and update my email. I think everything is working again.
There is just one more problem, which is that my entire media library has become unlinked. So now all of my posts are back, but with a little help from the people at WordPress, I hope to get everything working again soon. Please be patient!
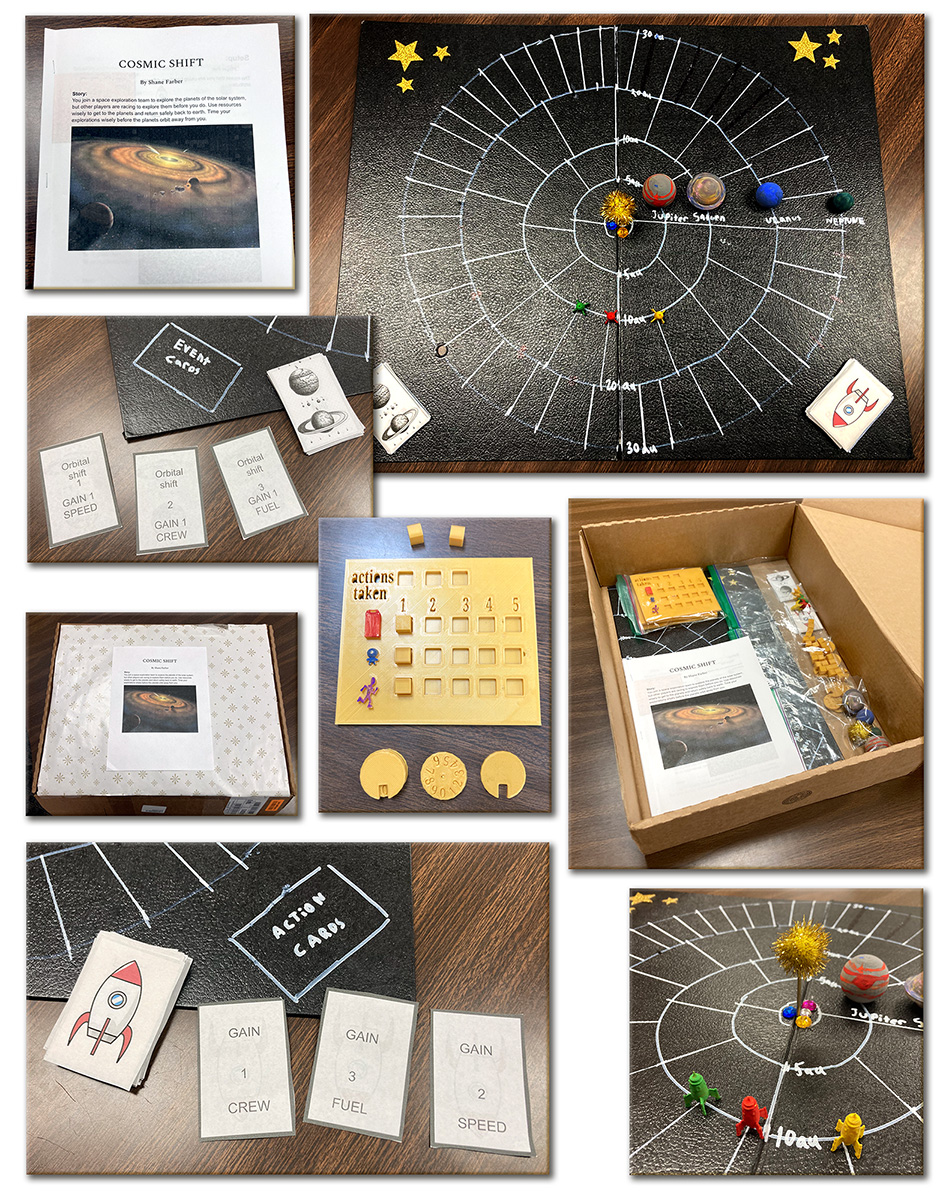
The Cosmic Shift game chosen as the Best of Show by our panel of judges.
I have been pulled away from much activity on this site due to my continuing efforts to get my doctoral dissertation completed. The first three chapters, which are essentially my proposal, are almost done. Chapter 2, the literature review, only needs a few more sections pasted in with a bit more editing, maybe 2-3 days worth, and I will send it off to my committee chairperson, Dr. Farber. Chapters 1 and 3 have already been sent, although they need editing. My goal is to have all three in shape by the end of May (2024) and in the hands of my full committee by the start of June. I would like to set up the proposal defense by the end of June, get the proposal to the Institutional Review Board (IRB) and gain approval by the end of August, then start my actual dissertation research by September. The data gathering will conclude by the end of November, with analysis and write up of the final chapters next spring. I hope (knock on wood, cross my fingers, throw salt over my shoulder, and anything else I can think of) to defend the final dissertation by this time next year.
It has been a long and winding road (cue the Beatles) and more than one complete change of plans. But there is finally coherence in my proposal and plan. I have simplified and cut and slashed until only the essential core remains, which is to study how teachers implement student-created digital media projects in STEM classrooms. This will be done through a Cosmic Creator Challenge at Clark Planetarium in Salt Lake City, where I now work as an Education Program Specialist. 6th grade students will demonstrate their mastery of space science standards through creating their own digital media projects using three dimensional choice (choice of topic, choice of medium, and choice of approach). They will present their projects to peers for critique, then make revisions and submit them to the education department at the planetarium for final judging.
A 3D model of the reasons for the seasons, one of the 6th grade space science standards.
We held a pilot program this fall (2023) and the results were excellent, giving me confidence that my plan will work. We saw definite indications of enhanced student creativity and engagement, as well as the effectiveness of three-dimensional choice. We did a pre-and-post test design and scores improved 7.9%, which is about par for project-based learning. Now I just have to convince my committee to let me do this for my dissertation research. I have created a whole new blog site to provide resources and information on the Challenge, and it is at: https://science-creativity.com. Check it out and let me know how you like it and if you can use any of what is there. It has links to flipped software training videos I made last year and ideas for student projects. I will post updates soon on how this first year’s contest went and give information on next fall’s challenge. My site on space science lessons and activities is continuing (https://spacedoutclassroom.com) and has been updated more often since I am now at the planetarium.
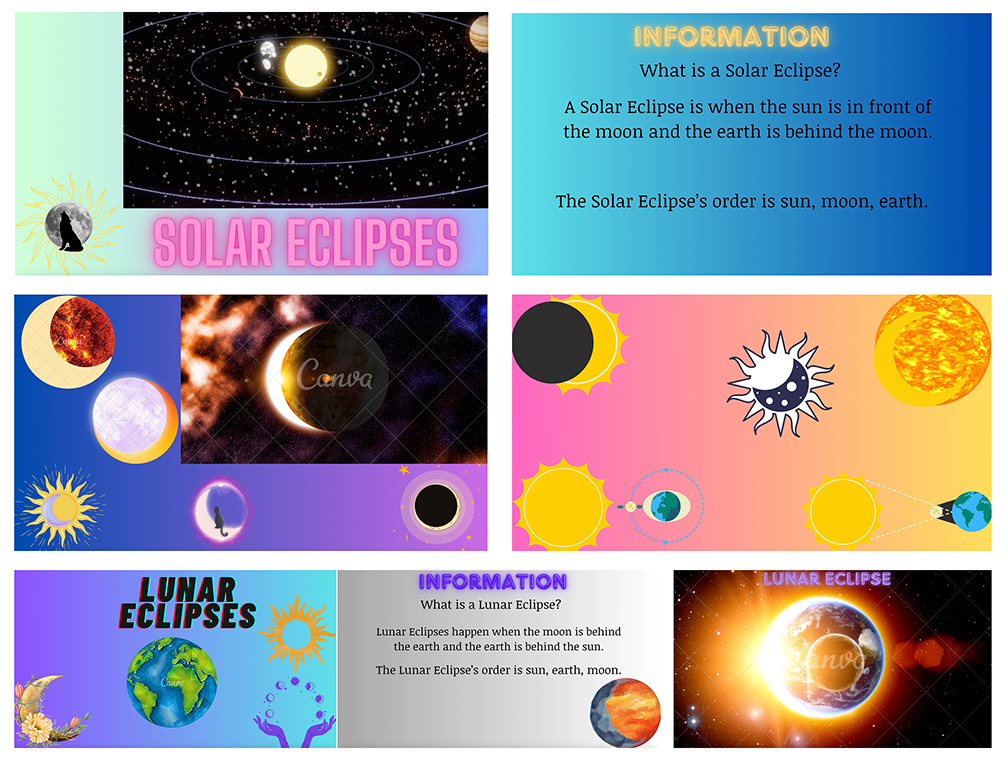
Frames from a Canva project on eclipses that won the video category.
Again, I apologize for this site’s unavailability and my lack of attention to it. I have quite a few updates on the elements and places I’ve visited (such as California’s gold country and Bodie, CA) in the past few years, which I will start to add as soon as my dissertation proposal is approved and I have some breathing room again. In the meantime, we are finally back in business.
Frames from a project on stellar evolution created in Wick Editor, a linear animation/interactive software. Students can choose which type of software and which type of project (here a branching informational program) to demonstrate mastery of their chosen STEM concept.
The purpose of this post is to invite you, as a STEM classroom teacher or informal educator, to participate in my doctoral dissertation research study. I need teachers to look over the new website I’ve been putting together at https://science-creativity.com (everything on it is free – I made it with WordPress which is why it is a .com website) and provide feedback in the following ways: A – How functional and usable is the website? Are there any problems or issues that need to be resolved? B – Are there any features you would like to see that are not currently there, including blog post topics related to teaching creativity and innovation in STEM classrooms that you would like to learn about? C – If you are planning to conduct a project-based learning activity in one or more of your classes before the end of June 2023, please consider having your students create a project using media design software as described on the website. They could choose one of the 40 or so projects described on the Projects page (where there are also excellent student examples). Have your students try out the videos linked on the Software Training page to learn any software they do not know and then use that software to create their own media content to present to each other. D – If your students do try out the software training videos and create a STEM media project, then please share good examples with me and I will post them on this website. You could explain it as a competition – only the best projects will be selected and displayed. The winning students and their parents will need to sign consent forms if they want recognition by name. E – I will ask you to fill out a survey on how well the project went with your students, to what extent they used the training videos, the level of their creativity, etc. Since I will be using your responses in my final dissertation, I will also ask you to sign a consent form. Both of these forms will be posted to the https://science-creativity.com website. If you decide to participate, I will send them to you.
Two frames from an Animaker resume, one of the types of projects described on my website. Instead of the usual static Powerpoint or Google slideshow, why not allow your students to do something with a bit more pizzazz, such as an animated slideshow or Prezi?
This is a lot to ask, especially so far into the school year. Any feedback you can give will be helpful, not only for my final dissertation but to improve this website as a teacher resource. It is entirely free and always will be, and is a work in progress. I will upload additional posts as it becomes an increasingly important focus of my work going forward. With this announcement, the site is officially in beta form. Let me know how it can become more useful for you and what features or topics you would like to see. Spread the word. I can be reached at: David Black, elementsunearthed@gmail.com or write a comment to this post.
In the meantime as I continue to build this site, I am proceeding with the revisions to my research proposal. I mentioned last post that I have focused in on a final three-part research question, which is the following:
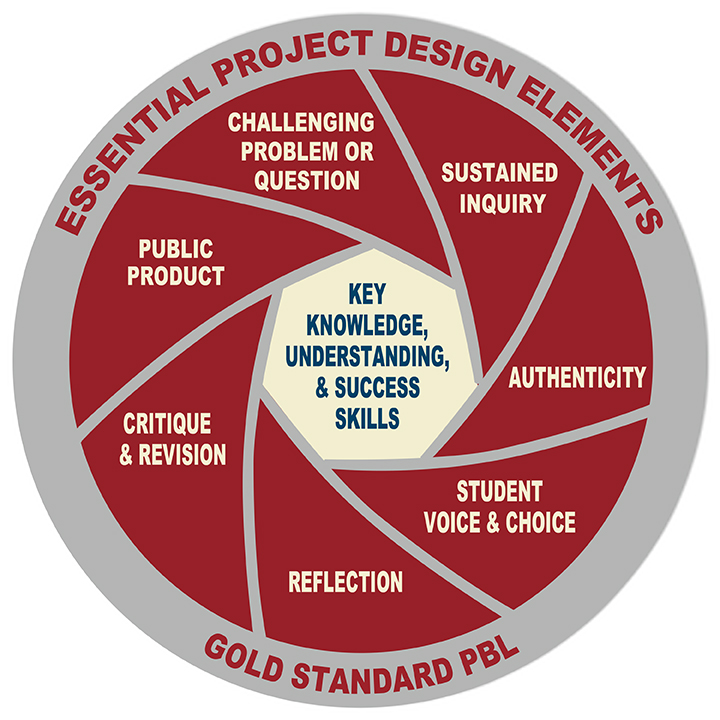
To what extent can STEM teachers implement choice boards for using browser-based media design software to: A – promote differentiation, access, and equity through Universal Design for Learning (UDL)? B – establish the components of “Gold Standard” Project-Based Learning (PjBL)? C – enhance student creativity and Social and Emotional Learning (SEL)?
I have to establish a need for this line of research, how it fills gaps in previous studies, and why my approach will sufficiently answer this question. These are the first three chapters of the final dissertation and what I am working to revise right now. I have written extensively on this website about why such research is needed, but it is finally time to move forward with the actual study. As described in my last post, I will be tasking my students with three major projects over this semester, culminating with the STEAM Showcase at the end of April and the Stanford Innovation Lab project in May. Each project involves using choice boards and media design software to demonstrate STEAM concept mastery.
A unit choice matrix for my biology students at New Haven School. Concepts with green bars are covered in class, and concepts that are open must be completed through student-created projects. The types of possible projects are listed horizontally.
The idea of choice boards is an extension of what I was doing with my classes at New Haven School. I built a choice matrix for each unit, listing the unit concepts vertically and the types of projects they could do horizontally, as shown here. On the back of the sheet I listed a series of questions for the unit; if students knew the answers, they would be well prepared for the unit test. It acted as their study guide. On the matrix, the horizontal colored lines represent projects or concepts we covered together in class through activities, videos, or lectures. The open topics were the ones the students would need to learn through creating their own projects. Since the school’s email system was tightly locked down (because it is a residential treatment center) and we only had Chromebook computers, I couldn’t use very many types of software – only those that didn’t require an email verification and were browser-based. I taught my students how to use Scratch, SculptGL, Tinkercad, and a few others. Because Canva requires email verification, we couldn’t use it, so any layout design had to be done by hand or I had to design it for them; our Ad Astra newsletters in astronomy were laid out on my computer using Adobe InDesign. I didn’t know about Photopea or Wick Editor at the time or I would have used them. Many of the examples I have of excellent student projects were therefore done by hand.
Scratch by MIT is an excellent method for students to demonstrate their mastery of STEM concepts by creating an interactive game or quiz, such as this test on types of rocks. It can be programmed to be self-scoring and choose random questions, as shown by my training videos on the website.
The unit matrix worked fairly well at showing students the types of projects they could do with the limited software available to them and included hand-drawn options. Now, with my dissertation, I am focusing on browser-based media design software through the lenses of universal design for learning (UDL), project-based learning (PjBL), social-emotional learning (SEL), and student creativity. With more software available to regular public or private school students, they need more extensive lists of choices with better descriptions. My dissertation committee chairperson, Dr. Farber, suggested choice boards as a possible answer. I have adapted my previous unit matrix idea to allow for three dimensions of choice: choice of a specific topic for a course concept, choice of type of software(s) to use, and choice of the type of project to create. The diagram shown here demonstrates these three dimensions for an upcoming biology project.
Altogether I have grouped different types of browser-based media design software into nine categories including image creation software (Photopea, Inkscape, Procreate); infographics/poster creation or desktop publishing software (Easel.ly, PicktoChart, Canva, and ThingLink); animated presentation software (Animaker, Powtoons, Prezi, or Voki); storyboard or comic strip software (MakeBeliefsComix or StoryBoardThat); 3D modeling and animation software, including augmented reality (SculptGL, Tinkercad, Mixamo, or Aero); sound editing or music creation software (Audacity, Soundation, or Vocaroo); video editing software (WeVideo, Canva, Adobe Express, or iMovie); interactive or linear 2D frame-based programming (Wick Editor); and stage-based programmable control of sprites or characters (Scratch). I also added choices for using mini-computers and robotics, plus multi-vector projects that combine several other choices.
For students up to the challenge, they can build 3D characters using SculptGL along with textures, import them to Adobe Mixamo (a free program online) to add rigging and animations, then program them to move around in an Augmented Reality (AR) scene in Adobe Aero. Here, my gray alien character is doing a dance routine in my doctor’s office.
There are many other types of browser-based or free software, including some for iPads that I am not familiar with (my students showed me one a few days ago for creating animation that I need to check out, but my iPad is too old to run it). The point of my dissertation is to combine student choice and voice (a necessary part of project-based learning) with media design software for student-created media content of STEM concepts. This is all meant to increase student engagement, access, equity, creativity, social-emotional learning, project quality, and content mastery.
The PDF at the bottom of this post describes each of these project types listed by software. It is not an exhaustive list, as there are many more ways to do things than I can possibly imagine and types of software that I am not even aware of despite a great deal of research. As I say frequently in the training videos, the possibilities are endless and entirely depend on the imagination of the students.
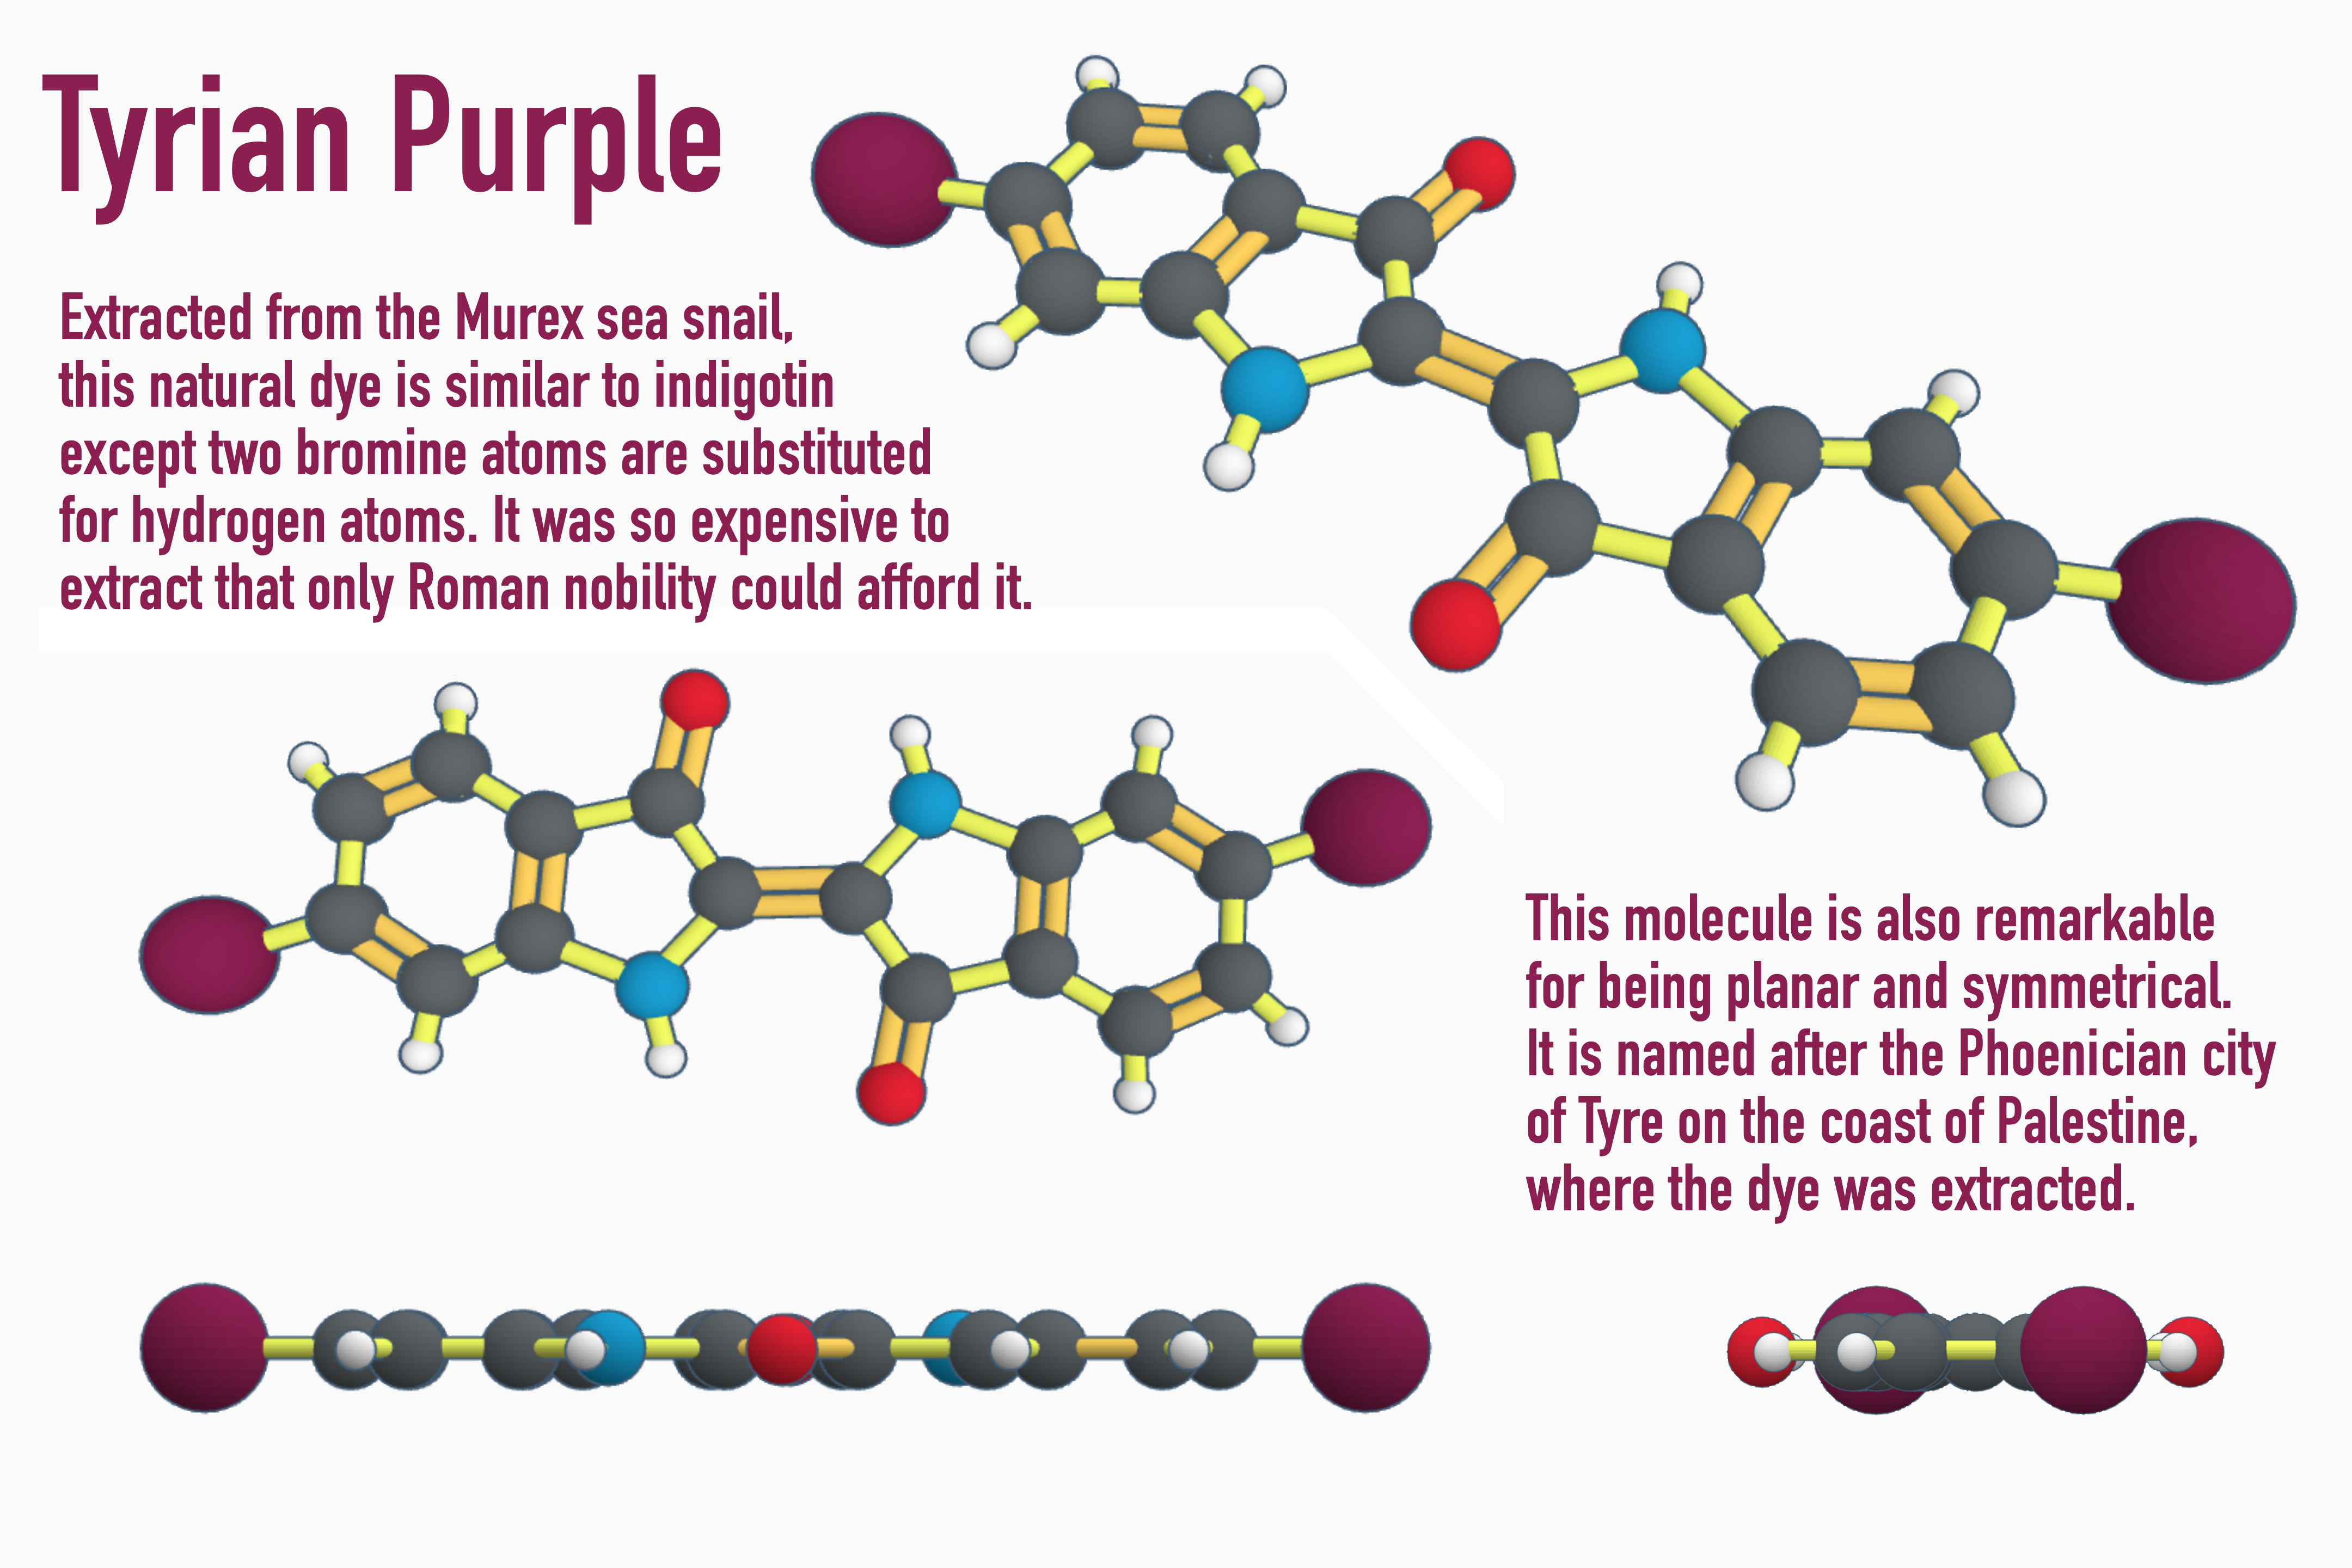
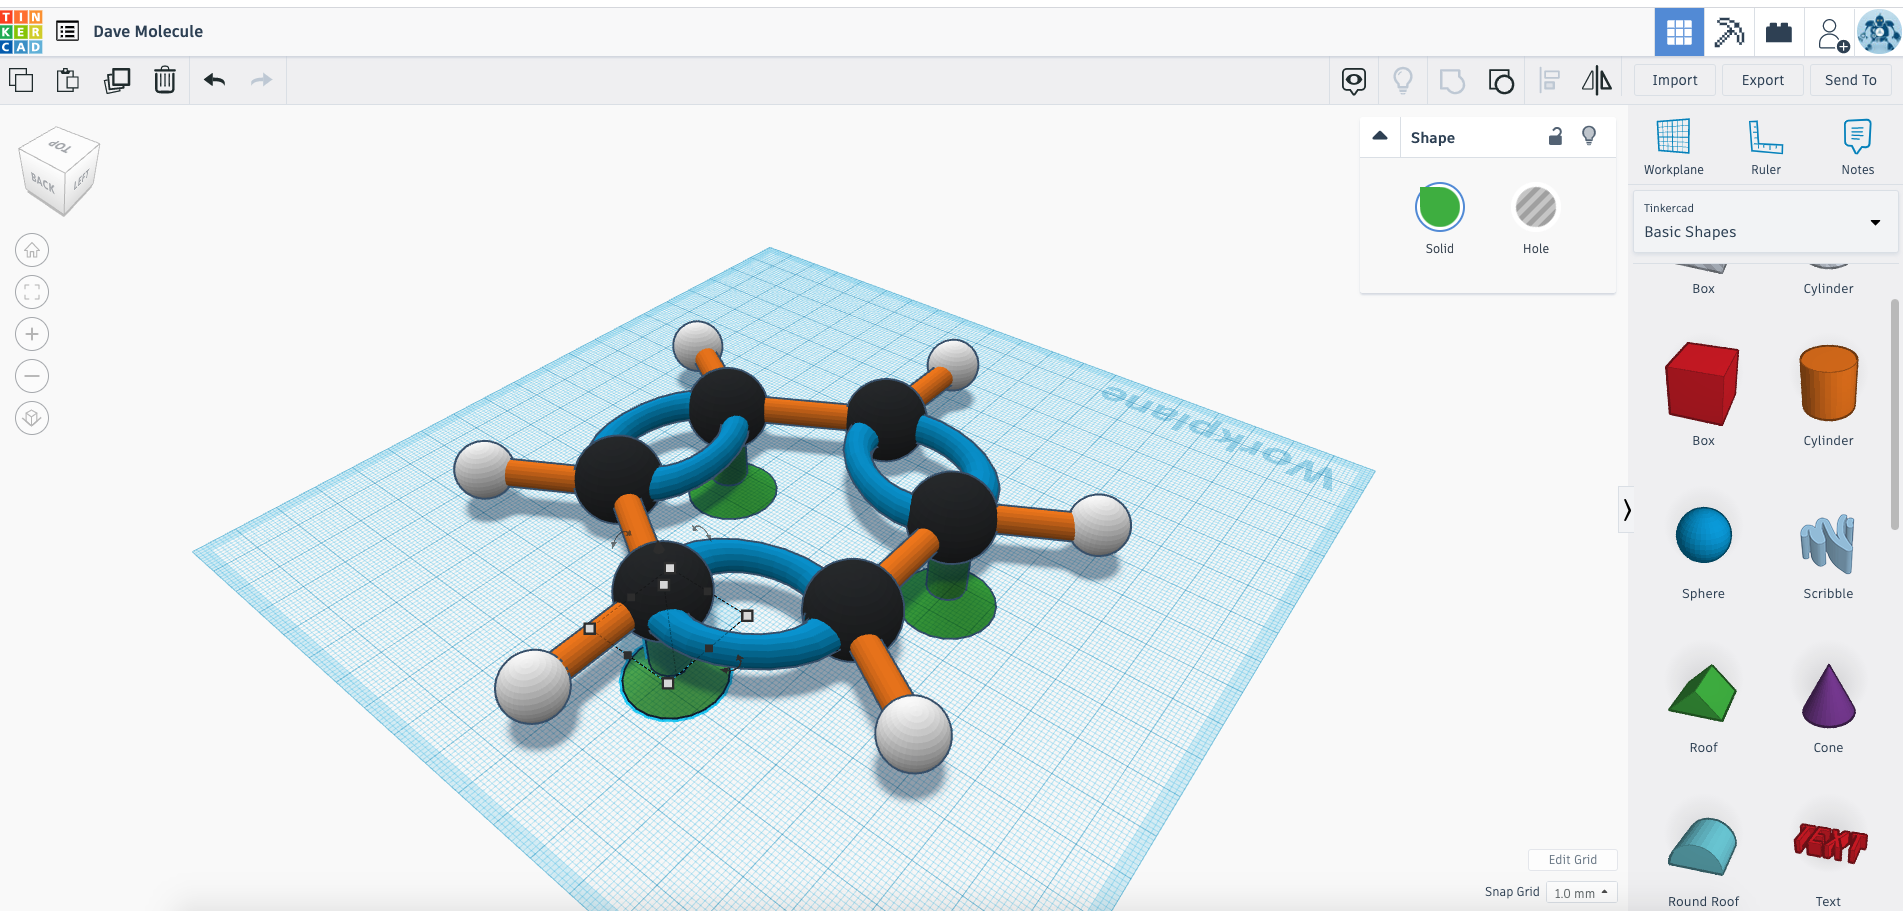
Students in a chemistry class can pick a favorite molecule (such as Tyrian purple) and create a 3D model in Tinkercad, then capture different angles to use in an illustration or poster inside Photopea or Canva. Or they could build a model of a space probe or a virus using Tinkercad or SculptGL.
Because some students will try to get away with doing the least amount of effort (which, of course, leads to the least amount of learning), it is necessary to build in structure and scaffolding with tight rubrics for what is expected. That is why I use peer critique and revision as an important component of this process. The students’ peers act as an audience for the projects, which must be presented as part of “gold standard” PjBL. Students provide feedback through a Google form on five aspects of project quality: Does the project show deep mastery of content? Does it demonstrate creativity? Is there evidence of high student effort and professionalism? Do they show competency with using the software? Are they able to effectively teach their topic/concept to their peers? Students use the forms to rate their peers using suggestions that are kind, specific, and useful (Berger, 2018) and if teams do not get the rating they desire, they are allowed to revise their project and re-present it to me for a better final score.
All of this is to explain to you how to implement these choices, projects, and videos in your own STEM classes. I am hoping to gather data by the end of the school year so that I can analyze the results and draw conclusions by the end of August and have my dissertation defense by October 2023. I hope that you can review the website and try out the projects and videos with your own students. Let me know if you would like to participate and I’ll have you sign the consent form (this is a requirement of my university’s IRB) and send you the assessment survey link, then you can report on how it goes, make suggestions, and send some student examples. If the students want recognition by name, they will need to sign consent forms along with their parents.
The benefits to your students is that they will learn the content of your class more thoroughly and deeply and learn valuable and marketable media design skills. It will be much more engaging and fun for them to create their own STEM media projects than it is to read a textbook and answer questions at the end of the chapter. Hopefully, they will be motivated by the project to learn the concepts on their own. They will be recognized for their creativity.
As a final project, students can prepare mini-lessons, presentations, activities, and handouts for a STEAM Showcase night at the end of the school year. Here, students are demonstrating how to make soap for their siblings and parents.
The benefits for you as a teacher will be to see alternatives for project-based learning, with flipped video instruction already provided so that you don’t have to build it all yourself. You choose the topics the student teams can choose from, provide them with examples and scaffolding for the content, and allow them to create something useful that you could show to future groups of students. You’ll also get to participate in advancing methods for teaching STEM courses. At the end, once the dissertation is successfully defended and edited, I will send you the final version which could be helpful to enhance your own teaching. While you are at it, try out the videos yourself and increase your own media design skills. I find them to be very useful as a teacher. One final benefit to you is the future possibility of grant money; I hope to extend this project beyond the dissertation and apply for grants with the NSF and others, which you would be the first in line to be part of. Those teachers who participate now will be the first I will consider for the grants. I wish that I could offer a stipend for your participation now, but that will come eventually.
Once again, the website is: https://science-creativity.com (remember that everything on the site is entirely free. You have my permission to use any idea or document posted there). I can be contacted at: elementsunearthed@gmail.com or by adding a comment to this post. I hope you choose to participate – it will be well worth the effort.
Thank you for reading this and for considering my invitation.
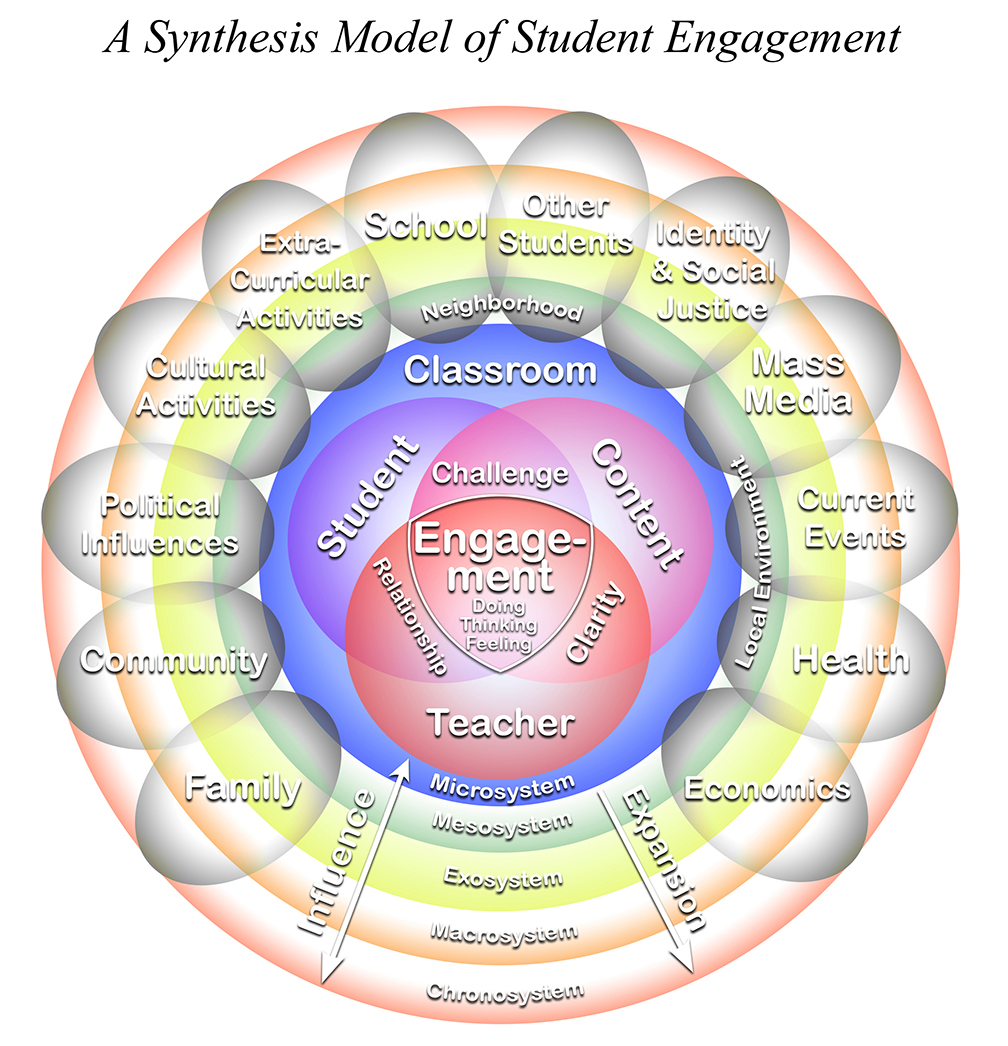
A synthesis model of student engagement incorporating the models of Bronfrenbrenner, Groccia, and Fisher et al.
Over the past year as my doctoral coursework has concluded, I have been working toward the dissertation research. Before I tell you more about where my research is heading, it is time for a progress report. Please read through this to the end, as I have a request to make of you that could be very beneficial for your students. I would like your help to try out my new website in your STEM classes.
In my last post I described taking my written and oral comprehensive exams. I would like to discuss one of my responses in further detail. In this essay, I looked at theories of student engagement and created a synthesis model that incorporates Bronfenbrenner’s Ecological Systems Theory (1986) with a three-fold engagement theory by Fisher, Frey, Quaglia, Smith, and Lande (2018) and Groccia’s (2018) model of social influences.
The synthesis model, shown here, places the classroom as a microcosm at the center of multiple spheres of influence, including the school, the community, the larger society, and across time. All of these spheres exert an inward influence on the classroom and affect how well students engage in classroom activities. For example, the exosystem of state requirements and standards determines what a teacher is supposed to focus on in a particular subject, thereby influencing what students are allowed to learn. Inside the classroom itself engagement is mediated by the three factors of the Fisher et al. model, which are the student, the teacher, and the content with engagement occurring at the intersection of all three. Groccia’s model was specifically for college students, represented by overlapping zones of influence such as other students, the community, the faculty, the research/subject, and so on. In high school, I found there are at least twelve factors that are usually seen as being outside of the classroom but which influence the classroom and a student’s ability to engage. These include family, friends, social media, jobs, after-school activities such as sports and clubs, identity and social justice needs, current events, politics, physical and mental health, other students, and so on. These are not just distractions for students; they can actively influence what happens and what is taught in a classroom.
My insight was that just as these spheres and factors influence the student’s ability to engage, at the same time, the students in a classroom, as part of these systems, have an ability (A right? An imperative?) to influence the larger society. The influence goes both ways. That high school students can change the world even as individuals can be seen by the examples of such students as Greta Thunberg, Malala Yousafzai, and William Kamkwamba. In educational theory, we call this social reconstructionism. At some point, once the doctorate is done, I intend to write a series of books that include these ideas and how high school classrooms and students must re-image themselves as agents of change in the world.
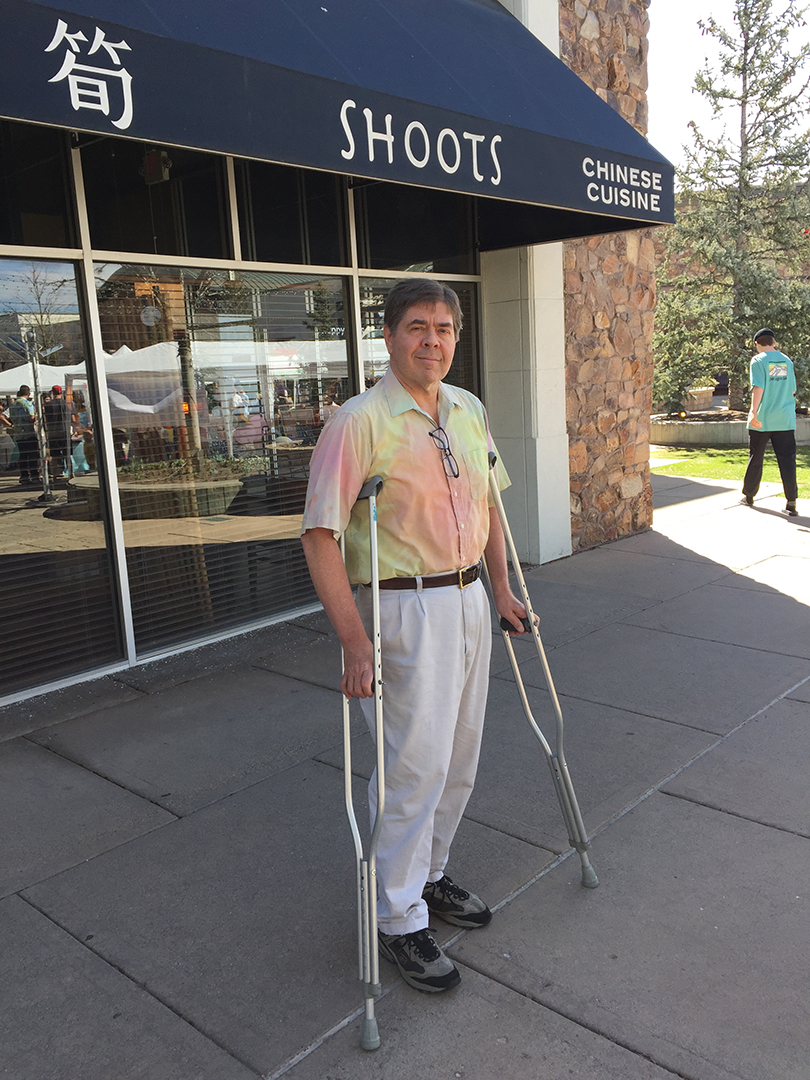
On crutches during March 2022. My knee is doing much better now after some extensive physical therapy.
It is now February 2023 and I finally have my research questions in place and approved by Dr. Matt Farber, my committee chairperson. I have a rough draft of the first three chapters, which are considered as the proposal, but with better research questions these sections need major revisions, which I am hoping to complete within the next two weeks (before the end of February). I will have only three months after that to get approval from the full committee and from the Institutional Review Board and to complete my primary research data collection. Then this summer will be dedicated entirely to analyzing results and drawing conclusions, which will become Chapters 4 and 5. My target for final submission is still the end of August this year with dissertation defense sometime in October. It will be tight. In the meantime I am looking for a permanent professorial job.
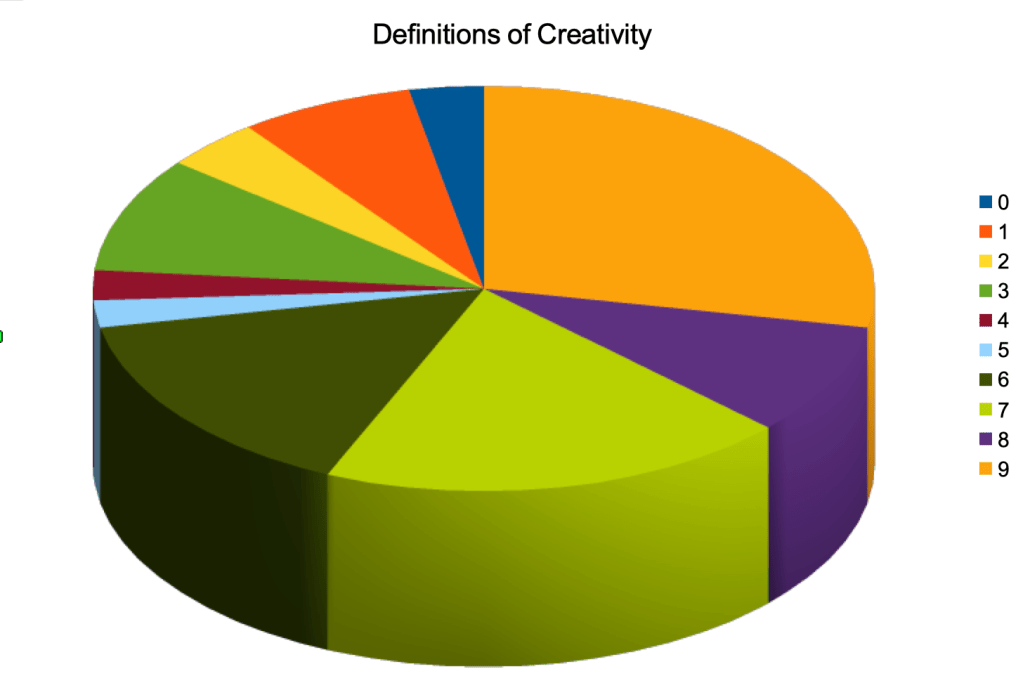
By the middle of last summer it was apparent that the proposal writing process was harder than I anticipated and required setting aside enough time each day for thinking and pondering about what I was reading in order to achieve any kind of insight. In fact, one of my major areas of research is into the process of gaining insight as one definition of creativity. Altogether, I have identified at least ten different definitions of creativity based on approaches in the literature, ranging from the ancient Greek concept of the daimon through to modern multi-factor, multi-level theories such as Kaufman and Beghetto’s 4-C model. I will write a post soon about those, once I have completed the Chapter 2 literature review revisions.
To give myself the time I needed while also providing a new platform through which to conduct part of my research, I left New Haven School in mid-July, attended the second year of the Teacher Innovator Institute at the National Air and Space Museum for two weeks, then found a part-time teaching position at a private school near my home. Because I need to keep the school’s identity private as part of the requirements for my dissertation, I will not provide its actual name here but will call it Westview School. I am mentoring the science teachers at the school to train them on project-based learning strategies, hands-on activities, and student-centered teaching pedagogies. The school has been moving into a high school program, building the grades upward and installing a new science lab, which I helped to design and which is almost complete, so I have ordered supplies, equipment, and chemicals.
A screen capture from one of the videos I edited this fall. I have now built a website with links to all the videos and to project descriptions and examples at: https://science-creativity.com.
Meanwhile I am writing and writing. But since part of my research is how STEM teachers can teach concepts through student-created digital media projects, part of what I have to investigate is how to best teach the media design software. We can’t assume that our students already know how to do video production or computer programming or 3D animation just because they are digital natives, and most STEM teachers have neither the time nor inclination to learn it themselves and develop lesson plans for teaching it, given all the standards they already have to meet. The alternative is to provide online training for students through flipped video instruction. That has been a major part of what I am working on over the last seven months. I used TII grant money to purchase a new cell phone with a better camara and equipment (lights, a good microphone with plosives filter, etc.) and took it with me (it all fits into a small suitcase, which was why I bought it) to TII to start recording the videos during the evenings.
I have continued to record and edit these videos on how to use browser-based free software for digital media creation. I provided a link to the overview video in my last post, but altogether I will have 16 videos completed this weekend. More importantly, I have created a new website at: https://science-creativity.com to provide links to all of the YouTube videos and to write blogs specifically on my dissertation topics. It is still a work in progress, but I did complete a major portion of it this week which was to create a kind of choice board with descriptions and examples of different types of projects that students can choose for each category of software. Through their digital media creations, students will demonstrate their mastery of STEM concepts, their creativity and quality, and their ability to teach other students. I will explain this website more next time; it has been and continues to be a major focus and needs to be up and running by the time my research proposal is approved. I hope that it can be a major resource for STEM teaching and student-centered learning.
Banner image for my new website. It shows a collage of student projects.
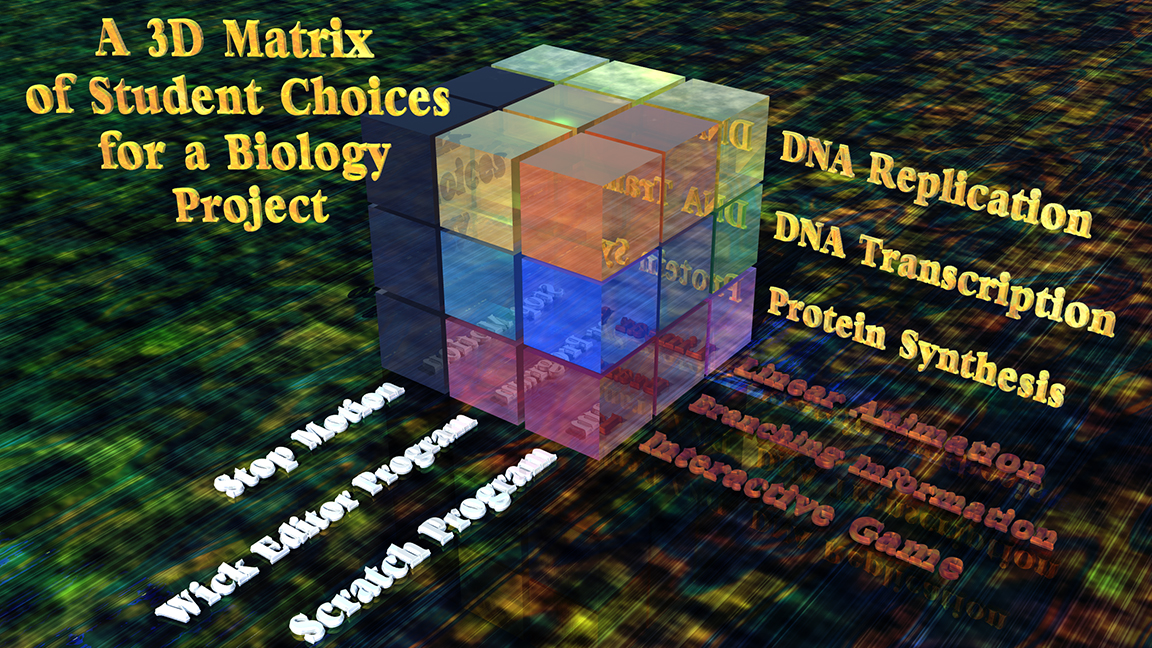
In-Class Projects: This second semester my focus is on three major student projects which will provide data for my dissertation. The first is their next in-class only project, and I am using different levels of choice and structure for the three classes to provide comparison and research data. The biology students will be creating an animation on one of three topics: DNA replication, DNA transcription and translation, and protein synthesis. They have three choices for software usage: do a stop-motion animation with video software to compile the images; use MIT Scratch to program a linear animation or game; or use Wick Editor, which is a linear animation program similar to an older version of Adobe Flash. I am finishing up the second Scratch video today and will get it posted to YouTube and my website tomorrow. Their third dimension of choice is the type of project they choose to do – it can be a linear animation, a branching information program, or a game or quiz. Altogether, since you cannot do a branching program or game using stop-motion animation (which has to be linear), there are 21 possible choices for each group. The entire project has fairly high structure and limited choice, which is needed for this group of students.
For the chemistry class, they are creating a project on chemical reactions. They have four topics: balancing reactions, the five different types of reactions, stoichiometry, and limiting reactants/percentage yield. They can choose any category of software and any type of project, giving them something like 160 possible choices, allowing high choice with moderate structure. At the end, they must have some type of media-enabled product they can use to teach the other students and demonstrate their mastery of chemical reactions. A PDF version of their choice board with short descriptions of each type of project is provided below.
For physics the students are finishing up classical mechanics with a complex machine project. Here the possible projects can be a Rube Goldberg device using all six types of simple machines, eight steps, and as many consecutive repetitions as possible (the record last year at New Haven was 25 times). Or they can choose to do a cardboard marble run with six types of machines and a method to get the marbles back to the top without touching them, looking for at least 25 cycles. Or they can create a perpetual motion machine that has to go through 25 rotations without any extra energy added. We are now in the design phase after I showed them great examples, such the Rube Goldberg device music video created by OK Go for their song “This Too Shall Pass” or Mark Rober’s squirrel mazes or the Wintergarten marble run music box machine. The students must show a 3D diagram of the device and create an animation of how the objects will work. I am encouraging them to use Wick Editor, Scratch, or Stop Motion but they are independent enough that they are probably going to use dedicated iPad animation and drawing software such as Procreate instead. Although I would like them to test my recent videos, I want this project to have moderate choice and low to moderate structure so I will not force it as much as I will for the biology class animations.
At the end of each of these in-class projects, the students will use the critique process I have trained them on last semester to evaluate each others’ projects. They will also complete a reflection assignment, which we haven’t done much of yet but is essential for project-based learning to be effective.
A 3D matrix showing the three dimensions of choice students have for their DNA animation project. They have three choices of topic, three choices of software, and three choices of project type. Since stop-motion animation must be linear, this means the biology students have a total of 21 possible choices.
STEAM Showcase projects: The next project will be the same for all classes: it is the STEAM Showcase, which I am resurrecting here at Westview School. They have already begun to choose topics and I have talked with our elementary and middle teachers to know what topics they will be teaching at the end of March. Student teams of 2-3 people are choosing a topic, writing a script/outline, creating a presentation, practicing an activity or demonstration, and designing a handout. This will require using several different types of online software. They will first present their projects to their peers in class at the start of March and receive feedback from them, then make revisions. At the end of March they will visit the K-8 classes and present their topics and receive feedback from the teachers. The purpose of this is to provide them with a real audience, plus if they can explain science concepts to kindergarteners, they really them them down. The bonus is that this will get the K-8 students excited and begin drumming up some positive PR.
On April 27 we will hold the final showcase. We will take over 4-5 rooms and run simultaneous sessions of 20 minutes each just as I have done before. We will video and photograph all of this and I will write about it here and compile a YouTube video. After that showcase night, students will complete a reflection assignment and survey to provide me with research data and to cement their learning.
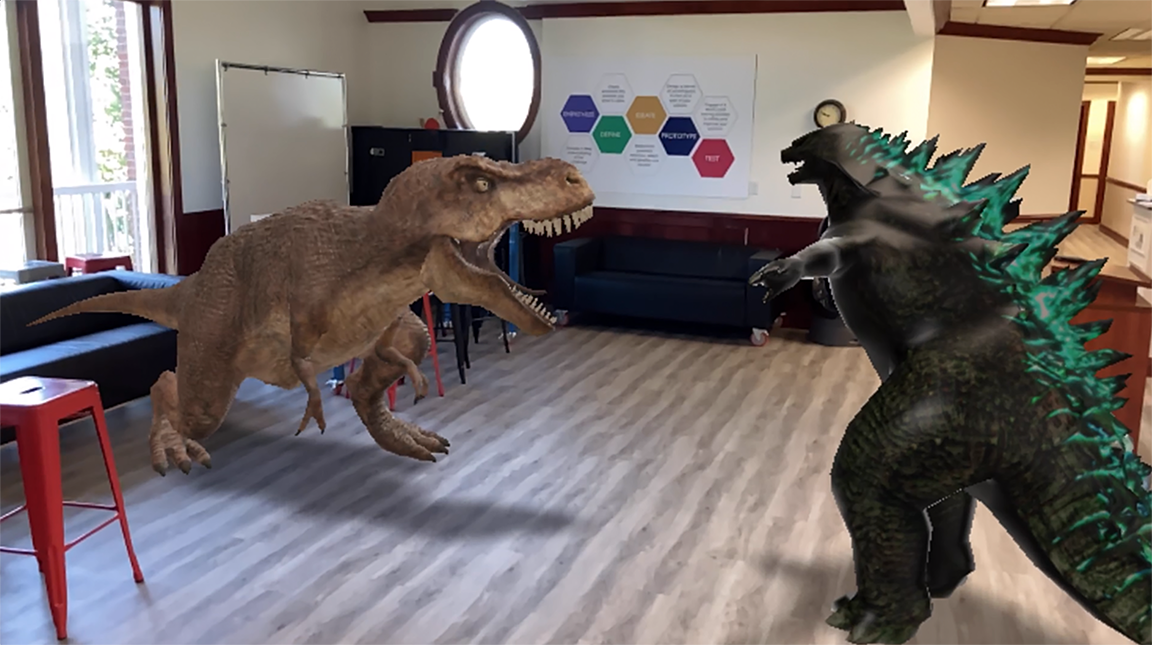
To test Adobe Aero for Augmented Reality, I placed T-Rex and Godzilla in the common room at Westview School. The five steps of the Stanford Innovation Lab projects are on the poster behind them: Empathize, Define, Ideate, Prototype, and Test. Students are moving into the Define stage now.
Stanford Innovation Lab project: The final big project is happening in what we call the Stanford Innovation Lab class. All high school students take this class, which is for two hours each Friday. It is basically an engineering design class focused on human-centered design, based on classes taught at Stanford University. Teams of students are working with different organizations locally to identify problems, design prototypes, and propose solutions. Westview School is private and focuses on entrepreneurship and innovation (a good match for my dissertation) and this is all about learning through collaborative problem-solving. Each team’s situation is unique, but as they get further into the design phase (they are in the problem-finding and ideation phases now) they will need to use more design principles and software. They are working toward a final presentation day in May when all the participating businesses/groups will bring representatives and judge which team has the winning proposal, and the winning team members will receive cash prizes.
To provide structure (and an additional research source), I created a choice board/checklist of each step in the process with requirements that the teams complete so many (say five of eight) possible tasks for each step. Some of them are required, others they can choose, so that there is a good combination of structure and choice involved. As soon as we introduced this choice board last week, the teams started making measurable progress. I will videotape the final presentations and photograph the teams as they progress, collecting periodic surveys as data points for my dissertation.
All of these projects, put together, should be enough to gather both quantitative and qualitative data sufficient for my research requirements. It will be a mixed-methods study, and should provide some important insights in how to combine student-created digital media projects, choice boards, critique and revision, and STEM education.
There is a major weakness here, of course, which is that this is just one private school and it is highly unique, just as New Haven was, so whatever conclusions I draw from this research will not be very generalizable to a larger population of public schools. This is another reason for the website: to create a resource for other teachers, then recruit them to try it out in their own classes, fill out surveys, and add to the data of how well this program will work in other schools and without my direct instruction/involvement. I call this Phase 3 of the larger project, which will ultimately go beyond my doctoral dissertation and become part of what I do as an Ed.D. and what my future books and papers will discuss. I will be presenting at two different conferences in March on the subject of my dissertation and hope to recruit some teachers there. I will send out emails to the TII teachers to ask for volunteers, and I will scour all the contacts and teachers I know in Utah to help out. I hope for 8-10 teachers to participate, but even more would be great.
If you are a STEM teacher interested in project-based learning and teaching creativity in your classroom, you would be an ideal person to help out. I know this because you are still reading this post! What this would entail is looking over the https://science-creativity.com website, including the training videos and project ideas, then setting up a similar project to the ones I have described above. Give your students three dimensions of choice: Choice of specific topic, choice of software, and choice of approach or project types. Use the choice document I posted above, and have your students look through the website – it may need to be unblocked – and make their choice of software and project, then plan it out. I am also posting a PDF of my biology DNA animation project presentation and my chemistry reactions project here so you can see the level of structure and requirements for each. Then provide your students with the scaffolding, structure, and support they need while allowing them the freedom to choose and to create. At the end, I will provide a survey for you to complete as the teacher and a consent form and ask that you share some of your students’ projects with me.
I realize this is quite a bit to ask so late in the school year, but if you are planning a project-based learning experience anyway this could be a great way to increase student engagement, content mastery, creativity, quality, and choice. I hope that you will try this out, or at least provide some feedback on how to make the new site more useful.
Thank you for reading this. I hope to hear from you! My contact information is: David Black, elementsunearthed@gmail.com.
Here is the PDF file with project descriptions organized by software category. Altogether it has about 40 different types of projects, and combined with choices of topics, the permutations can be in the hundreds, providing students with a high level of choice within structure. It isn’t an exhaustive list, students can certainly think of other ways to use media design software to demonstrate their mastery of STEM concepts. For those students who have difficulty coming up with project ideas, this should help.
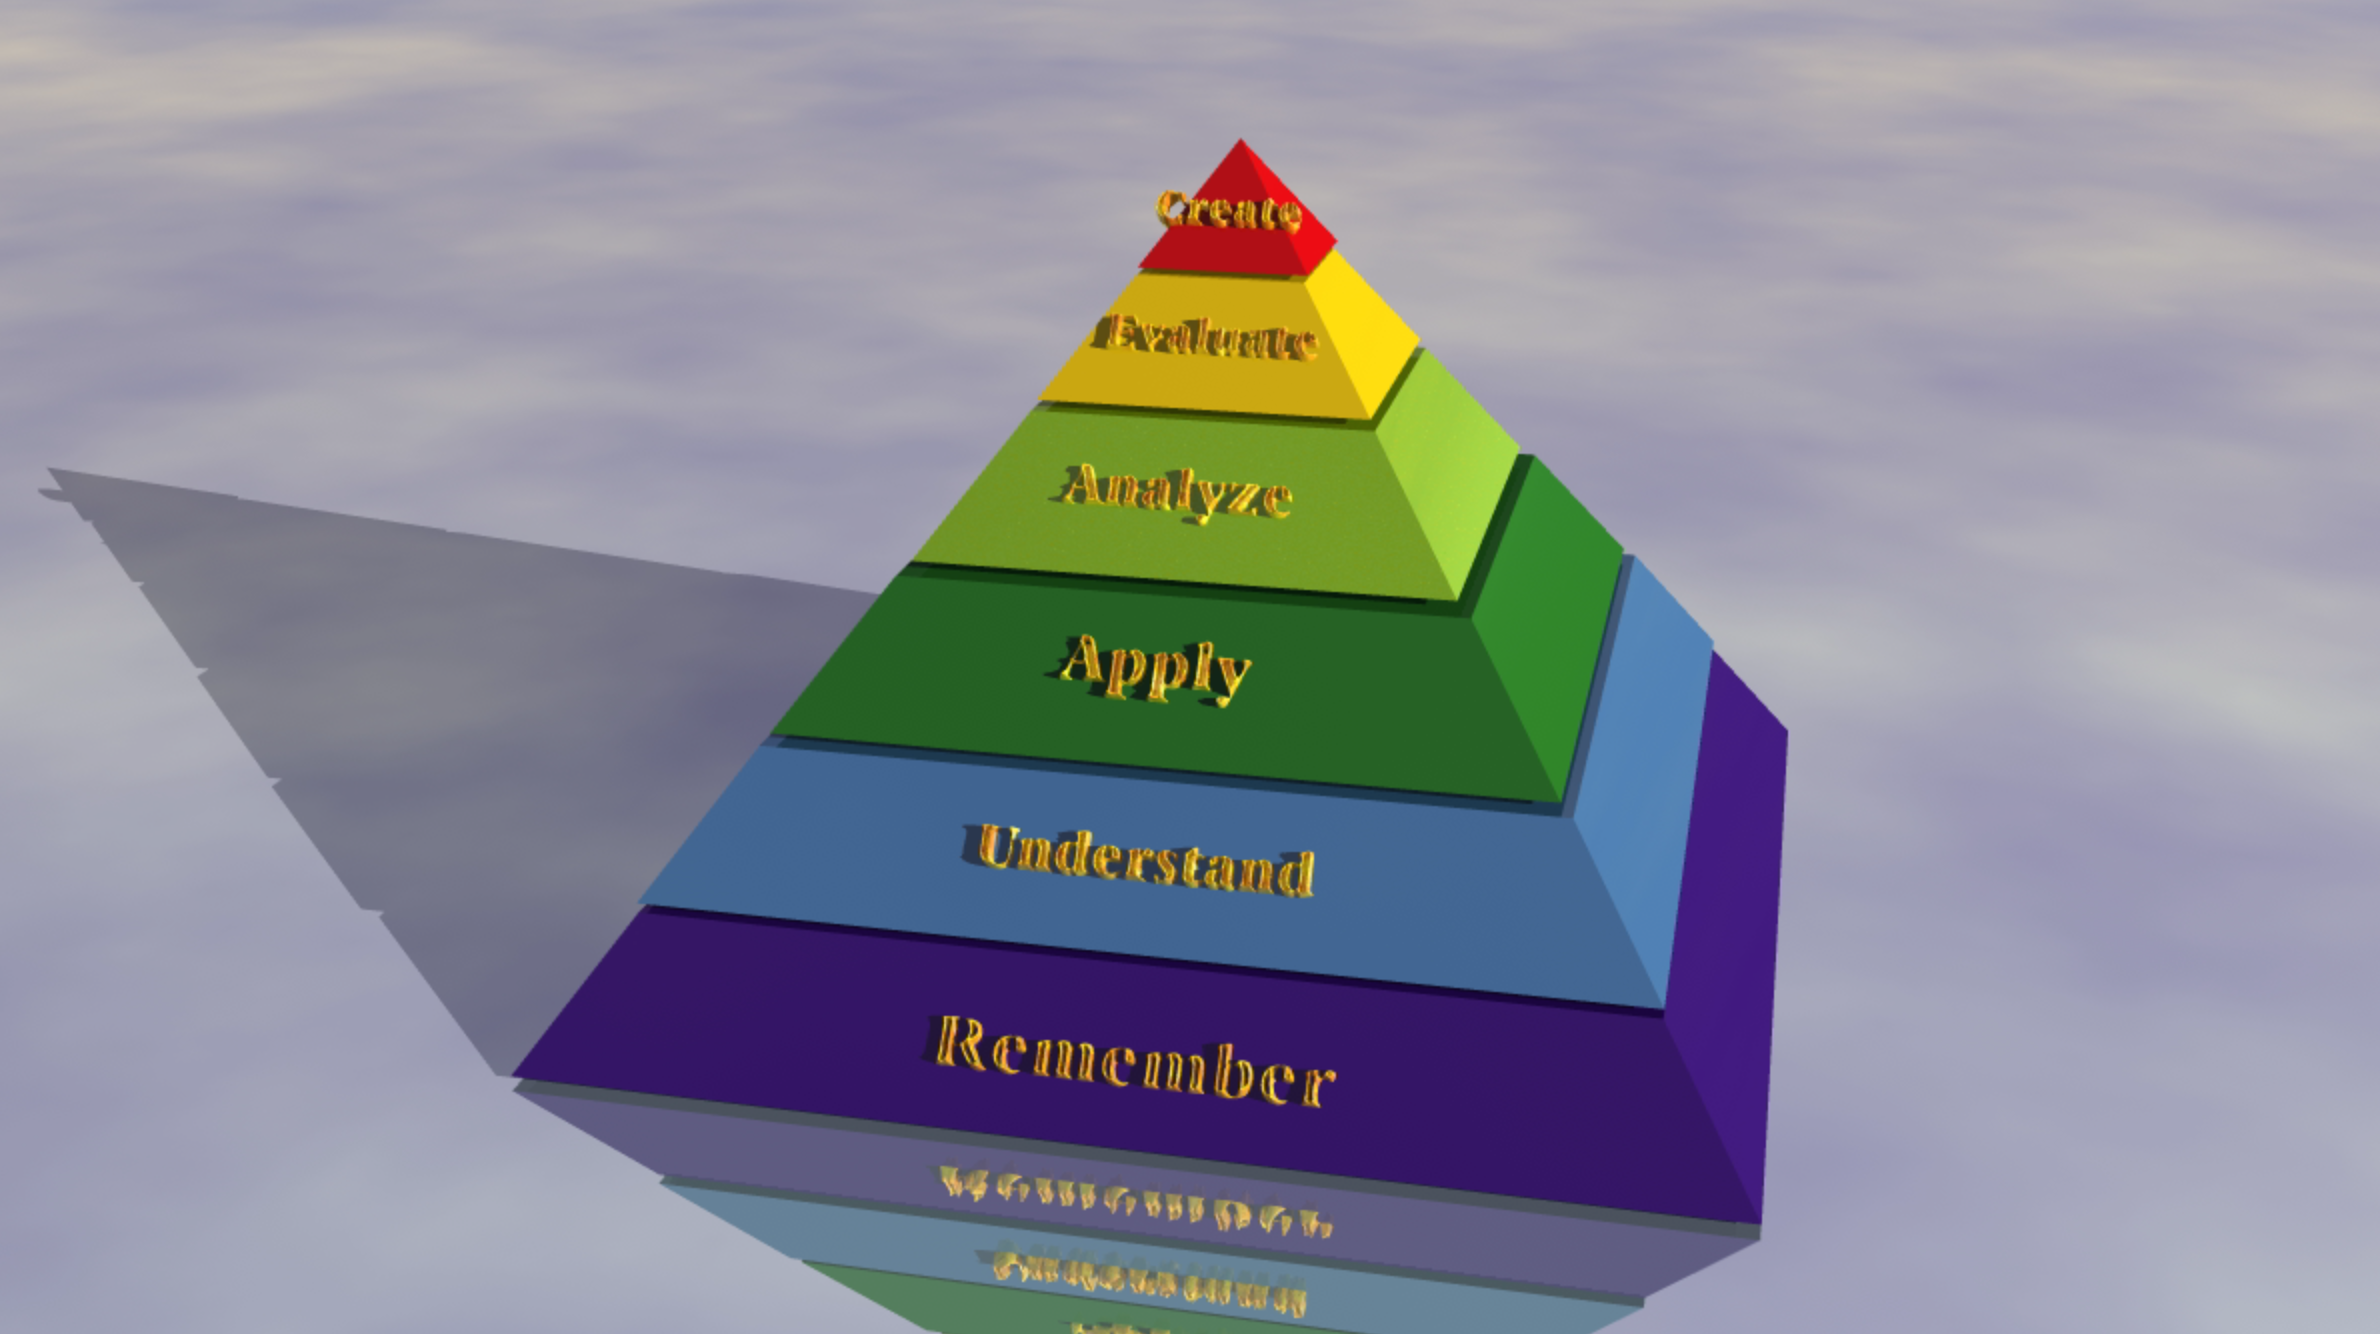
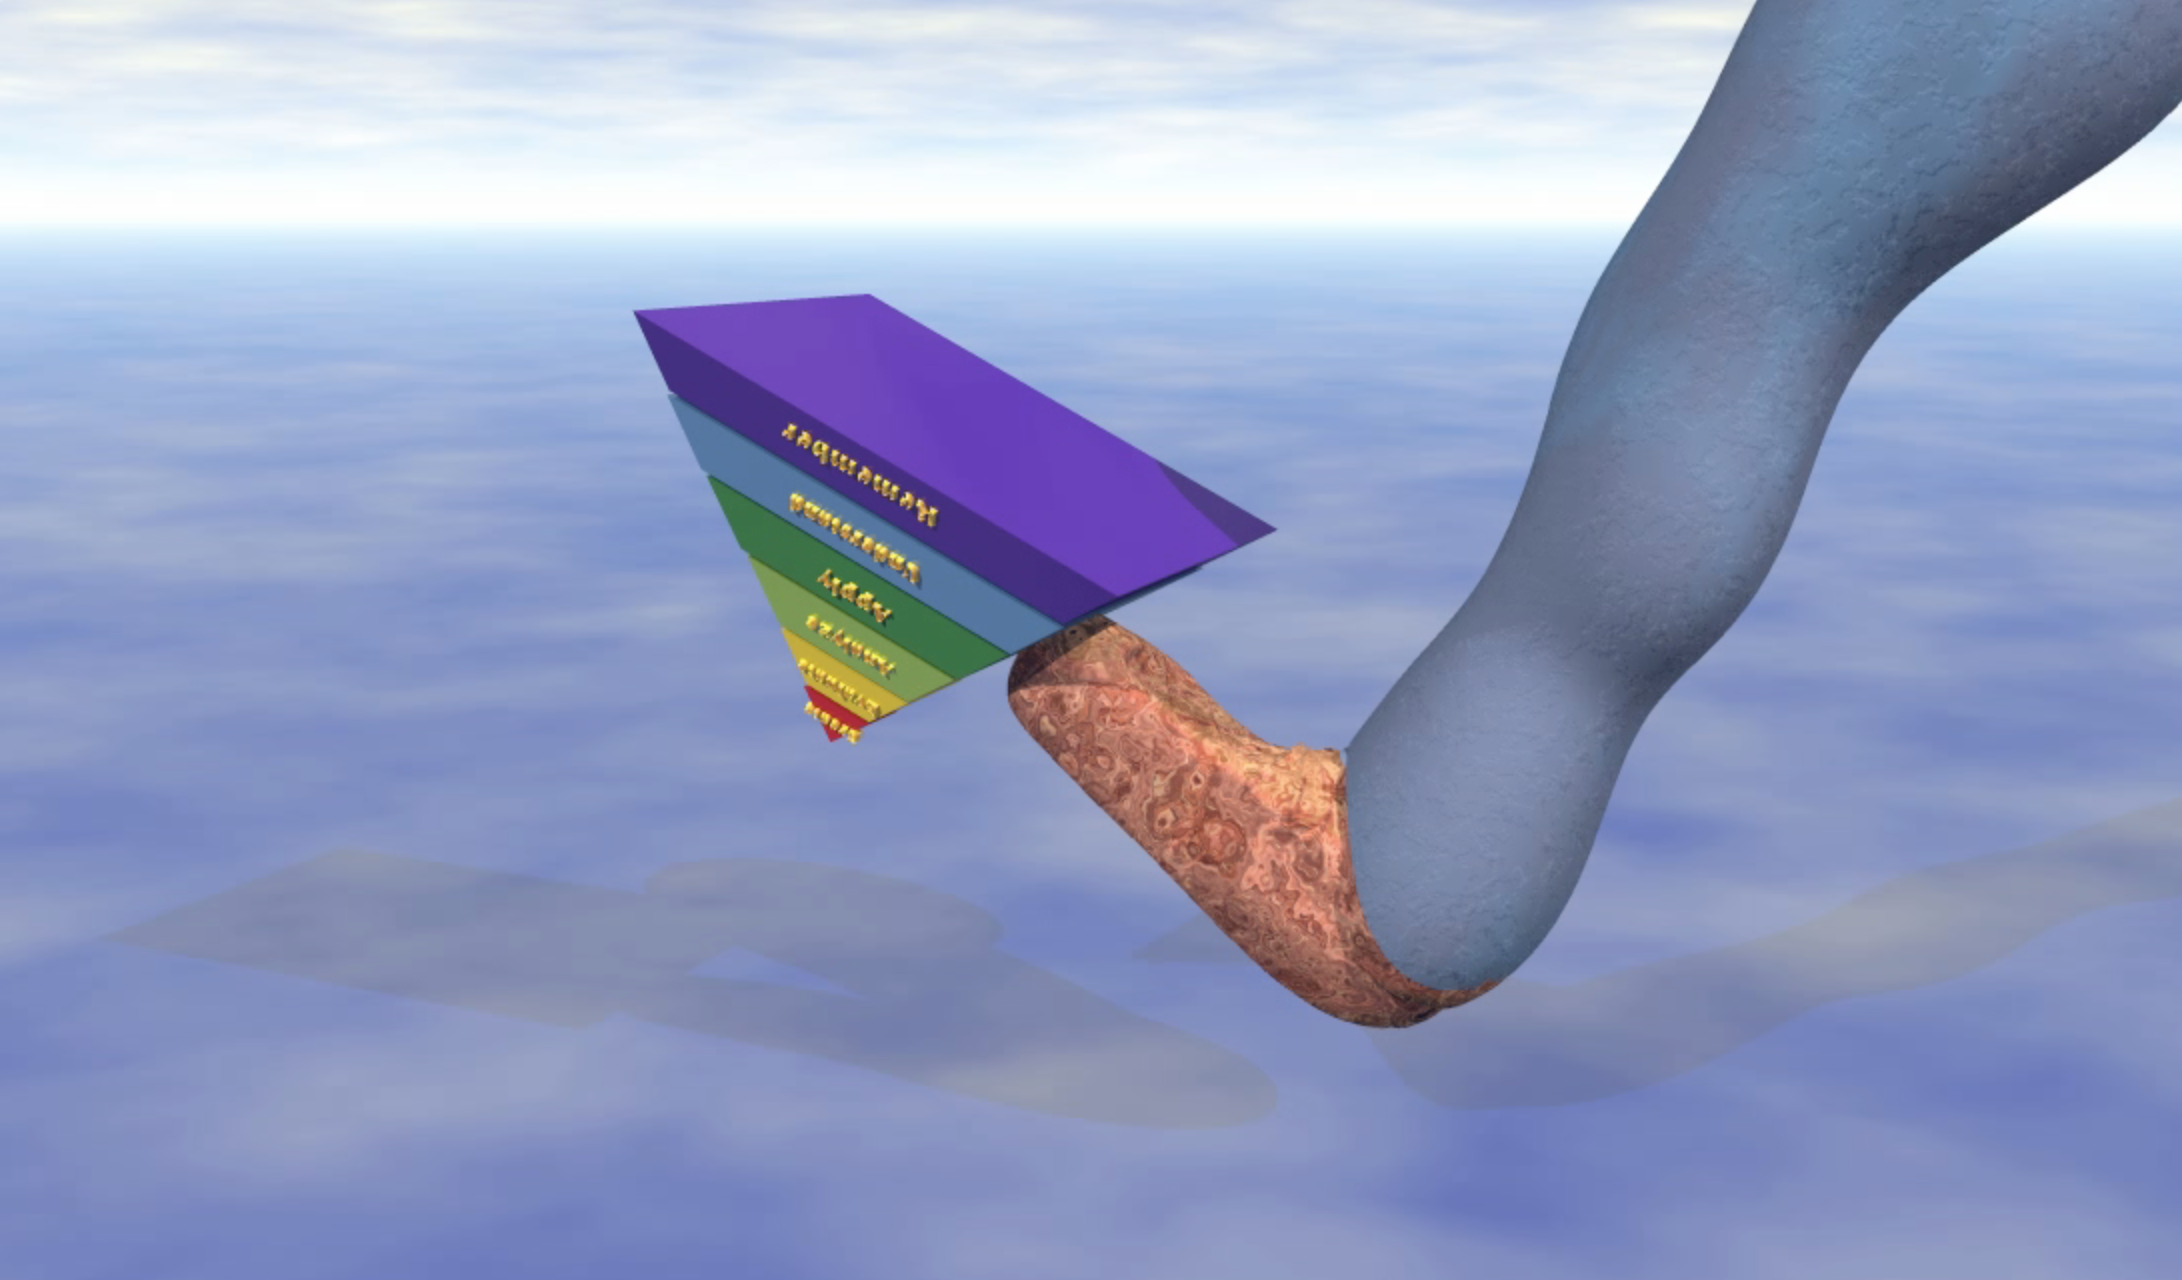
A 3D version of Benjamin Blooms taxonomy of thinking skills, starting with remembering facts at the bottom and building up through understanding, applying, analyzing, evaluating, and finally reaching creating. Most teachers spend so much time on the basic facts that they never get to the creating level, which is the most motivational and engaging level of the hierarchy.
Since my last post nine months ago I have made considerable progress toward my doctoral dissertation proposal, although not as much as I had planned. I made it through my written and oral comprehensive exams with flying colors, although I ran into a snag during the written exam time frame. I had my right knee replaced on Jan. 28 and was only three weeks post operation when the exam started. On the Monday of President’s Day (Feb. 18) I was walking into school with my cane and my wife helping (she had to drive me to school since it was my right leg). It was snowing lightly. I hit a slippery spot on the sidewalk and fell backward onto my right leg, badly tearing the muscles in my thigh as the leg hyperextended, and also causing a small fracture next to the implant on my femur. I was on crutches for two months and in a lot of pain during the exam period, but I still managed to do well. By June I was more or less back on my feet with a lot of physical therapy and even attended a Deeper Learning conference in St. Paul, MN. More on this later.
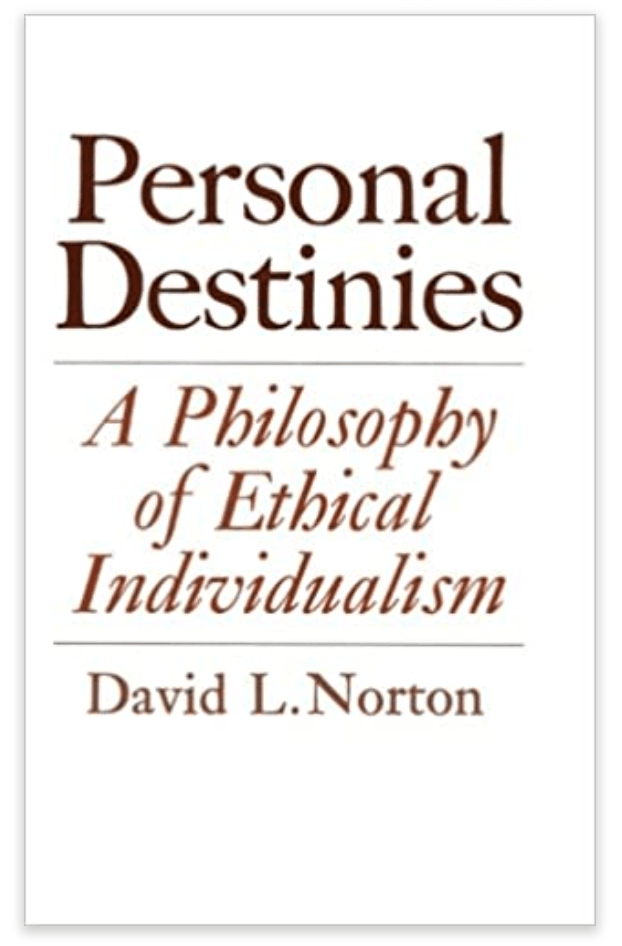
Apollo and the Muses, who communicate with one’s inner voice or Daimon to bring out one’s personal excellence, or Arete. David Norton’s 1976 book “Personal Destinies” outlines the Greek concept of the Daimon. As teachers, we should be helping students find their own excellences, then actualize them.
I was hoping to have my proposal done by end of June and fully approved by now, but some uncertainty about my future has delayed my work, especially the methodology section. I was teaching at New Haven School for 4.5 years and came to the realization that as long as I was teaching full time (and more, since I also taught summers) I would not get much done. I needed to free up time that I could dedicate to the work, so I started looking for another job or jobs. The position for Secondary State Science Specialist came open and I applied, but was not selected. Then a part-time teaching and consulting position opened up at a private school called Ivy Hall Academy which is less than two miles away from my house, greatly cutting down on my commute time and allowing me time in the mornings to write when I am most creative. I will tell you more about this position and how it change my planned methodology in another post soon, but for now I want to report on my progress.
This is me by the science lab building at Tioga High School where I first started teaching and where I developed my first successful project-based learning activity.
As soon as the summer term was completed at New Haven, which went well, I took off for Washington, DC literally the next day for the Teacher Innovator Institute at the National Air and Space Museum. We finally got to have our second in-person workshop after two years of COVID delays. I used the last of my NASM grant to purchase some video vodcasting equipment including a new microphone and a new cell phone and add-ons so that my video studio has shrunk immensely – I took it all with me and recorded several videos while in Washington, DC.
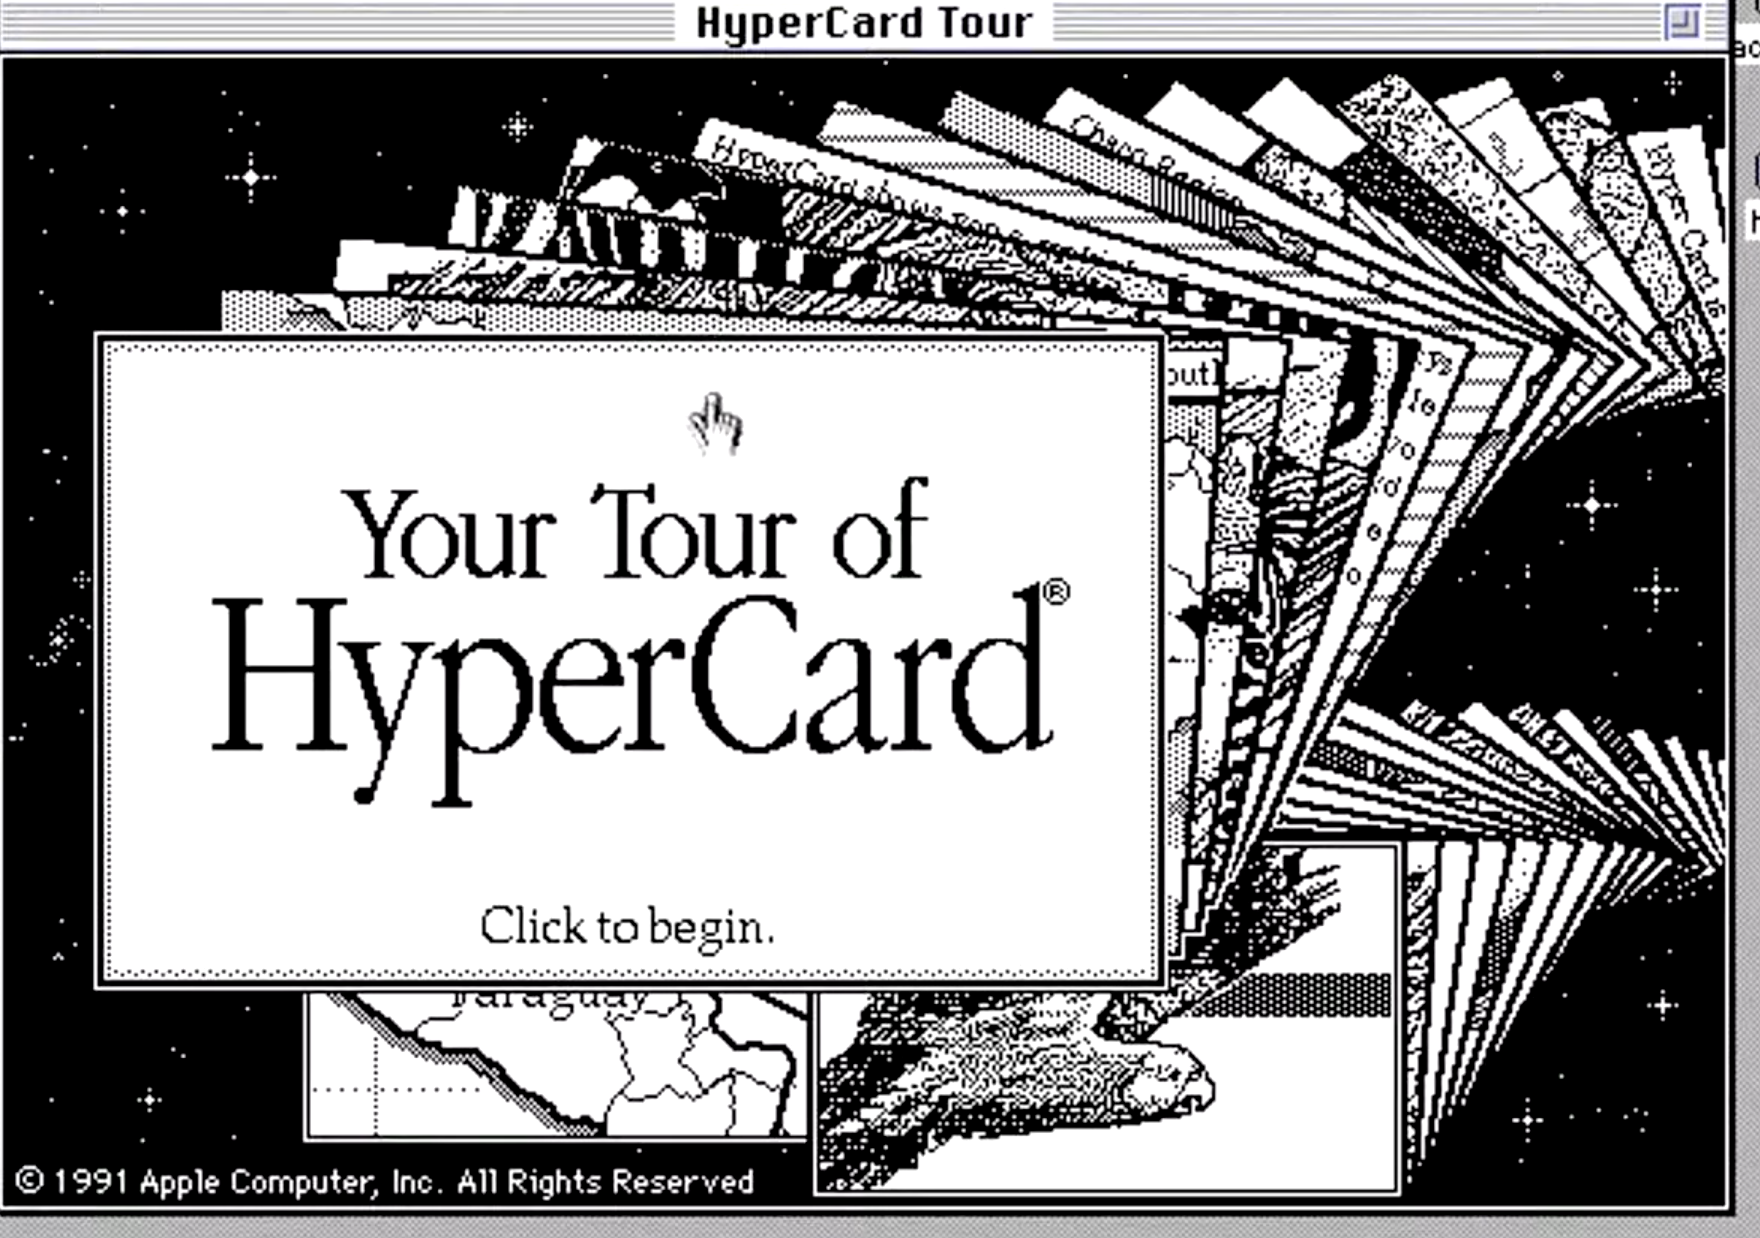
A screenshot of the HyperCard learning tour, made with HyperCard. This looks primitive compared with the sophisticated software we have now, but it was the first program to allow interactive programming with a Graphical User Interface. My students used this to create their organic molecule project.
These videos have two purposes: first, to teach browser-based software to students in a flipped video learning model so that they can use the software for self-expression, creativity, and content mastery for their science content projects without requiring the teachers to have to learn it or teach it. The second purpose is to explain the theoretical, conceptual, and pedagogical frameworks of my dissertation so that teachers can have the information they need to try out student-generated media design projects for content learning in science.
The first of these videos, an overview, is completed and posted to my YouTube channel here:
I have also completed and posted four videos on how to use Photopea, a browser-based image editing program that is very similar to Adobe Photoshop from several versions ago. The videos teach the basics of using Photopea’s tools to color a line-art image, to use the type tool, to use selection tools and layer masks to isolate an image, and how to undistort an image taken from an angle. I’ve also almost completed a first video on using Wick Editor, a vector-based animation program similar to an older version of Adobe Flash (now Animate).
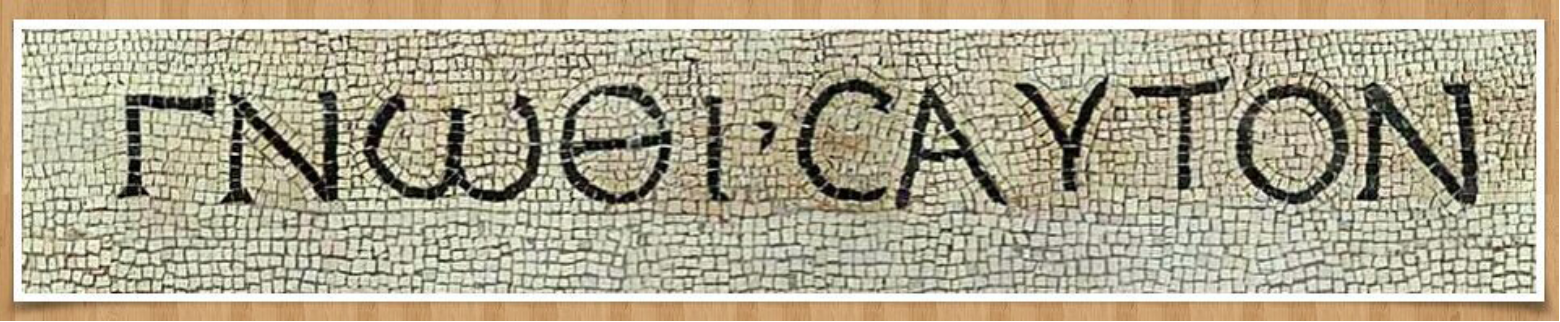
“Gnothi seauton” or “Know theyself,” the great Greek moral imperative taught by Socrates. It is part of my conceptual framework for this dissertation to help students explore science using digital media creation as a way of knowing themselves, then becoming their best destinies by actualizing personal excellences.
I hadn’t known about either of these programs prior to summer starting, but I presented a workshop on using browser-based tools and the participants taught me about them, so I wound up learning more from them than they probably learned from me. These two software packages fill in gaps in my suite of browser-based programs. I have also filled in the final gap by seeing how I can create animation using Clara.io. Although still a long ways from proficient, I am getting there.
Let’s kick out Bloom’s taxonomy and start with creativity instead of facts. With a creative project motivating them, students will dig down to find the facts, applications, understandings, and analyses on their own. This is the core thesis of my dissertation.
Over the next two months I will add more videos, hopefully one every other day, in between writing my rationale, literature review, and methodology chapters. I hope to get back on track now that I have more time and am getting some traction.
Since my methodology plans are still evolving, I will talk about them in my next post. In the meantime, here is the script from this Overview video in case you want to read it.
This schematic diagram shows the direction of my planned dissertation research. I will be mixing six different theoretical frameworks (not an easy task, but they all relate to my overall model of students as creative innovators) to support pedagogies of project and problem-based learning with mastery assessment for an adjustable education. The classroom processes include scientific inquiry, student-created media projects, the engineering design cycle, and student critique and revision to create the outcomes of highly engaged learning, deeper concept mastery, higher student creativity and quality work, and increased societal innovation.
It is now December 2021 and I have completed another semester of classes at the University of Northern Colorado toward my Doctor of Education (EdD) degree. I haven’t posted very often on this blog site over the past six months because I have been so very busy completing assigned readings, writing papers, and preparing my initial dissertation proposal. I also presented a poster at a conference in Albuquerque. I thought it was high time for an update.
I am pleased to report that my coursework proceeds well. Except for the glitch that was my statistics course, I have received straight As. My courses this fall semester were EDF 700 on Curriculum Theory and Assessment and EDF 720 on Research Methodology, which was primarily a preparatory class for our dissertation proposals and culminated in our first attempt at what will be fleshed out and finally approved next semester.
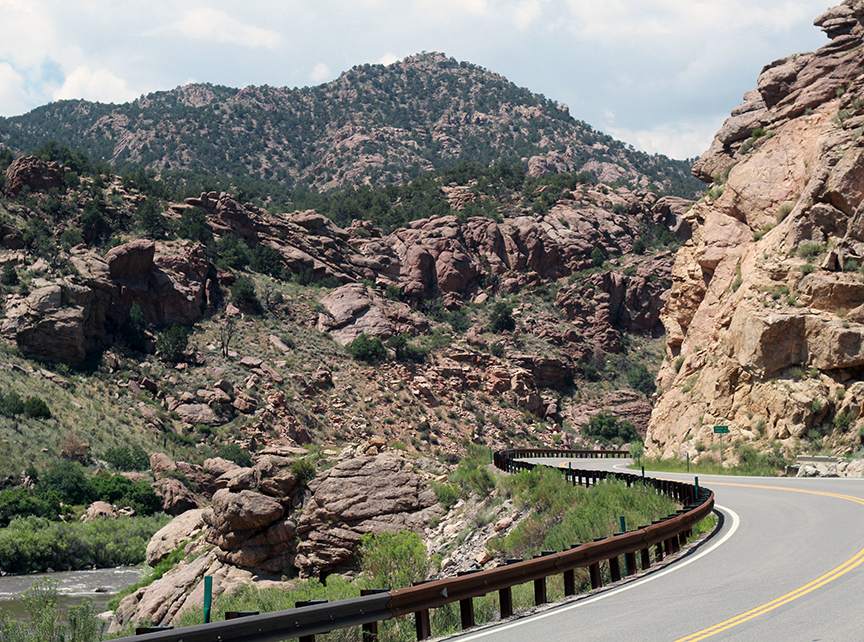
The highway traveling south along the Arkansas River in central Colorado. The pinkish along the road are metamorphic pink granite. I took this route when diverted off of I-70 because of mudslides in Glenwood Canyon during July 2021.
Last summer I traveled to Loveland, Colorado in late July to attend a three-day in person seminar class which focused largely on what lies ahead for us. I took my usual route to Grand Junction and stayed at a KOA I am familiar with there. I learned that I-70 was closed in Glenwood Canyon due to mudslides, so I took US 50 south to Delta, CO. This route actually goes through two Deltas. I am from the one in Utah. I continued through Montrose, then through Gunnison over several mountain passes, then braved the route over Monarch Pass. The brakes on our minivan have needed work, so I was white knuckling it down the eastern side. I drove through Buena Vista and south along the Arkansas River to Canón City, then took the cutoff to Colorado Springs and I-25 to Loveland. It was a long day but a beautiful route. I was happy to find my camping spot at the Riverside RV park west of Loveland and set up my tent.
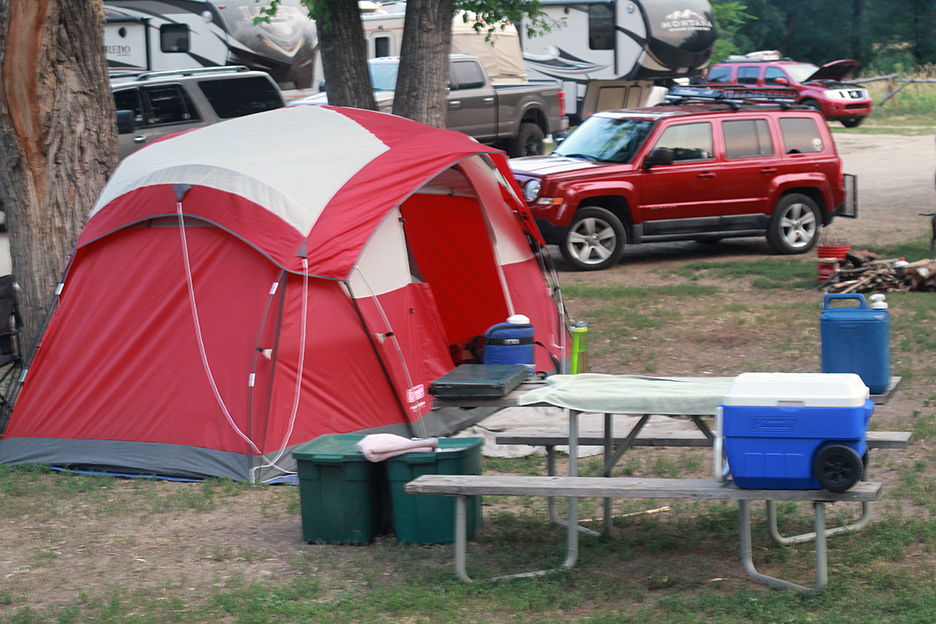
This is my campsite at the Riverside RV Park near Loveland. There wasn’t much space between campsites but at least the cottonwood trees provided good shade. I had a run in with a very persistent squirrel I called Phat Gus (go check out Mark Rober’s squirrel mazes on YouTube to find out why) who chewed through the lid of one of the green plastic tubs you see here. All he got was a hamburger bun for his trouble.
My 2019 cohort is now in our final year of classes before we begin the grand adventure of our dissertation research, so we were the “old guys” at the seminar and were asked to provide some words of wisdom to the “younger” cohorts, even though this is only the second time we’ve been to Loveland. What was supposed to be our second summer was canceled, like everything else, due to COVID. Our seminar class was held online instead. I said that I still have problems with imposter syndrome; I often do not feel smart enough or experienced enough to contribute to the field of education as a full doctor of education. I must earn my place through my upcoming research. And what a project it will be!
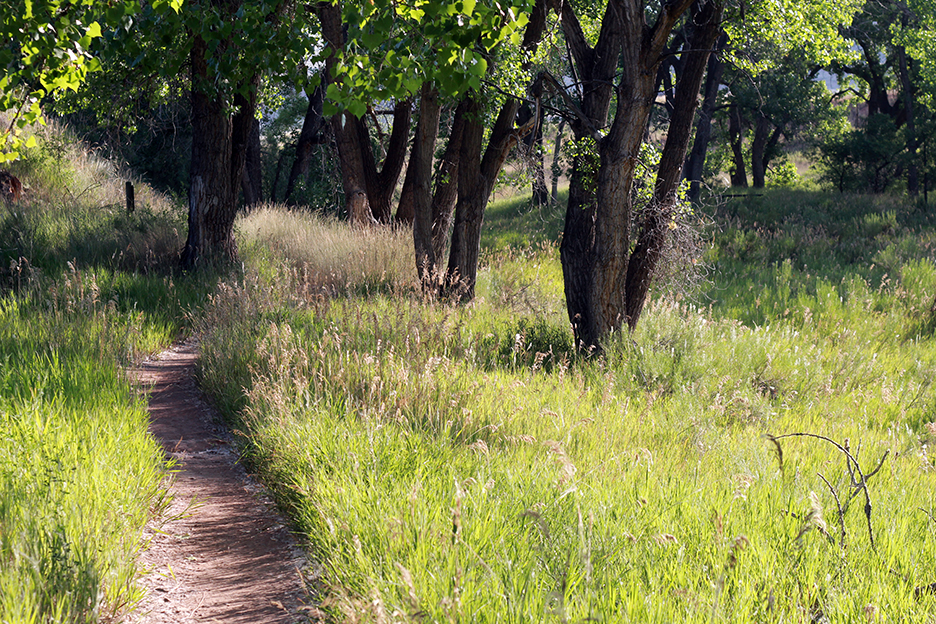
A trail near an old gypsum mine along the edge of Devil’s Backbone near Loveland, CO.
Instead of making the traditional poster/handout presentation of an educational theorist, we decided to do something a bit different and created a game of sorts. The theorist I chose was Seymour Papert, since I needed to learn more about how his theory of constructionism differs from the constructivist theories I was already familiar with. I had outlined how the constructivist ideas of Dewey, Piaget, and Vygotsky influenced such later people as Jerome Bruner and Elliot Eisner, but didn’t know where Papert fit in, so this was my chance. I created a two-page handout while trying to get Internet access to work in my tent at the Riverside RV Park and had it printed at a commercial print shop in town that I happened to see driving through. The presentation went well and I had time while in Colorado to explore the town of Estes Park one evening and hike along a trail at a rock formation called the Devil’s Backbone near the RV park even though my worsening right knee didn’t allow me to go far.
Devils’ Backbone, a layer of basalt turned on its side west of Loveland, CO.
I drove home by going north on I-25 to Cheyenne, then west on I-80 all the way to the Heber City cutoff. It was another long day of driving but the weather was nice and the roads good. There were no treacherous mountain passes to navigate so I could save the brakes and I made it home by about 6:00 after leaving at 9:00 that morning.
Entering Estes Park, CO. The brakes on my minivan needed fixing, so I drove home through Wyoming instead of continuing on this road through Rocky Mountain National Park.
The next day I had an appointment to tour the Lassonde Studio makerspace at the University of Utah, which I will report on in my next post. Then it was a short three week break that included an educator workshop put on by Epic Games to learn how to use their Fortnite Creative, Twin Motion, and Unreal Engine 4 programming systems. Then it was back to school at New Haven and at UNCo on August 23. I am determined that this will be my last year of teaching K-12 classes full time. By this time next year I will need full time to do my dissertation research.
As fall classes progressed I also needed to prepare for a trip to Albuquerque for the American Association of Teachers of Curriculum meeting, a group of college level curriculum educators for which I had a poster accepted. My poster was essentially an outline of my dissertation proposal and the revised mastery program I was using in my New Haven classes so that I could “run it up the flagpole” so to speak and see who salutes. I wanted feedback to see if I was on the right track, and since the theme of the conference was Creativity and the Muse, my topic fit very well.
Dr. McConnell during our summer seminar class in Loveland going over the process of our dissertation research.
I worked on the poster and overpacked it with information and images, including examples of student projects from my fall classes. I talked about the need for teaching creativity, the many definitions of it, why we should invert Bloom’s taxonomy and start with creativity, how the jaggedness principle applies to human creativity, why the concept of the daimon fits in (this conference was about the Muse, after all), and how my mastery program with student critique and revision helps students with concept mastery, creativity, quality, and teaching others. Knowing that I also wanted to provide a handout on my presentation, I created a double-sided single sheet handout that also diagrammed my research plans. These are linked below at the end of this blog post.
Spanish Fork Canyon in October 2021 as I drove to Albuquerque.
After putting new tires and repairing the breaks on the minivan, I took off from school at noon on Oct. 5 and drove through Spanish Fork Canyon to Green River, then on I-70 to Crescent Junction and south through Moab. The weather was threatening rain from an approaching storm, but I managed to outrun it all the way to Cortez Colorado where I pitched my tent and stayed for the night at a KOA just outside of town. The rain hit in the night, but my two spray cans of waterproofing on the tent worked well and I stayed dry despite the broken main zipper. I had figured out how to hang a blanket over the doorway while in Colorado and the rain stayed out.
Wilson Arch along the road between Moab and Monticello, UT on my way to Albuquerque, October 2021.
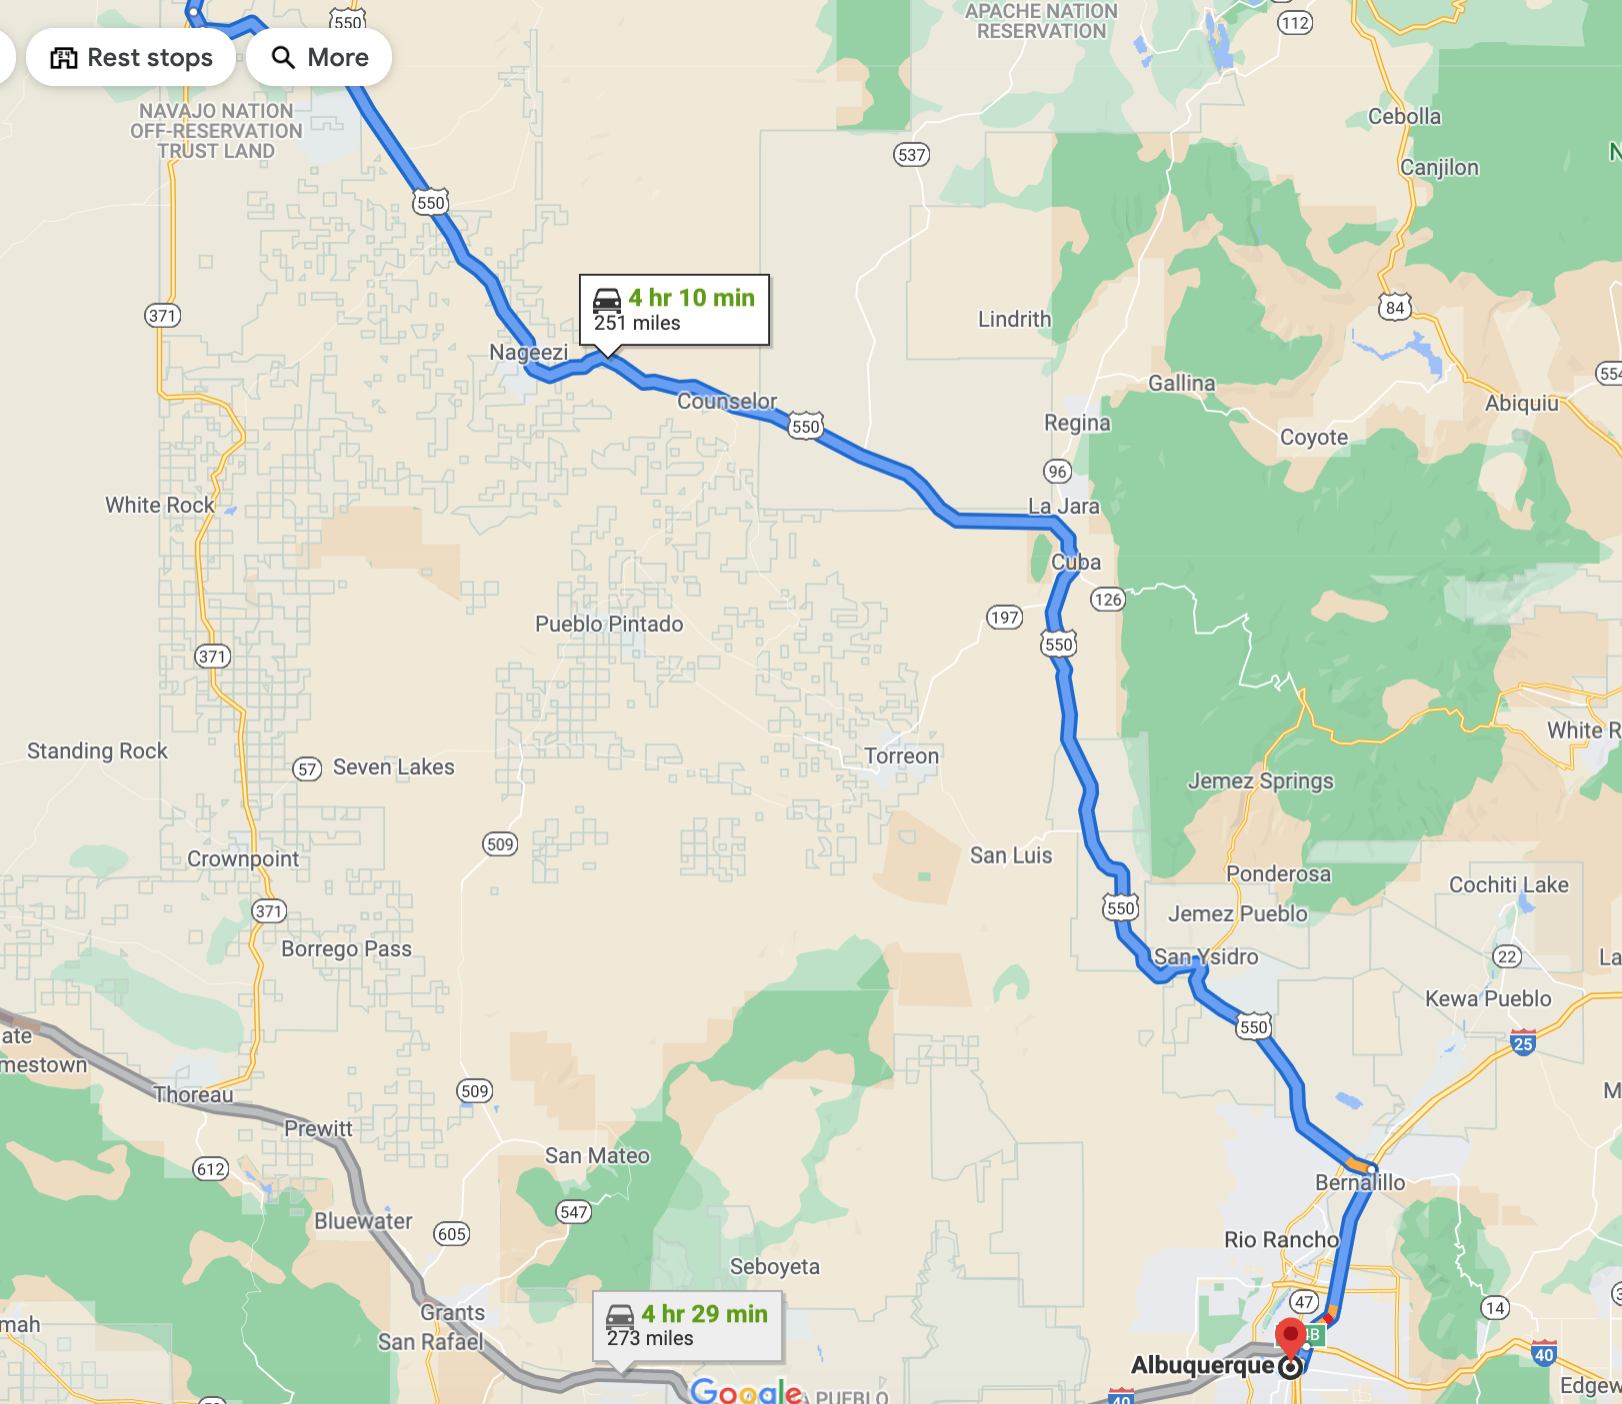
The next morning there was just enough break in the rain for me to get the tent shaken out and packed up and eat a quick breakfast before heading out. I hit the rain just south of Cortez, but then it cleared out and was gorgeous for the rest of the day. I stopped along the road to take some photos of the Shiprock and almost hit a car because I missed seeing a red light in the town of Shiprock, NM because they hang traffic lights in an unusual way. I traveled to Farmington and then on south on 550 toward Albuquerque. It was a pleasant drive through the mesas and high desert of northern New Mexico, and I was happy to be covering new ground. I stopped for lunch at a Mexican restaurant in Cuba, NM and then on to where the road joined up with I-25, then south to Albuquerque.
Along Highway 550 south of Cuba, New Mexico.
I took I-40 east around the south end of the Sandia Mountains, then drove northeast to my campground, called Turquoise Trails. I got there in good time and spent some time letting the tent dry out as I pitched camp and dozed off in my camp chair. I will be here for several days, so I took the time to find a good site convenient to the showers with decent shade. The forest is mixed junipers and piñon pines on the east side of the Sandia Mountains. I had decided to drive down and camp instead of fly and stay in a hotel because this is also the week of the Balloon Fiesta and all the hotel prices are jacked up and flights are still hard to come by as the Delta variant of COVID continues to spread. This way I could explore more, too.
My route from Farmington, NM to Albuquerque, traveling on Hwy 550 through Nageezi, Cuba, and Bernalillo through several Native American reservations and pueblos. This was a new route for me. My camping spot at Turquoise Trails Campground was just about where the 14 marker is east of the Sandia Mtns and north of I-40 in the bottom right corner of the map.
That evening I got dressed up and drove back into the city and found an underground parking garage kitty corner to the DoubleTree Hotel where the conference was taking place. I was a bit early for the opening reception, so I hung out and ran into Mandi Leigh. The reception was low key and I met some previous University of Denver students, now employed professors, and the author of one of my textbooks. We ordered horse doovers and talked shop. I didn’t realize it until the next day, but one of the people I was talking with was a researcher for the ExMASS program and saw our presentation. It was getting dark as I drove back to camp following the reception. It seems strange to be camping in October, but being so far south the weather is fair although cool at night (down into the 50s) and warm in the high 70s during the days. I slept well on my new air mattress despite my painful knee.
The Double Tree Hotel in downtown Albuquerque where our conference was held. I never saw much in the way of traffic or people in the city.
I saw the balloons launching to the north of the city as I drove back into Albuquerque the next day. This was my day to present my poster, so I carried it with me and stashed it in a spare room that had been reserved by the conference. I officially registered and got my mask and program and attended sessions all day. I got a call during lunch to schedule my knee replacement surgery for Nov. 19. It would be more complicated than anticipated because of the distortion of my leg following my accident in 1971 and will require a robotic laser marker and two surgeons to get the angles right.
Our poster presentations were to be in the lobby of the Native American cultural museum where we were having dinner. There were only seven posters and we finally found a place to set them up – I took my small camera tripod and taped my mounted poster on it, then set it up where people going into the banquet could see it. Most of the conference participants were touring the museum, and very few came to see our posters. This was not at all like the poster sessions I was used to from AAS or other scientific conferences where thousands of posters are presented in huge conference centers on large Hessian wall-weave barriers. Here it was quite unorganized, and I was disappointed in the number of people who stopped at my poster. Mostly they were from my cohort, but they did provide good feedback. I printed out way too many handouts. Well, now I know next time to do a session instead. The hotel didn’t even provide projectors – presenters had to bring their own.
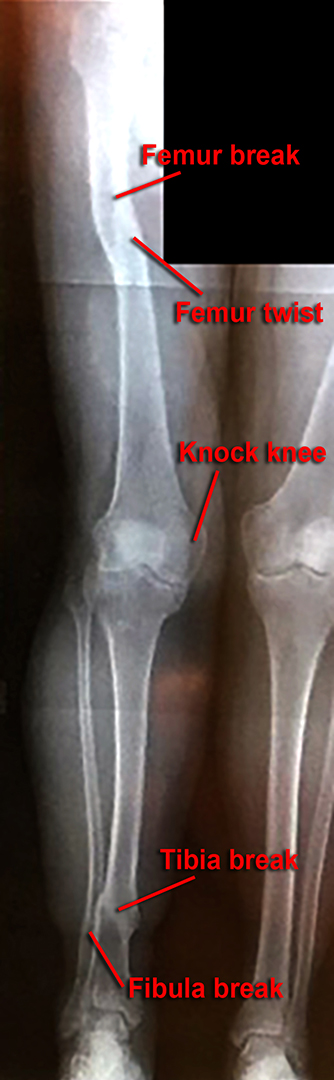
An x-ray of my right leg with markers to show the various breaks and problems. I’ve had to live with this for 50 years.
There was an excellent dance entertainment by a group of Puebloan performers and we bused back to the hotel after. I was quite tired as I drove back to my campsite and fell asleep.
A fun junk sculpture in downtown Albuquerque. My kind of art!
The rest of the conference was excellent and I attended as many sessions as possible. I never made it out to see the balloon fiesta, but high winds cancelled several of the mass ascents on days later in the week as a storm front came in and dropped a small amount of rain. I got to know a number of people, made contacts, got to meet several authors of my textbooks including Bruce Uhrmacher, and got to know a new city and area. The final sessions were on Saturday morning October 9. In the meantime I had to send in several small assignments for my EDF 720 class and had to use the hotel’s guest internet as my connection at camp was way too slow and spotty.
After the conference was over I visited the National Museum of Nuclear Science and History and learning about the Manhattan Project and Cold War ICBMs.
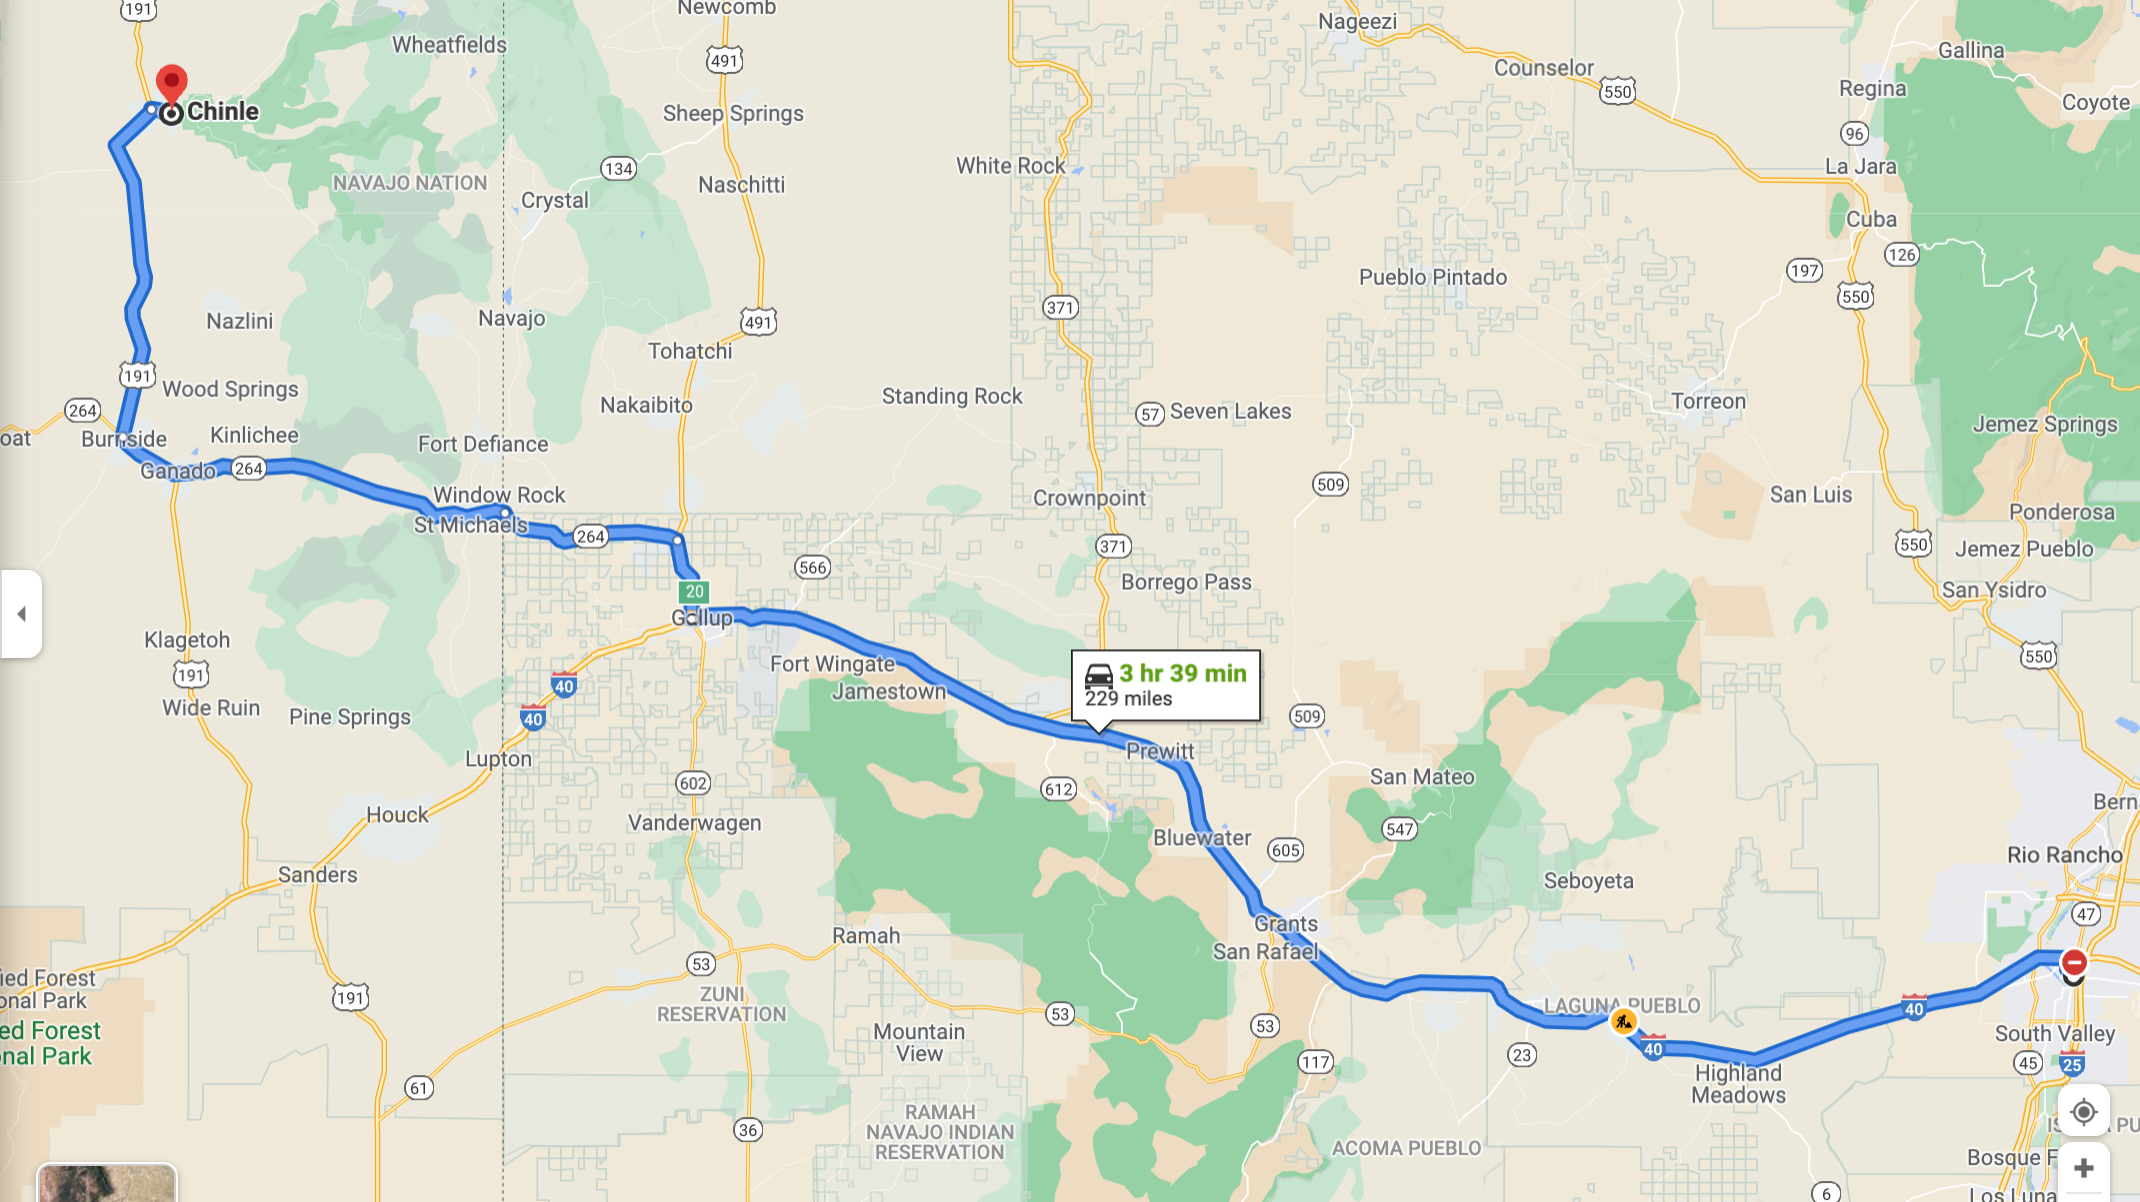
After the final sessions I visited the National Nuclear Science Museum and took the tramway up to the top of Sandia Peak (more on these in future posts). I pulled up camp and left Sunday morning driving west on I-40 to Gallup then north-northwest on 264 to Burnside and north to Chinle, where I took two hours to visit the south rim of Canyon de Chelly.
My first view of Canyon de Chelly on my way home from Albuquerque, October 2021.
As the sun set I drove on to Kayenta, AZ but the motels were too expensive (I checked all three) and had to drive north through Monument Valley after dark to find a somewhat decently priced motel in Mexican Hat. The next day I drove back down through Monument Valley, then back up to Goosenecks of the San Juan and on through Blanding, Moab, and on home, arriving just as a rain-snow storm came in. The golden aspens on the Abajo Mountains and Spanish Fork Canyon were beautiful against the gathering storm clouds.
As I drove out of Monument Valley there were many cars stopped at this spot taking photos with people standing in the middle of the road for some reason. Then I realized why. I could almost hear a voice calling , “Run, Forrest, run!”
For the rest of the semester I have worked on my initial dissertation proposal and asked Dr. Matt Farber, an expert in the gamification of education, to be my dissertation committee chairperson. He accepted. Now that the semester has ended I am going through all of the research articles I have collected (quite a few) and annotating them, preparing to completely flesh out my introduction and literature review. I am also writing up study guides for various theorists and ideas that are likely to come up when I face my written comprehensive exams in late February.
A panoramic photo of the Goosenecks of the San Juan River, a perfect example of entrenched meanders.
By the way, my knee surgery did not happen. On my doctor’s appointment in early November I saw my full leg X-rays for the first time since 1971’s accident where I broke my leg in two places. The tibia-fibula break was a short perpendicular snap just above the ankle, but it was a bit offset. My femur break, however, was along the length of the bone at a shallow angle and the resulting set caused my knee to twist in. It also showed where the traction pins below my knee pulled free of the bone and caused the upper fibia to collapse, so that I pretty much have three breaks to the leg. All of this twisting and offsetting is why my knee joint has worn out after 50 years.
Unfortunately, my hemoglobin A1c was too high, so the surgery was postponed. I still do not have a new date. Since I will be going to Houston in early February and have comps at the end of February and don’t want to be on pain medication during that time, I will need to postpone until March. They are not scheduling any overnight surgery right now anyway (the complexity of my situation will require an overnight stay) because of the Omicron variant filling up the hospitals, so give or take new variants I am unlikely to see surgery before March anyway. I just hope I can keep walking that long. It is getting worse every week. (Update: As I was posting this article I received a call – finally! – from my doctor’s Medical Assistant telling me the surgery has been scheduled for Jan 28. So goodbye Houston. I won’t be going to SEEC after all and I’ll be on pain medication for my written comps. But better that than wait until March.)
I am posting pdfs of my Albuquerque poster and handout here. I would love any comments you have on the proposals. My initial rough draft of the final proposal was well received but needs some editing based on the suggestions of my cohort reviewers and Dr. Harding, so I will post it once it is edited.
Here is the handout on Seymour Papert (please excuse the typos. I typed this in a tent, after all):
Now on to the final semester of classes. I look forward to June when I will be past comps and ready for the final adventure. This research is why I have gone to three years worth of effort and expense. I hope to make a mark on the field of education and lay the groundwork for future research and several books I am planning to write that will be a culmination of my 30 year teaching career.
Rock fin in Canyon de Chelly
View east from the Sandia Mountains along a ski run. My camp was at the foot of these mountains.
My route from Albuquerque to Chinle, AZ. From there I visited Canyon de Chelly, then headed northwest to Kayenta and north to Mexican Hat, then home through Blanding, Monticello, Moab, and Green River.
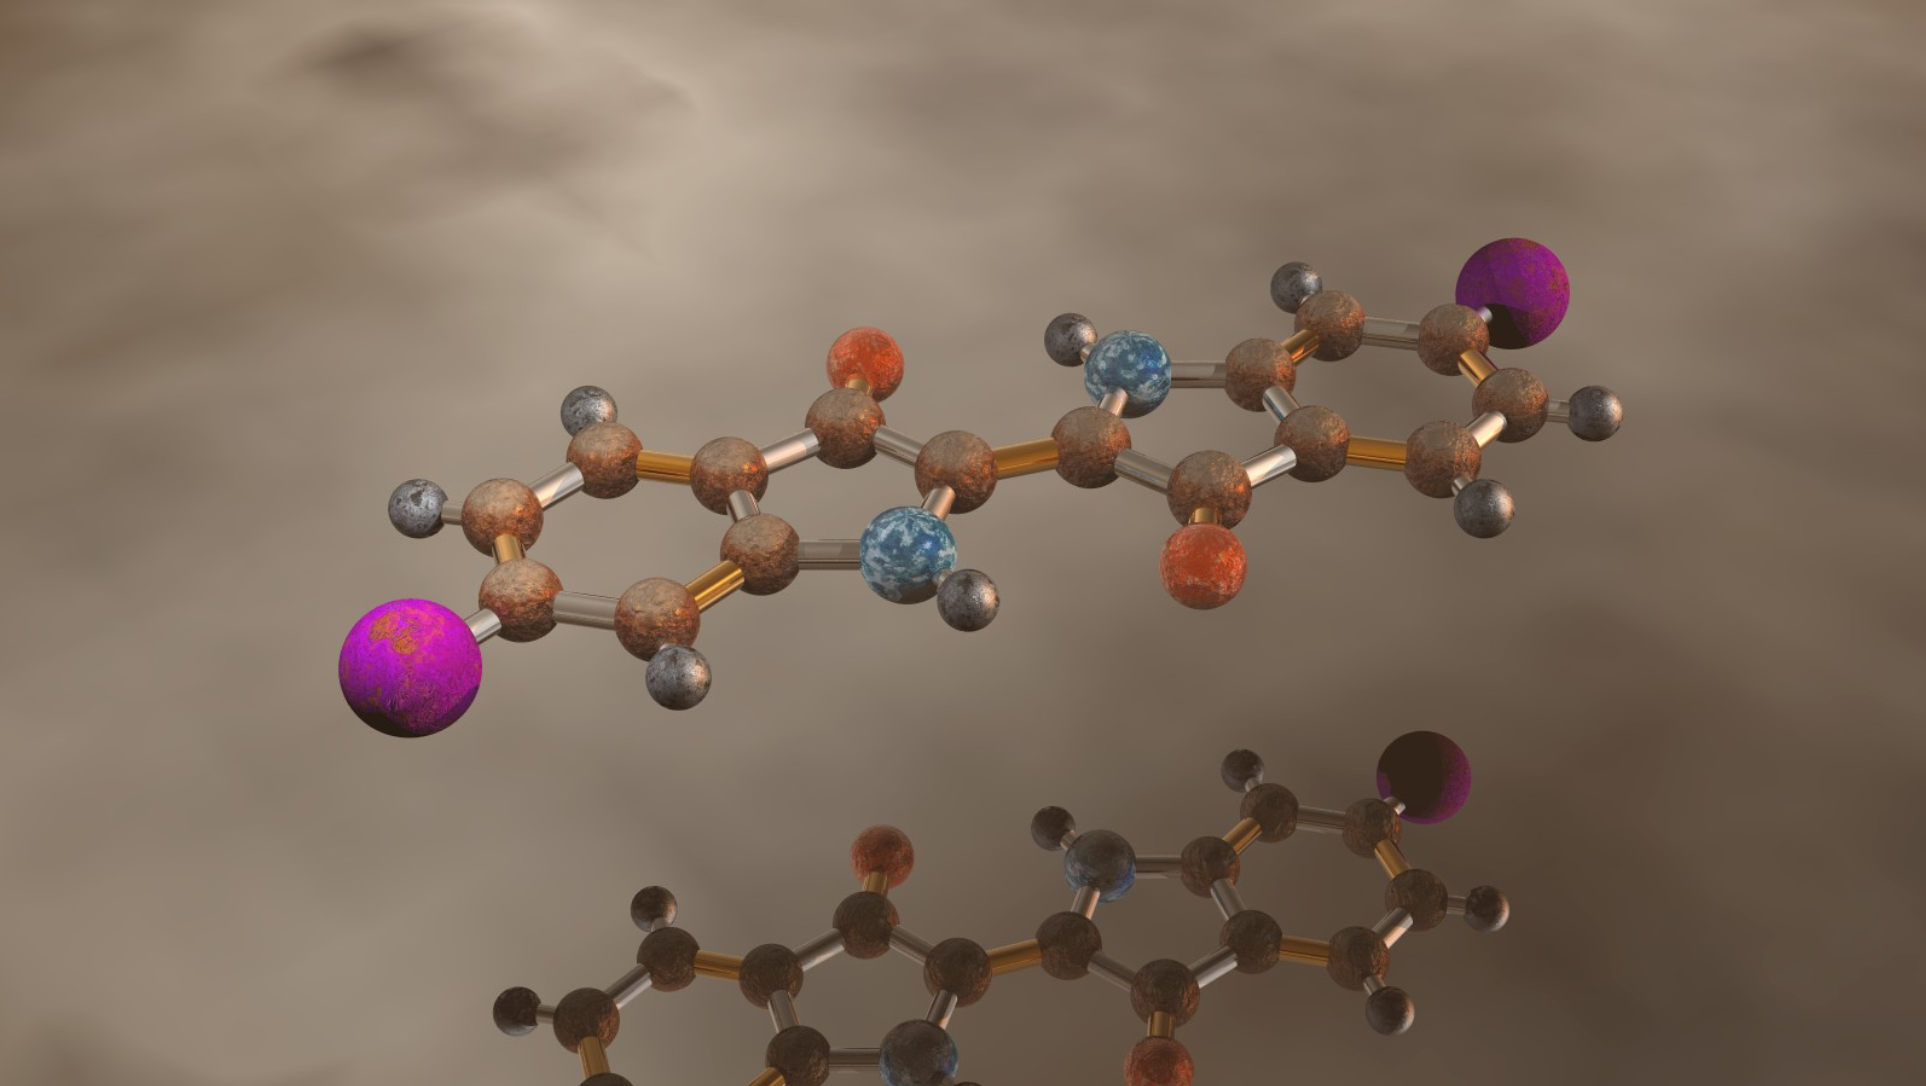
A 3D model of Tyrian purple, the ancient Phoenician dye extracted from murex sea snails.
This blog is the script for a final video project for my Educational Technology class as a doctoral candidate at the University of Northern Colorado. The final video can be viewed at: https://youtu.be/jimJqjsetNM.
Introduction
3D modeling and printing are taking the Do-it-Yourself world by storm as makerspaces spring up in many schools. Considered to be an innovative way of learning next-generation skills, 3D modeling and printing are fun hobbies, but are they effective educational tools? Is 3D technology worth the cost and the time it takes to learn? Will a 3D printer merely sit in the corner and collect dust, or will it be frequently and effectively used to teach class concepts? Is 3D printing just another new toy or is it a pedagogically sound method for deep learning?
My name is David Black and I have taught media design and science classes for 30 years at the secondary level. I have developed multi-disciplinary projects that combine science with 3D modeling, but I lacked a theoretical framework. This video explores the history and innovation of 3D modeling and printing within a theoretical framework of constructivism and a project-based learning pedagogy to effectively teach science concepts. We will look at the diffusion of this new technology, how it works as a medium to convey learning, the basic steps and history of producing 3D models and prints, and provide examples of 3D technology use in science classrooms.
A photo gallery interface for the AM to FM project. Designed as a scrapbook, the animation zoomed into the pages and each item became a category for different images that could be viewed interactively. The entire interface was programmed in Macromedia Director.
A Theoretical Framework
When students create their own science educational content, or learner-generated digital media (LGDM), they achieve a deeper understanding of the science. Researchers have found that students not only learn science content well through media creation, they also develop marketable media design and 21st century skills of collaboration, communication, critical thinking, and creativity (Hoban, Nielsen, & Shepherd, 2013; Orus, et al., 2016; Reyna, 2021).
Reyna and Meier (2018) conducted a literature review of studies that use learner-generated digital media to teach science concepts. They concluded that previous studies were limited because they lacked theoretical frameworks or sound pedagogy. These researchers assumed that the participating students already knew how to use media design technology tools since they were so-called “digital natives.” According to Reyna and Meier, just because students grow up using computers and digital devices doesn’t mean they have ever developed media creation skills such as video editing or 3D modeling. In a follow up study, Reyna scaffolded media design skills training through smaller partial projects embedded in a theoretical framework of constructivism and a project-based learning (Reyna & Meier, 2018; Reyna, 2021). As an example, a teacher might have a student team create a short Public Service Announcement (PSA) as a practice project to gain skills in using cameras, lighting, and microphones and to learn the entire video creation process or workflow before tackling the final project.
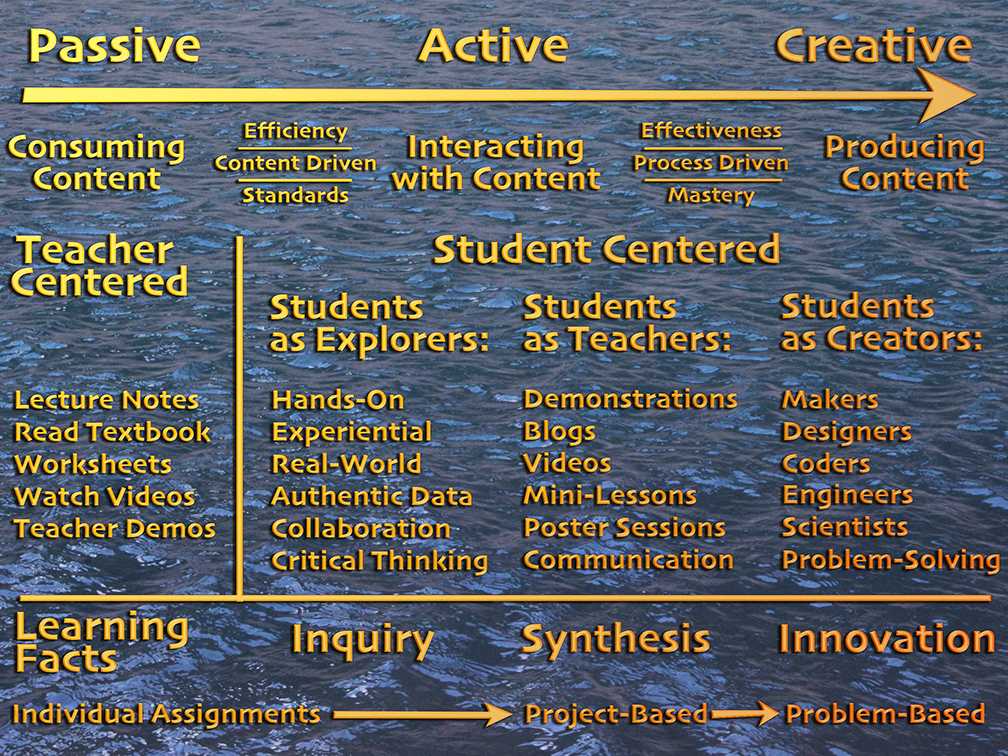
A final (?) version of my model of constructivism, with students as explorers, teachers, content creators, makers, designers, coders, engineers, scientists, critical thinkers, collaborators, communicators, and problem-solvers. My model suggests that students need to move from being passive learners to becoming active and creative learners.
Constructivist theory proposes that learning is a socially mediated cognitive process whereby learners experience a subject and construct their own meanings for it. They create mind maps or schema that tie previous learning, emotions, and social reinforcement together with their new knowledge. Schema develop through the processes of assimilation, where the new knowledge is placed into existing categories, and accommodation, where the schema are revised to acknowledge divergent information. Constructivism acknowledges that the learner is at the center of the process.
3D modeling is inherently a constructivist activity, as creating the models literally requires constructing one polygon or primitive at a time. That the model exists only in virtual space does not mean it is any less a constructed medium. By 3D printing the virtual model, the printer builds an actual model one layer at a time. If properly planned and conceived, students can also construct science knowledge through 3D modeling and animation. Instead of consuming scientific content, students become producers of content. They become the experts and the teachers, and learning occurs as a natural byproduct of the process.
Lev Vygotsky was a pioneer of constructivist theory. He also developed the concept of the Zone of Proximal Development shown in the image at right.
Constructivist theory can be traced all the way back to Socrates, who said, “Education is the kindling of a flame, not the filling of a vessel.” John Dewey proposed that students learn by doing, that is, in an active, creative process where they construct their own meanings through discovery with the teacher as a guide on the side, not the sage on the stage (Brau, 2020). It is the opposite of objectivism, where teachers are the center of the process and must somehow pour their knowledge into their students’ brains. Lev Vygotsky added that learning is socially mediated through interpersonal interactions, language, and culture and that students learn within their zone of proximal development; as students learn more, what they can do with help (the ZPD) expands (Brau, 2020). Jean Piaget developed cognitive constructivism where children develop naturally through various stages from concrete to abstract, with each stage of cognitive growth affecting the construction of learning (Brau, 2020). Seymour Papert developed his constructionist theory where students construct learning through making. He saw computers as a tool for learning and invention where students learn through doing and experimentation, including the use of computer programming and media design. Today’s makerspaces are based on his theories.
The characteristics of gold-standard project-based learning, as developed by PBLworks, formerly the Buck Institute for Education.
Project-Based Learning Pedagogy
Project-based learning is a natural fit as a pedagogy for media design creation. It usually occurs in teams and the conclusion is a public product. According to PBLworks, formerly the Buck Institute for Education, gold-standard PBL includes seven characteristics (https://www.pblworks.org/):
(1) A challenging, meaningful question or problem to address; (2) Student inquiry using authentic data or sources where they discover the learning for themselves as a natural outgrowth of the initial question; (3) Student voice and choice in the type of project chosen and how it will be accomplished; (4) Collaboration and communication as students actively participate and work through issues creatively; (5) Frequent opportunities for critique and formative feedback, with revision; (6) A public presentation of the final product; and (7) Student reflection on what they have accomplished and learned.
Each project ends with a presentation before a public audience, usually at some type of back-to-school night with feedback and suggestions from the audience. Knowing that their work will have a public audience motivates students to deliver a high quality product and helps to actively engage them in the process of learning. As John Spencer, a well-known PBL guru, explains:
Students who engage in authentic project-based learning have increased agency and ownership. They’re often more excited and engaged in their learning. When this happens, they retain the information for a longer amount of time while also learning vital technology skills like digital citizenship and media literacy. However, they also learn vital soft skills, such as collaboration, communication, curation, and problem-solving. As they work through iterations and revise their work, they develop a growth mindset. Often, they learn how to seek out constructive feedback. This connection to the community can help them develop empathy (Spencer, 2021).
Marshall McLuhan invented the concept of the global village and was famous for saying that “the medium is the message.”
The Message and the Medium
In the early 1960s, Marshall McLuhan created the concept of the global village, which predicting the interconnectivity of the World Wide Web, and famously stated that “the medium is the message.” Such technologies as print and movable type have a profound effect on the human psyche and cultural understandings. Humans re-invent themselves and how they communicate with the invention of each new medium (McLuhan, 1962). Richard Clark argued conversely in the 1990s that the medium of a message was unimportant to the learning process and that cost-effectiveness was the only consideration in choosing one medium over another in instructional design (Clark, 1994). If more than one form of media can be used for a particular learning task, then they are replaceable with each other and the medium does not influence the message. Robert Kozma (1994) takes a middle ground, similar to Kalantzis and Cope (2012), where the medium conveys or mediates the message, influencing the message because of the medium’s unique affordances (advantages, disadvantages, limitations, conventions, etc.). Learning from a video with its linear format is qualitatively different than learning from interactive media such a website or a CD-ROM-based multimedia title. Learning from printed text alone is different than learning from text with images, or moving text and images in the form of a video.
A simple chart can show a great deal of data, such as this one showing the growth of STEM related jobs from 2012 to 2020.
3D modeling and animation has its own affordances that allow it to present a unique learning experience unlike other media. It can visualize large datasets, allowing patterns and inter-relations between data to be understood that purely numeric data tables cannot. A chart of the stock market can lay out several indices together for comparison over time, representing over 80,000 different data points in one infographic, which would be impossible to interpret as raw data but is easily accessible visually (Krum, 2013). If the data represents values in a two-dimensional grid, then a 3D graph is the best way to visualize and understand the data, as in the example of the voltage data I will talk about later. The medium chosen to convey learning is therefore an essential part of the learning experience. This agrees most closely with Kozma’s middle ground stand on the Clark-McLuhan continuum (Kozma, 1994).
With this in mind, let us now turn to an examination of the history of 3D modeling and printing as an innovative technology and how it can be used in science classrooms.
The movie Tron by Disney broke new ground by including scenes that were completely made of 3D animations.
History of 3D Modeling
The first experiments with 3D computer modeling began in the 1970s using mainframe computers, the only ones that could handle the millions of calculations necessary. A group at the University of Utah’s computer lab led by Ed Catmull developed a process to build smoothly polygonal models with accurate reflections called raytracing. As microprocessors improved and computer speeds and power increased, the first entertainment applications appeared. By the early 1980s movie studios were experimenting with computer graphic inserts for special effects. Disney’s Tron brought complete scenes designed and rendered in 3D, followed by even more photorealistic effects in The Last Starfighter with complete Codon Armadas including spaceships, planets, and asteroids.
A still frame from Robert Abel & Associates’ “sexy robot” commercial during the 1984 Super Bowl. It was an advertisement for canned food . . . By the way, this was the same Super Bowl where the infamous “Big Brother” commercial introduced the Apple Macintosh computer.
Meanwhile, some of the artists that started with Tron founded their own studios, including Robert Abel and Associates, who created a number of iconic and Clio Award-winning TV commercials including the famous 1984 Super Bowl sexy robot commercial that introduced innovative motion capture technology (Art of Computer Animation, n.d.). Lucas Films and Industrial Light and Magic experimented with completely 3D animated short movies. When Steve Jobs left Apple Computers and invested in the studio, they became Pixar Animation Studios and created the groundbreaking Luxo, Jr. animation. Jobs encouraged John Lasseter to create a full-length 3D movie; the result was Toy Story in 1995 and the rest is history.
History of 3D Printing
In 1981, Hideo Kodama of Nagoya Municipal Industrial Research Institute published a description of a liquid resin-based photopolymer that becomes solid by hardening each layer with focused ultraviolet light, but he did not file a patent (Goldberg, 2018). In 1984, Charles Hull invented a similar system called a stereolithography apparatus (SLA). Refinements continued, including building up layers by sending UV light in cross-sections. In 1992, the first Selective Laser Sintering (SLS) device was invented, which uses a laser beam to sinter or weld together a powder into layers.
The original MakerBot Thing-o-Matic, one of the first commercial 3D printers for home or school use.
Although both of these techniques are still used in high-end industry, the type of 3D printing most familiar in schools is the Fused Deposition Modeling (FDM) technique where a plastic filament on a spool is fed into the printer by a motor, melted by a heated nozzle, and deposited in layers continuously to make cross-sections (3Dsourced.com, 2019). For each layer, the build plate is moved down. It is also called Fused Filament Fabrication. This type of printing was first developed in the late 1980s by F. Scott Crump who went on to found Stratisys in 1990 as the first company to build FDM printers and plastic filament.
Altogether, these technologies are referred to as additive manufacturing because the models are built up, or added, layer by layer. By comparison, a 3D milling machine or CNC router uses subtractive manufacturing because it starts with a larger blank and carves away parts.
By 2009, when the first FDM patents expired, new companies entered the market with lower cost desktop 3D printing machines such as MakerBot, FlashForge, Prusa, Ultimaker, Dremmel, and others. Various types of plastic filament became available, including Polylactic Acid (PLA), Acrylonitrile Butadiene Styrene (ABS), and even flexible nylon filaments, fused metallic filaments, and water dissolvable filaments for printing supports. Filaments come in many colors and finishes, including filaments that change color as they spool into the printer. A new development is 3D printing in full color, however these printers cost $3500 or more. To print in color, 4-process color (CMYK) dyes are added to a base color filament as it extrudes.
The 3D process begins with primitive objects such as cylinders and spheres assembled in 3-dimensional space, as shown here in TinkerCAD. Boolean commands can use one object to cut holes in other objects.
The Process: From Model to Print
Many 3D models are available for free on Thingiverse (https://www.thingiverse.com/) and other sites, but ultimately the fun of 3D modeling is to do it yourself. Complicated by working in three-dimensional space on a two-dimensional computer screen, in 3D modeling primitive objects such as spheres, cubes, and cylinders are given textures and composed into scenes. They can be combined to add, cut, or intersect other objects using Boolean commands. Other objects are created using a polygonal mesh like chicken wire. Meshes act as three-dimensional vectors and can be modeled from equations and deformed using envelopes. Grayscale images can be converted into terrain objects with light areas as mountains and dark areas as valleys.
Primitive objects are shown as a wireframe model, sized and moved into a complete composition such as this Greek temple.
To create complete scenes, the objects are aligned and composed, the camera positioned, lighting and atmospherics provided along with other procedural effects, then rendered out through ray tracing as if the scene were being photographed by bouncing a beam of light out from the camera. To animate objects, a timeline is added and the objects are given hierarchical links from parent to child, a process called forward kinematics. The pieces can be moved, rotated, and otherwise changed over time by adding keyframes on the timeline. The computer then renders out an animation frame by frame, creating all the in-between frames itself. Complex characters can be rigged with bones and joints or morph targets to deform the polygonal structure over time.
Learning 3D animation is traditionally a difficult and time-consuming process, with each step from modeling to rigging to texturing to animating done by different teams of specialists for a major CGI-based motion picture. Teaching students how to do all of these steps competently can take several weeks of class time, if not years, which few teachers or subjects can afford to do. However, new tools are simplifying the process.
This model of a dinosaur has had bones and joints added, which can be rotated and animated to distort the wireframe model. This model can walk, thrash its tail, turn its neck and head, and eat unsuspecting time travelers.
TinkerCAD is a browser-based modeling tool that has a range of primitive objects and simple textures that can be combined into more complex models, which can then be exported and printed with a 3D printer. It is not set up to do complex polygonal modeling or animation, but is a good introduction to working in three-dimensional space. SculptGL is another browser-based modeling tool. It does create complex meshes, but instead of subdividing polygons one at a time, the tool works as a ball of virtual clay that can be pushed and pulled. The model can be colored with paintbrushes and the final models and textures exported as .OBJ files for use in more sophisticated animation software. I have not yet found a browser-based tool that can assemble complete scenes, add keyframes, rig bones and morph targets, and render out animations. There are full-scale downloadable programs available for free or as educational licenses, including Blender and Autodesk Maya. Many tutorials exist online for how to use these programs.
Once a 3D model is completed it is saved as an .OBJ or .STL file, then imported into a 3D printer’s slicing software which provides the G-code directions for moving the print nozzle across the build plane while extruding the melted filament. Where overhangs occur, supports must be built in (which can be done automatically or by hand). Once the model begins to print, it can take several hours to complete a moderately large print. The print must then be removed from the build plate and the raft and supports snapped off and sanded.
The benzene molecule, shown above in TinkerCAD, now printing out on my 3D printer.
Subject Integration and Adoption of 3D Modeling and Printing in Schools
Reyna’s 2018 literature review concluded that most previous research in learner-generated digital media lacks theoretical frameworks or solid pedagogy. This agrees with the TPACK model of technology integration (Rodgers, 2018), where the affordances and workflow of the technology, the appropriate pedagogy for teaching, and how students learn the content knowledge through the technology or medium must be considered to successfully integrate technology into the classroom. By using a constructivist/constructionist framework and the pedagogy of project-based learning and by training students how to create the media as they develop their own science-related content, we are following the TPACK model.
For 3D modeling, we cannot assume that even digital natives know how to use the conventions of modeling in three-dimensional space on a two-dimensional surface. It is a challenging innovation to learn, and many problems can occur in the modeling and printing process. Students do not naturally know how to subdivide polygons, use Boolean commands to cut holes, create procedural UV texture maps, create the lighting and atmospherics needed for a scene, or set up a 3D object for a successful print. This is highly technical work, and requires practice and scaffolding with simpler projects before large-scale media projects can be undertaken. Time must be set aside for training and practice either in class or using a flipped classroom model. The purpose of the 3D modeling – to learn a science concept – must be carefully considered and needs to be worth the time and effort and cannot be adequately taught through any other medium.
For adopting new technology, there is always a balance of risk and certainty. Some people and organizations are willing to accept risk to stay ahead of the curve, others, such as most schools, are risk-averse and will not adopt new technology until it has been widely accepted. This puts them behind the curve as laggards or late adopters.
Because of these challenges, 3D modeling and printing have been slow technologies to truly take hold in schools. Although 3D printers are popular now, most schools and teachers have little idea how to use them effectively. If we use Everett Roger’s model of technology adoption (Legris, Ingham, & Collerette, 2003), schools are usually in the late adopter or laggard phase for adopting 3D technologies. They do not want to waste the time or dollars to invest in a 3D printer just because it is the newest shiny thing. Some individual teachers may be ahead of the curve and ready to adopt, but they will need to learn how to use 3D technologies on their own; there is little to no professional development training available through school districts unless provided by teacher associations.
Using 3D Modeling and Printing in Science Classes
Because of the time and challenge required to do 3D modeling, printing, and animation there should be a compelling reason for using this medium in a science classroom; the 3D model or animation must convey a scientific concept more effectively than other forms of media. Some possible applications include modeling and animating scientific processes or principles, modeling complex authentic data where it cannot be visualized in any other way, and creating accurate models of science-related objects that can be examined.
To demonstrate how data can be visualized in 3D, my chemistry students this week studied electrochemistry by comparing the voltages of different combinations of metal electrodes, recording the data in a two-dimensional grid separated by commas. We used a free program from the National Institutes of Health called ImageJ to convert the raw numbers into a grayscale image, with higher values represented as lighter shades of gray and lower numbers as darker shades. This image can be converted into a 3D object by Adobe Photoshop. Finally, an altitude sensitive texture is applied and text added and the scene rendered as an image or animation. Patterns in the data that are difficult to notice as raw numbers become readily apparent as a visual image. Students can easily see that magnesium is the most reactive metal and has the highest voltages. 3D visualization has great advantages over trying to understand a grid of numbers.
The SOFIA airplane, as modeled by my 6th grade Creative Computing Class.
As an example of building models to illustrate concepts and objects, in 2004, my media design students began work on a video documentary for KUED, Salt Lake City’s PBS station, on the history of AM radio in Utah. They created animations of transistor radios as part of the title sequences of each segment based on photographs of actual radios. They modeled interfaces for an interactive DVD of our final video and for an accompanying CD-ROM programmed with Macromedia Director. Students in my 6th grade Creative Computing class each modeled a part of the SOFIA aircraft, or Stratospheric Observatory For Infrared Astronomy, and my high school students assembled, textured, and animated the final model. It was used to demonstrate how the telescope works for a video we made about my flight on SOFIA in 2013.
A diner modeled for the AM to FM project. The animation zoomed in on the jukebox, which acted as an interface for the history of AM radio.
My media design students created models and animations of Mars space probes for an interactive CD-ROM on Mars Exploration which they presented at a student symposium at Arizona State University. They learned how to access and model 3D terrain data of Mars from the MOLA instrument on the Mars Global Surveyor probe to analyze possible landing sites on Mars which we then printed out using color-changing PLA filament. Other students collaborated with the NASA Lunar Science Institute to study selenographic features and create a 3D animation of the Big Impact Theory of lunar formation.
My biology students use TinkerCAD or SculptGL to model and print viruses for a unit on microbiology. To visualize the periodic properties of the elements, my chemistry students create a grid of data points and convert it to 3D models using ImageJ and Photoshop. My eighth grade physical science students created a 3D animated video with greenscreen narration showing a possible habitat that astronauts can live in on their way to Mars. To represent land forms on Earth, my students access EarthExplorer by the United States Geological Survey (https://earthexplorer.usgs.gov/), which allows grayscale heightmaps from the Shuttle Radar Topography Mission to be downloaded and converted into highly accurate 3D models.
A viral mini-museum. My biology students recently chose a virus, then modeled and printed it in 3D and created a display poster on its infection vector, parts, symptoms, and treatment.
All of these examples took time to learn and execute, so we needed to have compelling reasons for using 3D modeling that were worth the opportunity cost of time and the steep learning curve. In each case, using 3D enabled us to present authentic data more completely and helped us visualize important scientific concepts more effectively than other types of media.
Using 3D modeling has benefits for students. Visualization of big data sets has become a growth career, as has 3D printing of everything from prosthetic limbs to cars to rocket parts. It allows for rapid prototyping and has become a necessary component for engineers. My students have used these techniques to create visuals for winning science fair projects, such as this one that determined whether surface features on Mercury were caused by impacts or volcanism. As part of the Mars Exploration Student Data Team program, my media design students downloaded Mars dust opacity data from December 2003 to January 2004 and converted it into animations showing how a dust storm arose over the Tharsis Plateau, blew across the equator, and spread globally just as the Mars Exploration Rovers were approaching. My current physics students are using altitude data from the Lunar Reconnaissance Orbiter’s LOLA instrument, turning grayscale heightmaps of the Moon into 3D models, then mapping spectroscopic data from Moon Mineralogical Mapper instrument to show where different commercially viable minerals might be located according to surface landmarks as shown here (Fa & Jin, 2007). They are creating a poster of their results for the ExMASS program to compete with students from nine other schools.
The alchemist in his lab. As part of a project to teach students chemistry lab equipment, I had them create their own versions of florence flasks, and other equipment, new and ancient, as well as models of various minerals. We put these together into this scene for fun.
Conclusion
In this paper I have described many 3D modeling and animation projects created by my students. They have learned many positive things about STEAM careers and processes along the way, but of most importance, they learned science concepts more deeply through 3D modeling than through any other method. Although 3D modeling can be rewarding in its own right, it has additional benefits for students including teaching marketable skills and providing them with opportunities to collaborate, communicate, solve problems, and enhance their creativity. Given our limited time as teachers and the high opportunity cost, we have to be very sure that 3D modeling also enhances science learning in ways that other options can’t achieve. In my own experience, the projects are well worth their time. Other teachers will have to look at their own situations and determine whether or not it is worth investing the time to learn and use 3D modeling in their own science classrooms.
Thanks for reading this. I hope it provided some ideas into how and why to use 3D modeling and printing in your science classroom.
Hoban, G., Nielsen, W., & Shepherd, A. (2013). Explaining and communicating science using student- created blended media. Teaching Science, 59(1), 33-35.
Kalantzis, M. & Cope, B. (2012). Literacies. Cambridge University Press: New York, NY
Kozma, R. B. (1994), The Influence of Media on Learning: The Debate Continues, School Library Media Research, Volume 22, Number 4, Summer 1994.
Krum, R. (2013). Infographics: Effective communication with data visualization and design. John Wiley & Sons: Hoboken, NJ.
Legris, P., Ingham, J. & Collerette, P. (2003). Why do people use information technology? A critical review of the technology acceptance model. Information & Management, 40 (2003), 191-24.
McLuhan, M. (1962). The Gutenberg galaxy: The making of typographic man. University of Toronto Press: Toronto, Canada.
Orus, et al. (2016). The effects of learner-generated videos for YouTube on learning outcomes and satisfaction. Computers & Education, 95 (2016), 254-269.
Reyna, J. (2021). Digital media assignments in undergraduate science education: An evidence-based approach. Research in Learning Technology, 29 (2021), 1-19.
Reyna, J. & Meier, P. (2018). Learner-generated digital media (LGDM) as an assessment tool in tertiary science education: A review of literature. IAFOR Journal of Education, 6(3), 93-109.
A still from an animation showing a dust storm on Mars forming above the Tharsis Plateau in December, 2003 just as the Mars Exploration Rovers were approaching. The data from for this animation was downloaded from the atmosphere opacity measurements of the Mars Global Surveyor space probe.
As educators we don’t often question the need for standards. After all, without standards, teachers would teach whatever they want to. Yes. Exactly.
What I am about to say will be considered as educational blasphemy. I have to say it anyway. Here goes: Education standards do more harm than good.
There, I’ve said it. Now I need to defend my claim logically.
When state boards of education and national committees get together to write new standards, they are doing so with the intention of improving learning outcomes in a subject area such as history or math or science. But I argue that higher standards have not and will not lead to improved student outcomes for several reasons: first, standards become an end unto themselves instead of being a means to the end of improved outcomes. This means-ends inversion leads to a myopic focus on meeting standards, as evaluated by high-stakes tests, above all else and to teachers being pressured to teach to the tests in a misguided effort to increase scores. Even if schools are able to increase scores, it does not mean that students are learning more in any long-term fashion. When school funding is tied to meeting standards, district leaders and principals put emphasis on test scores and encourage teachers to do what is needed to improve them. Shifting time and focus toward passing tests moves students away from inquiry experiments, creative projects, and other activities that make learning fun and meaningful, leading to lower motivation. As classes become boring and meaningless, student learning actually decreases and creativity is stifled. The student outcome that society needs the most is creativity. Education standards therefore hurt society.
Second, standards are meant to be minimal guidelines. Any competent teacher should be able to meet standards and go beyond them to teach with the passion that leads to extraordinary education. Yet teachers who do so and step beyond the bounds of the state standards are often censured and cautioned to stick to the approved curriculum. Teachers are forced to play it safe in order to keep their jobs. Extraordinary education entails risk; playing it safe will never lead to students caring deeply about a subject or learning how to be creative innovators within it.
Third, the very notion of standards is based on the idea of standardization of education, to make all education everywhere the same experience for all students for a particular subject. It is saying that all students are like the Model T Ford, which Henry Ford said one could buy in any color as long as it was black. Our educational system has been based for far too long on an obsolete assembly line model, with students as raw materials entering the factory floor, moving through standard classes taught by standard teachers and emerging as standard models of some outdated ideal of an educated high school graduate, fit only to fill standardized roles in standardized jobs. Businesses complain that they can’t find enough graduates who can think for themselves, develop creative innovations, communicate and collaborate effectively, or even complete basic tasks like reading directions or doing basic math problems that come up. The graduates might have passed a standard Common Core math class and know how to do standard rote problems, but when they face anything in the real world that deviates from the narrowly specific problem sets they are used to, they cannot solve the problem. Since life is one big story problem, they are ill equipped to develop creative solutions to even small challenges.
As world problems increase and deepen in complexity, we don’t need standardized graduates. We need graduates who are out-of-the-box thinkers, creative innovators, and problem-solvers who can communicate and collaborate globally. We think that by increasing educational standards we will somehow get the types of graduates we need, but that is simply not happening. No Child Left Behind and its successor, the Every Student Succeeds Act, have attempted to raise national standards with the goal of improving student learning outcomes. They have failed miserably. Students are less equipped for life now than they were 20 years ago before these laws were passed. This is because standards do not, by themselves, raise educational quality. In fact, they can lead to a vicious cycle of diminishing educational quality as shown by the diagram at the top of this post and again here:
Although education standards are created with the best of intentions, they often do more harm than good.
Let’s start at the top. National commissions, businesses, and parent groups are successful in their calls for raising national or state educational standards and legislatures have passed laws to hold schools accountable to meet them. In order to hold schools accountable, schools must be assessed and the easiest way to do that is through mandatory testing of all students in critical subjects such as math, science, and English. Those schools that do not measure up are deemed unworthy and labeled as failing schools. Principals at failing schools face getting fired, so they encourage teachers, in many subtle and not so subtle ways, to do what they must to bring up test scores. Facing censure themselves, the teachers start to spend more class time teaching specifically to the test, drilling students and forcing them to memorize enough facts to get through the tests. At the same time, since only certain subjects are being tested, schools tend to put more emphasis on those subjects and provide less time in the daily schedule and less funds toward other, non-tested subjects such as art, music, and humanities. This means that students have less opportunities to learn creative subjects. With teachers now spending more time on drill and practice of testable facts, less time is available for inquiry labs, hands-on activities, and creative projects. Classes lean more toward rote learning and become boring and meaningless to students, who now have even less opportunity to find creative outlets. They do not learn how to collaborate, communicate, solve real problems, experiment, invent, tinker, make, or create. They do not learn how to be innovators, only learning how to regurgitate facts on tests. These graduates struggle in colleges and are not prepared to solve the problems they encounter in real jobs. Employers and business leaders call out for students who are better prepared and ask state boards and legislatures to raise standards. And around and around it goes. It is a vicious cycle.
The worst part of this cycle is the wasted potential I see daily in students who are convinced they are not creative, who prefer to read textbooks and answer questions at the end of the chapters because that’s what they’re used to and know how to do and who never get past the lowest level of factual knowledge in Bloom’s taxonomy because tests rarely get past measuring facts. Even if students learn enough facts to pass the end-of-year tests, they do not retain them for long because the facts have no context or depth, and within a month or two they are forgotten. Yet these students come into schools as kindergartners confident in their creativity. Somewhere along the line, as their attempts at innovation are stamped on repeatedly in the name of standardization, they unlearn how to be creative.
Another tragedy of this vicious cycle is that each step in the process is based on faulty assumptions and non-sequiturs. Having high standards and accountability does not mean we have to design more tests. There are other ways to evaluate schools, and higher test scores do not necessarily mean students are learning more and certainly not better. That we have mandatory tests doesn’t mean we have to cut funding for arts and humanities programs, yet that seems to commonly be the case. This is not an either-or proposition or a zero-sum-game, yet most school districts act as if it were. We can emphasize STEM fields and the arts. We can teach STEM through the arts. I have seen it done effectively. I know of a school near Salt Lake City that teaches science, math, and history through dance. Yes, dance, a program that is usually the first on the chopping block of school districts. The students demonstrated the germ theory of disease through a very effective dance routine. I can give numerous examples of teaching STEM through art from my own classroom, but that will be a future topic.
The worst assumption made by the proponents of standards is that the so-called “soft skills” of creative problem-solving, communication, collaboration, and critical thinking (the Four Cs) are somehow not important for STEM fields and careers. The Next Generation Science Standards actually de-emphasize creativity as a science and engineering practice. Yet all effective scientists or engineers I know of rely frequently upon their creativity and innovation to solve problems that crop up in their research. Creativity is a critical skill, yet our emphasis on standards is crushing it out of future scientists and engineers.
I am in a graduate program titled Innovation and Education Reform but I fear that reform is not enough. What it will take is a wholesale transformation of education, a systemic integration of creativity and innovation into education to meet the needs of the complex problems we face and to stay competitive as a nation. Every attempt we have made at raising standards has merely put more pressure on teachers and students and moved us further away from the model of schools that I have in mind. I would like to see creativity integrated into schools as a virtuous cycle, as shown in the diagram below:
If we teach creativity and innovation, it will lead to more scientists and engineers, more makers, builders, creators, and inventors and therefore to more inventions, more discoveries, more products, more businesses, and an improved economy. This will lead to happier citizens and a better society. The question, of course, is how to move from where we are to where we need to be.
This diagram is more complex but more profound, not because I am claiming any level of profundity, but because the ideas expressed here are rarely examined in this combination. Starting again at the top of the diagram, if we deliberately teach students to be more creative and innovative (how to do this will be the subject of my dissertation) then there are several avenues that should be pursued. The first is that science classes should teach the processes of inquiry and experimentation, or what we used to call the scientific method. Reducing science to a body of facts is to render it dry and meaningless when scientific discovery should be an invigorating and exciting process followed by all students. We cannot expect future scientists to make new discoveries if they do not learn the process of inquiry.
I believe that all schools should have well-supplied and supported makerspaces where students can learn to tinker, make, build, and invent (please refer to my previous blog post for more on this). Part of the makerspace’s purpose should be to teach entrepreneurship and the process of invention, the engineering design cycle, and manufacturing and marketing skills. For a good example of this, look at the Innovation Design program developed by International Baccalaureate. I had the opportunity to be trained and teach this program and it is rare even for IB schools to offer it; mine was one of only a few such programs in Utah at the time.
Teaching creativity should also involve project or problem-based learning (PBL), with a focus on solving problems through design and developing skills for team work, collaboration, and communication. Teaching creativity and innovation through inquiry, making, and PBL will lead to increased scientific exploration and discovery, to more inventions and better products, and to starting up new businesses that will improve our economy and standard of living.
Another area of teaching creativity and innovation that I believe does not get enough attention (and is worth a research project or two this semester) is to teach students how to express themselves through media design software and design thinking skills. Even if teaching these skills only leads to critical media literacy it will be worth the expense in computers and software, but if done right it can enhance students’ creativity through allowing them more avenues to express themselves, to find their voices, to communicate their ideas, and to design educational content that will teach others. I think that we have not done enough research on the importance of training students to be teachers. I follow the old saying (with my own modification): “Give a man a fish and you feed him for a day. Teach a man how to fish, and you feed him for a lifetime. Train him how to teach others how to fish, and you feed a village forever.”
Words to live by . . .
With more inventions and products, more educational content, and a higher standard of living we will have more resources available to improve education and other social programs. This will lead to happier citizens. As we teach others how to evaluate media claims and how to express themselves, we will build better informed citizens and allow voices to be heard who have been marginalized before. We have only to look at the misinformation out there concerning the effectiveness of wearing masks during this pandemic to see why scientific and media literacy are critically important social skills. Better informed citizens contributing their own voices will make better decisions both as consumers and as voters, which will lead to a stronger democracy and a better, more equitable society. This entire process will feed back on itself as a virtuous cycle; teaching creativity will lead to more creativity which will lead to a better society and increasing recognition of the importance of teaching creativity and innovation.
Given the complex challenges our society faces, we need to completely overhaul our educational system. I see this as the only way to fully integrate creativity and innovation, which must be done to solve our problems and keep our nation competitive. Now, hopefully, you see the rationale for why I am getting my doctorate and why my dissertation will be about how and why to teach creativity. I can see no other area where I can contribute more.
Examples of student projects created in my makerspace at New Haven School. On the left are 3D printed dinosaurs and virus models, 3D terrains of Mars, a working model of a human hand, rubber band shooters, and illustrations of micro-organisms.
Over the course of the last six months I have been exploring makerspaces as part of my continuing doctoral program at the University of Northern Colorado. Makerspaces are becoming more common in schools, libraries, businesses, and even individual homes and can be anything from a corner of a room dedicated to creative projects, a mobile cart shared by several classes, a workshop, an area in a school or public library, or a dedicated building. To make, as in the maker movement, means to exercise creativity and innovation to design, build, test, and improve projects. Makerspaces are places to create products and knowledge, not just consume them (Moorefield-Lang, 2015). Other terms used are hacker spaces, DIY (do-it-yourself) labs, fab labs, creation centers, etc. A generation ago, they were the wood, metal and sewing shops of high schools. Now they have become associated with STEM education, combining digital and physical creativity tools to promote science, technology, engineering, and practical math through hands on project-based learning (Sheridan, et. al., 2014).
Research Questions:
I began to conduct background research over the summer as part of my larger schematic on teaching creativity and innovation. As part of a course on case study research methodologies, I have designed a research project to explore the nature of makerspaces. At their heart, makerspaces should promote (and even actively teach) creativity and innovation (Halbinger, 2018), but I wanted to see how true this was in reality. Do the directors of makerspaces and the teachers who build them in their classes consciously try to use them to promote creativity and innovation in students? Do they deliberately teach entrepreneurship and other skills that future innovators will need? Because we live in an innovation economy fueled by new and creative products and services, we need to train future generations how to be innovators. But how should this be done? This question is central to what will become my dissertation research.
I have been involved with developing my own makerspaces at the last three schools I have taught at, adding pieces of equipment, supplies, materials, and projects over the last ten years. I want to know what effective practices and pedagogies are available to teach innovation through making. As I’ve built up a classroom makerspace at New Haven School, I have added capabilities, asked questions, and interviewed teachers who have already gone through the process. Many of the teachers at the Teacher Innovator Institute sponsored by the National Air and Space Museum, of which I am a part, have their own makerspaces. We received training from Josh Ajima, director of the district makerspace for Loudoun County School District in northern Virginia, who told us that makerspaces do not need to have a lot of fancy equipment. It is really all about the philosophy of making, of students using their hands to explore and learn by doing and building, not sitting and listening. It is a very constructivist approach in the best tradition of John Dewey and Seymour Papert.
Fabric swatches from an inquiry lab on the factors influencing natural dyes. I use my science lab as a makerspace and laboratory interchangeably.
Another question I have tried to answer through this project is the degree to which regular classroom teachers are making use of makerspaces and project-based learning to teach required concepts and course objectives. As a science teacher, how can I use making in a biology class to teach microbiology or paleontology or physiology? What types of skills need to be taught and scaffolding constructed that will help them be successful? Should I teach 3D modeling in a chemistry class, for example?
During background research I have identified seven different levels of makerspaces. These are: 1. Elementary schools (Rouse, Krummeck, and Uribe, 2020). 2. Middle schools (Slama, 2019). 3. High schools. 4. Colleges and universities (Wong and Partridge, 2016). 5. Community makerspaces, such as ones in public libraries (Moorefield-Lang, 2015). 6. Commercial makerspaces, set up as a for-profit business funded by patron subscription fees (Sheridan, et. al., 2014). 7. Professional in-house makerspaces, for specific research and development projects.
I wanted to know if these different levels of spaces have different types of equipment, projects done, challenges, training, and funding issues. I decided for my case study class this semester to do a comparison between these different levels and report on my findings. After gaining IRB approval and trying to work through all the COVID craziness, I contacted several makerspace directors for the levels that I lack experience with. These are middle school, commercial, and community. University level makerspaces will have to wait for another time.
My makerspace is used to directly support student projects for subject objectives, such as learning the organelles in an animal cell through baking a cake, as in this student project.
Methods and Choice of Makerspace:
I needed to find makerspaces within proximity of my home in Orem, Utah and did research in the local newspapers to find any articles. I knew that our local public library has a makerspace, but it has been closed during the pandemic. I found a library-based makerspace in a middle school in central Salt Lake Valley. I found a commercial makerspace in Provo, a neighboring community. I located names of directors and contacted each makerspace, but setting up appointments was challenging during the pandemic and some of the interview dates had to slip until after Thanksgiving as COVID cases surged in Utah and the governor locked down all after-school activities. I set up a Zoom meeting with one of the Orem Library makerspace director and took tours of the middle school and commercial makerspaces. I sent a list of questions to each person in advance so that they could be ready for my visits. During the visits, I videotaped my tours and interviews, then transcribed the footage using Otter software, cleaning up the results for clarity.
An example of an elementary school makerspace: the Collaboratory at American International School. Student projects are displayed hanging on the wall.
Elementary School Makerspaces:
In the spring of this year I interviewed three teachers who are part of the Teacher Innovator Institute at the National Air and Space Museum and are all 5-6 grade teachers. Two have classroom makerspaces, the third is the director of a district-wide dedicated makerspace.
They told me that the complexity and purposes of makerspaces in elementary school depend greatly on the grade level of the students. Early grades generally use a “craft corner” approach – an area of the classroom with supplies for art projects including construction and drawing paper, pencils and crayons, safety scissors, cardboard boxes and tubes, glue, and so on. The types of projects used are mostly for teaching fine motor skills and general learning and literacy. Challenges included purchase and maintenance of supplies. Funding is usually achieved by donations. One teacher posts a list of needed supplies at the beginning of the school year and asks parents to send whatever they can in with their students; another teacher provides a required purchase list for each student at the beginning of the year. Supplies must be organized into two categories: those that are freely usable by students and those that can only be accessed by the teacher for particular projects . Otherwise, the needed supplies will be used up, because some students will randomly glue things together just for fun (even in high school). Critical supplies must be rationed.
By upper elementary grades the students have reached a level of sophistication sufficient to begin higher-order projects, such as learning simple computer programming (coding) with modular block languages such as Scratch. They can begin to learn 3D modeling and printing, simple electronics using snappable circuits, and engineering design projects for constructing objects such as bridges and towers. The teacher who directed a district-wide makerspace found that the greatest challenge was completing projects in the limited time each student had to use her space, since they could only reserve it for 1-2 days per month across multiple schools and classes.
Elementary students making projects in the Collaboratory makerspace.
As the sophistication of projects increases, so does the need for more complex equipment. Usually this is in the form of kits or self-contained programmable robots such as LEGO Mindstorms, Cubelets, Spheros, and Ozobots. Some time must be spent teaching students the basics of each type of technology; to solve this problem, many teachers have experienced students pair up and teach the less experienced. This fosters a culture of cooperation and motivates learning.
For my central question about creativity, the three elementary teachers agreed that creativity and innovation are essential skills and should be taught early to students. As Michelle, a fifth grade science teacher, puts it:
“I have a makerspace in my classroom this year, and they’re all the time in my makerspace creating weird things or beautiful things or whatever, but they love to make things and make new things out of old things. And they go, like, you may have assigned everybody the same STEM project, but they carry theirs a little bit farther than what you’ve even thought about it going.“
She deliberately teaches them to be aware of their creative process by reflecting on the experience afterward through a FlipGrid video:
“I always make them do a FlipGrid after where they talk about, you know, what they used, what their idea was and why they wanted to build that. And it really encouraged the other ones to take it a little farther than what they were, instead of just making a flower out of a pipe cleaner. They were actually making things.“
Michelle recognizes the importance of creativity for scientists and why it is an essential part of science instruction:
“Because my husband’s a scientist and my daughters are scientists, I know that they have to think creatively, and they have to think outside the box. And they have, of course, real-world problems that come with their jobs, but they have to come up with ideas that haven’t been thought of before. And they have to be creative in their approaches.“
She does not deliberately teach how to be creative through any lesson plans or curriculum, but she encourages creativity in many ways, such as allowing students to go beyond the requirements of the project, experiment, and then reflect upon it. She also encourages creativity by putting constraints or limitations on their projects, such as a budget and the need for having a plan worked out before any materials are handed out:
“There’s one STEM project that I do that they have the materials and all the materials cost money. Well, the tape, charge them per centimeter because I don’t want them using all my tape. But it’s so funny, I’ll put this stuff out that I think has nothing to do with a project and they will find a way to use it. You know, so I just try to provide as many materials and they always have to make a plan and they have to list materials. And you know, that’s a hard lesson for some of them because they have to agree on a plan within their group.“
This process teaches cooperation, collaboration, communication, and problem-solving skills in addition to creativity and innovation.
She finds that there is never enough time or space, as creative makerspace projects always take more time and room than anticipated. She does not get any funds from her district specifically for her makerspace and has to use her allotment of instructional money to support her makerspace while relying on parents to donate what they can.
Middle school makerspace featuring Keva Blocks, which can be used to build all kinds of structures and to teach engineering design concepts.
Middle School Makerspaces:
I chose to profile the makerspace at a middle school in the central part of Salt Lake Valley. The neighborhood was first built in the 1950s and 60s during the Baby Boom and is now beginning to age. Some of the older homes have been provided for families of refugees from western Africa and middle Eastern countries, whose children now attend the school. There is also a large homeless shelter whose children attend the school. To balance this, students from a gifted program in the district also attend this middle school. There are about 1100 students in the school under normal conditions, but only 650 of them are now attending in person with the rest online during the pandemic. 62% of the school consists of minority students, mostly Latinx, and 38% white. 24 flags are represented in the school’s library, and it is common to hear west African dialects and Arabic spoken in the halls.
The makerspace has been established in the school’s library, and the librarian began the space when she first started at the school 1 ½ years ago. She inherited an unused library budget and decided to create a makerspace with sets of programmable robots including Spheros, Ozobots, and Cubelets. She purchases 20 iPads to control the robots and a set of Keva blocks for general engineering design projects. She has also purchases a 3D printer but has not yet used it.
She finds the Keva bricks to be in great demand, as they are simple, unbreakable, and can be used to build many structures. While I was observing, the makerspace was open for an after school club. She had the students create cantilevered bridges across gaps between tables, or at least create the longest overhang of bricks. Without mentioned terms like torque, center of mass, or even cantilever, she was teaching engineering principles. There were 13 students there, seven girls and six boys. The girls sat with other girls and the boys worked with boys. The director told me that this is often the case at the start of the year but eventually the girls and boys mix together across genders. This was only the third time they had been together because of multiple closures due to the pandemic. Of the students, four were black and the rest white; two of the boys working together were speaking an African dialect to each other. All were showing persistence and creativity in their approaches to solving the problem; when their bridges collapsed, they quickly picked up the pieces and started over. It was a safe place for them, without criticism.
Using Keva blocks to build a free supporting cantilevered structure, part of an engineering design challenge.
She will move them on to the Spheros, creating challenges for the students to build the tallest towers they can with the Keva bricks, then use the Spheros to attempt to knock over each other’s towers and protect their own. Eventually, the Spheros are used to push a small soccer ball around, with larger programmable robots used as goalies. Teams attempt to play soccer while controlling the robots with their iPads. She doesn’t provide much instruction but relies on the experienced students to teach the newbies and knows that the students, if given a fun challenge, will figure it out for themselves.
Her most important goal for the makerspace is not to teach science, engineering, or creativity per se but to provide a safe place for experimentation. If that exists, then creativity will be a natural result. She attends to the social-emotional well-being of the students, knowing that many of them come from challenging home environments.
There are challenges. She has had sufficient funds so far, but her equipment is new enough that it has not broken down yet or needed replacing. The Keva bricks are so basic that they will last many years; she simply needs more of them. Her biggest challenge is having enough time with students; it is an after-school club that meets only once per week for one hour, but this year the school has received a grant for a program that lasts 30 minutes each day, cutting into the short amount of time she has with the students. She can only do one simple challenge in the 30 minutes left. To help solve this, the lab and materials are available during lunch. As the year progresses and students learn more, she expects more students to come during lunch. The pandemic has limited how far she has been able to teach this year. She has largely come up with her own projects and challenges, with help from lesson plans created by the makers of the robot kits and Keva bricks. It is the lack of time needed to train herself that has prevented her from using the 3D printer.
Building out a free supporting structure with Keva blocks.
She sees her makerspace as a space for creativity. As she puts it:
“Makerspace is for an individual to come in and create and have ownership, something that they’re able to do on their own [and to] build and collaborate with others.”
As to whether classroom teachers use the makerspace to support their classroom content, she says that some are beginning to do so. For example:
“One of our teachers teaches Greek mythology and that history part and so she gets into the catapult. And so I ordered through Keva planks, catapult building . . . they’re able to take the Keva planks, and all of that and build the catapult set they’ve been learning about on that. Also, with the Keva planks, you can build the castles, the bridges, all of those kind of things that they had back in that era, for those students to be able to compare and to understand more how all those things were built.“
She believes that makerspaces can be models of inclusion as students learn to collaborate and work with each other. She has the more experienced students work with beginners with activities that are fun, safe, and cooperative. One example is to use the Keva planks to build towers, which teaches architecture and engineering, then use the Sphero robots to attempt to knock down each other’s towers. The teams use some Spheros to guard their own towers while attempting to attack the others. She emphasizes teamwork and emotional learning:
“. . . it was just awesome to watch them talking and working with each other on that. And that’s what I would see is kids getting along, and just trying to create and build something together. They weren’t making fun of other’s buildings, everybody worked great with each other. And I think that is what I want to see. I want to be able to see that kind of stuff because they don’t get that in the classrooms.”
Her makerspace isn’t about coding or learning math or STEM. It is about providing social-emotional learning and being able to have fun and work together with students from diverse backgrounds. As she explains the main goal of her makerspace:
“Mine isn’t about them coming away knowing coding, or them coming away being better math students. My goal is for them to come away with a social emotional learning. . . . my master’s studies has been in SEL, and that’s what I believe makerspace does is it helps students get that, that social emotional learning, especially when they’re working with others, . . . really, they’re playing with others. And they’re playing with others that are so different. They come, all of them come from so many different backgrounds. And what a great thing to see, I think, and to see them get along with each other, talking and working with each other. When they were building the city there, it was just fun to watch them talking with each other. And, you know, and just getting along.”
This was a finding that surprised me – that a makerspace was more than a place to learn about STEM fields. It has a higher purpose to teach students collaboration, creativity, communication, and to foster inclusion of all students.
Creating a bulletin board on the history of chemistry as a class project at New Haven School. Students created the captions and designed the bulletin board to fit into a space on the front wall of my classroom. I have moved it now so that it hangs on my ceiling.
High School Makerspaces:
I did not visit any high school makerspaces, partly due to the COVID pandemic and partly because I already have considerable experience with this level. I have helped to build makerspaces at several high schools, including my current school.
New Haven School
Using my school classroom budget and a grant from the National Air and Space Museum, I am building a makerspace in the corner of my science classroom. This space is used to support my classroom activities and projects, which are all centered around content objectives. For example, I have cardboard boxes, foamcore sheets, hot glue guns and glue, string, straws, and beads which are used for making working models of human hands for our biology unit on the musculo-skeletal system and 3D models of the nearby stars for astronomy. I purchased a 3D printer and teach my students how to use TinkerCad and SculptGL to create models that we can print out, such as models of viruses for our microbiology unit, or dinosaurs for a unit on paleontology, or organic molecules for chemistry, or terrains on Mars for astronomy (as explained here: https://spacedoutclassroom.com/2020/08/21/3d-printing-mars-terrains-using-mola-data/ ). We use PVC to build frames for stop-motion animations and physics equipment; wooden dowels, popsicle sticks and clothespins for rubber band shooters in physics; and Scratch software to design review games and animations.
One engineering project is to design a bridge using a small budget of spaghetti noodles, a sheet of paper, 2 feet of tape, and four gummy bears. It has to support a Matchbox car pushed across it without killing poor Tubby the Dog. If you don’t know who Tubby is, look him up . . .
I feel that a makerspace is not just equipment and supplies but also software, and that media design skills are a necessary part of the process. I use a mastery system of grading based on my own model of how to move students from passive to active to creative projects. Each unit, I list the concepts that need to be mastered on the vertical scale of a matrix and ways that students can demonstrate mastery across the top. They are encouraged to move along a continuum from passive to creative, and creativity is one of the characteristics that are graded during their peers’ Critique process, which provides positive suggestions and feedback so that students can improve their projects. All of the projects are graded on a scale of 0 to 8, with zero being no demonstration of mastery yet and 8 being full mastery with high creativity, quality, and with teaching concepts to others. I have submitted an article about this process to Educational Leadership and will write about it in more detail in a future blog post.
Student teams in my physics class designed, built, tested, and revised these rubber band shooters as an exercise in engineering design. They had to meet specifications of being able to test different pull back lengths and shooting angles.
The result of this process has been an increase in both creativity and concept mastery. Students are now more self-directed and will read the textbook or search the Internet to find the information they need to create their projects; I rarely need to lecture any more. My philosophy is that we need to invert Bloom’s taxonomy and put creativity first. Imagine that creativity is an apple seed, growing down to the roots of knowing facts, understanding, applying, analyzing, and synthesizing and growing up to innovation.
Other High School Makerspaces:
Other schools have various types of makerspaces. In some, dedicated rooms or spaces are built that house a variety of tools and support many student and teacher led projects. They are often created as part of Career and Technical Education courses, and Utah has a robust CTE program and a series of magnet schools called U-Tech where high school students can attend from their local schools for three hour classes each day in such fields as Medical Assistant, Dental Assistant, Welding, Computer Networking, and Media Design. I ran a media design program at what is now known as M-Tech (Mountainland Technical College) for nine years, teaching adult education and high school classes.
Other schools have initiated national programs that teach entrepreneurship and engineering. At least two Utah schools are part of Project Lead the Way (PLTW), a turnkey solution that includes curriculum, projects, and certifications geared towards engineering design. It is rather expensive, at a $50,000 annual subscription fee. Another national network that is part of at least three school districts in Utah is the Center for Advanced Professional Studies, where students learn entrepreneurship by working with local businesses to design and test solutions to problems and market their results.
Lassonde Studios is a live-in makerspace that allows 24-7 access to making for students at the University of Utah
University Makerspaces:
I have yet to visit a university makerspace, but through my research I can see that there are several types. Some colleges have makerspaces inside their school libraries open to students for working on projects on a pay-for-materials basis. In some cases, community members can also use the makerspaces for a fee. Some colleges of education create makerspaces as part of their teacher preparation programs to train prospective pre-service teachers how to use and run makerspaces.
University engineering and design programs usually have the most complex makerspaces. They hope to entice the best students to enroll at their schools and to promote entrepreneurship and new start-up businesses that will enhance local economies and bring in more community donations. They act as incubators and kickstarters, sometimes even providing grant money to promising student teams. At Brigham Young University, the Venture Lab supports engineering and design students by promoting their business ideas through an Ideathon, where students can pitch an idea and receive feedback from the audience and local business leaders. Small start-up grants support materials costs, and the lab provides construction and testing equipment for a wide variety of projects ranging from electronics to wood to metal to plastic fabrication, with commercial level additive and resin 3D printers, milling machines, CNC routers, laser cutters, etc.
At Lassonde Studios at the University of Utah, an entire new building has been built as both a dormitory and makerspace for students who are entrepreneurs, creators, programmers, designers, and innovators. The entire central core includes fabrication shops and meeting spaces that can be used for free by residents of the hall for design, prototyping, testing, and marketing ideas. At $45 million, the building is a hub for entrepreneurship and is rated as one of the ten best university makerspaces in the world. You can check out a video of student entrepreneurs at Lassonde Studios here: https://youtu.be/9C0DXJjiAi4.
I do not know how the pandemic has impacted these spaces. I hope to visit one or both of them during winter break or early next year to complete my initial research into makerspaces.
The makerspace at the Orem Public Library in Orem, Utah
Community Makerspaces: Orem Public Library:
The Orem Public Library in Orem, Utah established a makerspace four years ago. It is currently closed because of the pandemic, but equipment can be checked out by community members. I interviewed one of the directors of the space concerning its purposes and goals, challenges and successes.
As more libraries began to have makerspaces, library patrons began to ask if the Orem library would be building one. As he put it:
“Our division manager had seen them at other libraries and thought that it would be a really cool service for us to offer. We have had patrons in the past asking if we were going to have something like that, that they’d seen around or if we were ever even just going to have more equipment to check out, like projectors, and digitizers. The kind of archiving and family history aspect of it is really big in the community. So people were asking for those type of things.“
The library staff looked at community interest and the types of needs and services they could provide. They could see that family history and archiving was a common request, including digitizing old photographs and videos, supplying high end Bernina sewing machines, providing 3D printing services, and creating a video and sound editing booth with green screen, lights, cameras, music keyboards, and computer software. A conference room in the library was tasked with becoming the new makerspace and a community grant of $11,000 was used to purchase equipment. The new director traveled to other communities and to a commercial makerspace in Washington, DC to learn how makerspaces were working.
After four years, they have seen some interesting patterns develop in how the space is being used. As he explains:
“I think the archiving is a big one, being able to digitize your slides and negatives, and actual like print photos, and your VHS tapes and other cassette tapes. The kids who are getting into 3D printing has probably been the most popular. It’s been really popular with kids who are kind of interested in that or learning about that or just interested in the technology. And then also community members who are developing prototypes and or replacing like little things around the house that they’ve had for 40 years but never got rid of because they love it, but they’re missing this one little piece, and then we can usually help them print that. But other than that, I’d say converting stuff to digital has been the number two interest in there. And then we’ve also had a lot of people interested in, like the sound booth, and the green screen wanting to create some blogs and vlogs, creating content.”
He went on to say that the most common thing children want to print is a toy off of Thingiverse for $1 or so in plastic. The sewing machine can do simple embroidery and is used for costume design. They hold occasional cosplay classes to support this demand in the community.
The major challenges of the library makerspace is that of sustainability. As the 3D printers are used, new ones must be purchased to replace them as they wear out. Other equipment is more durable but expensive and there is only a limited amount of operational budget. Space is at a premium, with the green screen, lights, and other equipment crammed in his office as the library builds a new auditorium and additional conference room spaces. A final challenge is training; his major was film and sound editing, and he has an assistant who has learned how to do 3D modeling, but they have little time to teach patrons how to use the higher end software or machines they have less experience with. They have to assume patrons know the software already and can only occasionally provide one-on-one instruction when the makerspace is not very busy. Most of the adults who want to digitize their archival photos do not know how to do this. I asked if they have a need for volunteers to help teach patrons and he enthusiastically agreed and said he is hoping to set up a volunteer schedule when the makerspace reopens. I volunteered to help out when that time comes; it will give me a chance to see the makerspace in action and get a better feel for the types of projects and patrons there. They have created a few training videos but more are needed, and he has insufficient time to film and edit them.
To understand the commercial level of makerspace, I researched labs in my community and found a relatively new makerspace in downtown Provo, Utah. There had been one previously in the same neighborhood but when I tried to stop by and see it a year ago it was no longer in business. When I contacted them the new space, one of the employees was willing to answer the questions that I sent him and act as my tour guide when I visited on Friday last week.
This is a makerspace created as a for-profit business venture. It had originally been set up by the owners for a different purpose and they had bought the machines and equipment solely for doing custom work. When that did not pay off, they decided to open up the shop as a makerspace in the community for anyone to pay a monthly subscription fee and come in to use the equipment themselves.
They have a variety of machines and tools at a higher level than a community makerspace, including an embroidery machine, a dye-sublimation large-format printer, four well-used 3D additive printers including two Prusas, two laser engravers, a CNC router, a milling machine, three resin-based 3D printers, and a variety of electric tools such as table saws, band saws, drill presses, etc. The wood tools were in a separate area with a vacuum system to control sawdust and doors to drown out some of the noise.
You can tell a great deal about the types of projects done at a makerspace by looking in the trash bin. Here at ProLab Studio, patrons are using laser cutters to create Christmas ornaments and other shapes out of thin plywood sheets.
They do not make enough money off of the subscriptions themselves to pay for employees and make a profit, so they also accept custom jobs online from people that need projects done but who don’t what to do them themselves. They rent out part of their floor space to other companies: a sound booth for recording podcasts, a company that makes custom Nerf guns (there were many boxes of Nerf bullets in the back storage area), and a design studio. They inherited a large space in the basement repair garage of an old car dealership in the business district of southern Provo. The dealership is so old that among the signs painted on the bricks on the outside of the building is one for Edsel cars. The basement repair shop area has been cleaned out, partitions knocked down, and is now rented out entirely by ProLabs. They are only using half the space so far, and have plans to expand their woodshop into the large storage area in the back.
They had their best month ever in March of this year and then the coronavirus hit, slowing things down. It was fairly quiet when I was there – no patrons were using the equipment and only a few laser engraving projects were being done. The upstairs portion of the dealership was opened up as a display area and was housing a Christmas boutique, so quite a few people were walking around the area and eating filled churros from a food truck parked by the dealership, but none were finding their way around the side and down to the makerspace.
The types of projects done range from hobby crafts, learning new skills, and personal projects through prototypes of products for businesses to small-scale manufacturing. Some patrons see a product in a store that they feel can be made cheaper, or a business might want a set of embroidered caps or color-printed shirts for a promotion or a corporate event or team. Some patrons come to gain experience and practice different making techniques to enhance their resumes or job prospects. Looking in the trash bin, there were quite a few thin plywood sheets that had been cut out into patterns of Christmas tree ornaments; apparently many of the personal projects this time of year involve making DIY Christmas decorations, including wood cutouts for tole painting. One sheet had a girl’s name cut out of it, possibly as a birthday or Christmas gift that will be a decoration in a daughter’s room.
My tour guide told me that the major challenge had been having enough patrons lately due to the pandemic. They have plenty of space, a rarity for makerspaces, and their equipment was already paid for by the previous business. They use subscriptions for rental, employee salaries, and purchasing new or replacing old equipment. They have not done much in the way of advertising, as word-of-mouth has been sufficient up until now. The type of people who want to use makerspaces are generally good at searching them out using Google. They have weathered the COVID slowdown by increasing their custom work orders, which is really their major source of income.
The largest challenge they have is training. They cannot do much training of patrons; although some of these machines are fairly easy to use, such as the laser printers, other equipment such as the wood lathes and milling machines takes quite a lot of training to use safely. Employees do not have the time of training themselves to be able to teach others how to use the equipment, so they must rely on people already having expertise. They know most of their patrons and their capabilities well and so far haven’t had to set up any type of database or certification requirements, but they admit it may need to be done. They have not yet held any in-house classes but have created a video for training on one of the machines and may decide to do more. There will still need to be a hands-on component to the training; not all the knowledge needed to effectively run a complex machine can be learned from watching a video only.
The Fabrication Shop at the Jet Propulsion Laboratory. There are five 5-axis milling machines, and the large tan object to the right of center in this photo is a custom drilling tower. Any part for a space probe, such as a robotic arm or the rocker-bogey suspension of a rover can be created here.
Professional In-House Makerspace: The Jet Propulsion Laboratory:
The Jet Propulsion Laboratory (JPL) in Pasadena, CA is one of ten NASA field centers. It specializes in designing, building, and testing robotic space probes that explore Earth and other planets. To accomplish this mission requires highly sophisticated knowledge of interactive design, electronics, mechanics, propulsion, communications, data processing, and other engineering and technical skills in addition to expertise in planetary science and orbital mechanics.
Space Probe Approval
For a space probe to be approved and developed takes a number of steps. First, Congress must approve funding for the probe based on opportunities for launch, which depend on the orbits of the planets. For example, probes can only go to Mars once every 26 months when Mars and Earth align. An Announcement of Opportunity is made at the annual Lunar and Planetary Science Conference in Houston, and teams of scientists at various universities and space research centers compete to have their instrument fly on the probe. They submit proposals and the best ones are given seed money to create and test a prototype. The designs which test out the best and fit with the probe’s mission are selected and the scientific groups then build a final version which is shipped to JPL. Meanwhile, the bus (basic structure of the probe) is designed along with its systems, which include propulsion, communication, power, navigation, and landing sub-systems, if needed. Prior to the development of design software, space probes took up to ten years to design, build, and launch because each department designed its own part of the probe, then had to redesign when their parts didn’t fit with the other parts.
Wayne Zimmerman shows a group of teachers the cryobot that is designed to melt its way through layers of ice on Mars or Europa and has been tested successfully on an island off the Norwegian coast. Photo taken summer, 2004.
The Project Development Process
In the early 2000s, the Project Design Center was created to speed up the process of probe development as all system engineers work in the same room interactively. If propulsion requires larger fuel tanks, then communication and power systems need to be moved. All parts must be under an established weight and be able to fold together to fit inside the faring of the launch vehicle. The probes are a real-world transformer: They fold together for launch, then unfold for their cruise to another planet, then transform again for aerobraking or retro-rocket orbital insertion, then fold another way for entry, descent, and landing. Once the design is approved, the major parts are machined in the Fabrication Shop, which houses five 5-axle milling machines, a specialized 25-foot drilling tower, etc. Small devices and their micro-electronics are built in the Micro Devices Lab. All the parts are assembled and tested in the Assembly Building, which has a series of clean rooms. Once the vehicle is built and working, it is disassembled and shipped to the top of the hill and the parts are subjected to environmental stresses in the Environmental Test Lab, generally referred to as Shake and Bake. Parts are placed on shaker tables to simulate the vibrations of launch, placed in an acoustic chamber and blasted with over 150 decibels of sound to simulate the acoustic stresses, and placed in vacuum chambers under intense radiation to simulate the vacuum and radiation environment of space. Many parts fail; for most components of a probe, several copies must be made so that at least two space-worthy versions are available, the primary and backup. Once testing is complete, the parts are shipped to Cape Canaveral where they are reassembled inside the launch faring at the top of the rocket inside a clean room. Finally, they launch, cruise to their destination, and go into orbit or land. Every step of the way is tested and retested. Having a failure of a space probe wastes hundreds of millions of dollars and years of the scientists’ and engineers’ lives. Probes have failed for minor reasons, including failing to convert English units into metric units or the failure of a single explosive bolt to fire.
Continuing our tour of the Fabrication Shop at the Jet Propulsion Laboratory
JPL as Makerspace
JPL can be considered as the ultimate makerspace; all of the labs and shops at JPL have the overarching purpose of designing and building space probes and their instruments. Every project is unique, all results are innovations. As I have been told by JPL engineers, if it were easy or routine to make, they would have it done somewhere else. New technologies are tested all of the time, such as unfoldable solar sails, inflatable tires and habitats, probes with quantum level instruments and micro-thrusters that will fit inside a shoebox. Every building at the lab holds surprises. In one lab a cryogenic torpedo probe sits on a table. It has been designed and tested to melt its way down through layers of ice, sampling for signs of life along the way and sending data back through a wire tether to a lander. It may be used on a mission to land on Europa, a moon of Jupiter, and drill through the ice to test the liquid water ocean underneath. In another lab, a spider bot is being tested that can crawl down the cliffs of Valles Marineris on Mars. Rovers such as Curiosity, Perseverance, Spirit, and Opportunity are tested in an outdoor Mars Yard made to simulate the slopes, regolith, and rocks at a landing site. They are also tested inside at the In-Situ Instruments Lab. The Spaceflight Operations Facility receives data from probes in space through the Deep Space Network of radio antennas. The Multi-Mission Image Processing Lab takes that binary data and reassembles it into photos and 3D images.
An engineering test model of the Curiosity Rover in the In-Situ Instruments Lab (ISIL) at JPL in 2012. The actual rover was scheduled to land on Mars two days after we took this tour.
Many different specialties are needed by JPL. Students with experience in digital imaging, data processing, engineering, 3D modeling and CAD, computer programming, planetary science, electronics, mechanics, and so on are in demand. JPL looks for many types of talented people, and the more experience they have with collaborative problem-solving, creativity, innovation, and making, the more attractive they will be. For example, Rob Manning was a drafting student in high school and college who was hired at JPL to help design space probe parts. His talent has been recognized, and he is now in charge of the Seven Minutes of Terror of Mars landers and rovers, the most critical phase of Entry, Descent, and Landing. A thousand things must happen at exactly the right moments for a probe to successfully land on Mars. That so many probes are successful and last well beyond their designated life spans (the Mars Odyssey probe has been in orbit 19 years) is testament to the quality of engineering and craftsmanship at JPL.
To identify talented students and encourage them toward STEM careers, JPL brings in high school and college interns each summer to work with project engineers. Many of these go on to permanent jobs at JPL. They have a very active Education and Public Outreach department headed by David Seidel, one of my favorite people on the planet and whom I have worked with to provide educator workshops. As a teacher visiting JPL, one is struck with the focus and single-minded purpose of the employees and their attitude of being able to bring about the impossible, literally doing what has never been done before. The culture of experimentation, questioning, collaboration, thinking outside the box, testing, revision, and engineering makes it one of the most exciting places to visit on the planet.
David Seidel, Education and Public Outreach Director at JPL, leading a tour of the Microdevices Lab with a group from the NASA Explorer Schools program in 2004.
Emergent Themes:
In conclusion, my study of makerspaces has shown some common themes across all of the levels of makerspaces:
Training: There is a continuing need for training of both patrons and teachers/ directors/ employees. As new technologies and equipment are added to makerspaces, teachers find it difficult to take the time to learn and practice the new technology. Patrons need to be certified on new equipment and receive training on using design software. Some makerspaces solve this problem by having experienced students teach new students, or through formal classes or one-on-one instruction as time allows. Other spaces use videos to train patrons on equipment. Some makerspaces require formal certification before patrons can use equipment on their own.
Encouragement of Creativity: Although little evidence was found of formal teaching of creativity and innovation, all makerspaces encourage and support creativity either deliberately or indirectly. There is a major disconnect between the expectations of university level makerspaces and high school makerspaces; few high schools teach innovation or entrepreneurship, yet university makerspaces are set up to incubate new businesses and therefore expect students to already know these skills. Some programs have been created, such as entrepreneurship as a college major with courses designed to teach business acumen, funding, and marketing for start-up businesses, but more needs to be done especially at the high school level to train students to be innovative inventors and entrepreneurs.
David Seidel explaining how rovers are tested in the Mars Yard at JPL, summer 2002.
Challenges: Funding for initial set-up and continued maintenance and sustainability is the most common challenge followed closely by space; most makerspaces are short on room for building, testing, and storing projects. Another common problem for makerspaces in schools is lack of time for completing projects; teachers usually underestimate the amount of time required to creatively complete a project.
Structure: Makerspaces can either be highly structured and teacher-centered or they can be more student-centered where students work on individually chosen projects. Once common theme was that the structure of school makerspaces changes during the school year; at the beginning, when training on tools and equipment is needed, the lessons are more structured. As students gain competency, they are better able to propose and create their own projects.
Support for Content Area Subjects: When makerspaces are inside an individual teacher’s classroom, they are used to support content standards and objectives. When they are in school libraries with dedicated teachers, the integration with specific subject areas becomes weaker and the makerspace directors often use their own curricula or lesson plans. Often only an occasional teacher will visit or have student use the space to create content related projects, which lessons the potential benefit of school makerspaces. There is a general lack of training for classroom teachers on how they can integrate making into their lessons.
David Black (yours truly) in front of a large vacuum/irradiation chamber at the Environmental Test Lab (aka Shake and Bake) at the Jet Propulsion Laboratory, 2004.
Demographics: In some schools, makerspace usage is dominated by white male students, but in others there is a more balanced and equitable demographic. At the beginning of the school year in K-8 grades, the girls usually work with girls, but the groups will become more mixed by the end of the year. In some schools minority students are well-represented, in others more needs to be done to ensure full inclusion. Many makerspaces need to be redesigned to allow accessibility by people with disabilities. More girls and minority students should be engaged in making if we are to ensure an equitable balance of future engineers and innovators.
I am not through with this research yet; I hope to visit a number of my colleagues in middle and high schools and to visit univeristy makerspaces and other commercial makerspaces over the next few years to see how creativity, innovatin, inventing, and entrepreneurship all fit together in makerspaces.
Here is a summary diagram I created as part of my final report for the case study course:
A summary table of my findings from the comparative makerspace case study.
References:
Caruso, B. (2019). Innovation instruction in the academic library: A new focus. Journal of Electronic Resources Librarianship, 31 (2), 88-99.
Halbinger, M. (2018). The role of makerspaces in supporting consumer innovation and diffusion: An empirical analysis. Research Policy, 47 (2018). 2028-2036.
Kye, H. (2020). Who is welcome here? A culturally responsive content analysis of makerspace websites. Journal of Pre-College Engineering Education Research, 10 (2), Article 1.
Lassonde Entrepreneur Institute, (2016). Welcome to the Lassonde Institute, retrieved from YouTube on 12/11/20 at: https://youtu.be/9C0DXJjiAi4.
McAllister, G. (2019). MakerSpace review – Orem Public Library, retrieved from YouTube on 12/8/20 at: https://youtu.be/pnmJgHbro3o.
Moorefield-Lang, H. (2015). When makerspaces go mobile: Case studies of transportable maker locations. Library Hi Tech, 33 (4). 462-471.
Rouse, R., Krummeck, K, and Uribe, O. (2020). Making the most of makerspaces: A three-pronged approach to integrating a makerspace into an elementary school. Science&Children, Feb. 2020, 31-35.
Sheridan, K. et al. (2014). Learning in the making: A comparative case study of three makerspaces. Harvard Educational Review, 84 (4), 505-531.
Slama, J. (2019). New makerspace creates welcoming school culture at Midvale Middle, The City Journal, Dec. 4, 2019.
Steele, K., Cakmak, M., and Blaser, B. (2018). Accessible making: Designing a makerspace for accessibility. International Journal of Designs for Learning, 9 (1), 114-121.
Wong, A. and Partridge, H. (2016). Making as learning: Makerspaces in universities. Australian Academic & Research Libraries, 47 (3), 143-159.
Mihaly Csikszentmihalyi, who proposes that creativity is a cognitive state of flow, where the challenges of a task are balanced with the skill level of the individual.
Any human characteristic must be complex, given the many differences between people including their opinions, experiences, and mental abilities. Creativity is one such concept; an idea that everyone understands but that no one can agree on. We know that it exists and is widely distributed, but we cannt agree on what it actually is. I have been crawling down this rabbit hole for my entire professional life and especially this last year as I have begun a doctoral program in Innovation and Education Reform at the University of Northern Colorado. In my last post, I tried to lay out all the concepts related to creativity and innovation in order to systematically explore them over the four years of my doctorate (and beyond). The first concept that needs tackling is to develop a working definition of creativity, then move on to a definition of innovation.
Personal Destinies by David L. Norton. Not the easiest book to read, it discusses a philosophy of eudaimonism, or the development of the individual’s full potential, something that resonates with me as an educator.
For my first semester EDF 670 course, I was required to complete a detailed doctorate-level literature review. I delved deeply into the research on creativity, going all the way back to a Creativity course I took in college back in 1982. The leading definition then was that creativity was a process for solving problems using a rational sequence of steps (more akin to the current definition of the engineering design process). In a political philosophy course during my masters degree program, I was required to read Personal Destinies: A Philosophy of Ethical Individualism by David L. Norton (1976, Princeton University Press). He used a Greek conception of creativity as an inner trait or drive (called the daimon) that must be expressed for an individual to become themself, the second great Socratic imperative. Everyone has individual talents or gifts that can be developed; these talents are commensurable, in that our society consists of many different people whose talents compliment each other. Further research has identified other definitions for creativity, such as a great deal of research I did on creativity as flow, a mental state where skills balance challenge as proposed by Mihaly Csikszentmihalyi.
While preparing for this blog post two weeks ago, I researched websites that attempted to define creativity, thinking that I might find some alternative explanations beyond what was in the literature. I came across a website from Dr. Donna Hardy at Cal State Northridge who taught a course in the Psychology of Creativity (Psych 344/444) from 1997 through 2010 and asked her students to provide their own definitions of creativity, which were posted on the site at: (http://www.csun.edu/~vcpsy00h/creativity/survey.htm).
I have downloaded these definitions and analyzed them to develop an expanded list of possible approaches to creativity, including those I had already identified from my literature review. This resulted in a list of nine possible definitions. With these in hand, I went back through the student survey and tallied which categories their definitions fit into. In some cases the choice was obvious, but in others the definitions fit into more than one category, so I gave them multiple tallies. It was an admittedly subjective process, and the definitions are not mutually exclusive and possibly not comprehensive. There could still be other definitions that I have not considered. There were some students who refused to define creativity or said it was undefinable, used a tautology to define it (such as “creativity is the act of being creative”), or said that it was different for every person. I created a category 0 for these non-definitions. Altogether 548 students wrote their own definitions, of which I recored 748 tallies.
The nine definitions I came up with are as follows:
Categories of creativity definitions:
0. Undefinable, or refused to define, or said that it has a different definition for each person
An innate personality trait, skill, talent, drive, need, passion, daimon, muse, or genius. There exists a commensurability of talents where each person has a different set of gifts. It is a human characteristic that cannot be taught, but it can be enhanced, encouraged, or diminished.
constellation of cognitive or mental skills that can be taught, practiced, and improved.
A mode of thought or frame of mind that is autotelic (self-rewarding) including imagination, exploration, conceptualization, appreciation of beauty, spirituality, visualization, and flow (when there is a balance of skills and challenge).
A process or series of steps that can be rationally and sequentially followed and which is informed by experience and intellect. The problem-solving process.
A moment of insight, clarity, or inspiration – the “Ah hah!” moment. This usually follows a period of incubation.
Ideation or fluency with generating many new and unique ideas through synthesis and the creation of greater complexity. Brainstorming; conceiving that which does not yet exist or making something from nothing.
Thinking outside the box, open-mindedness, breaking boundaries, originality, divergent or unconventional thinking, mental challenge, and conceptual blockbusting. Seeing things in a new way.
Persistence and resourcefulness in bringing a final useful, socially valuable, or aesthetically pleasing tangible product from conception to fruition; innovation.
Self-expression, artistic expression, individuality; one’s personality or feelings and emotions made manifest which resonates with the emotions of others. An outlet for the soul; self-discovery, empowerment, fun, and play.
These definitions are a work in progress, and I will continue to tweak them until I am satisfied they are good enough to start doing some serious research with. I would like to do a survey through both of my blog sites and of teachers I know. There is still a lot of overlap between some of the categories. I think putting them all together, I am approaching a fairly comprehensive definition of such a complex human characteristic, but I haven’t quite arrived yet.
After tallying the categories, the results are shown in the table below:
Screen capture from a spreadsheet used to tally definitions of creativity.
The most commonly held definition of creativity by the college students in the Psych 344/444 class was that creativity is self-expression or artistry, an outlet for feelings, emotions, and personality. It is individuality, self-discovery, empowerment, fun, and play. 28.07% of the students wrote some variation on this definition. It may be too broad of a category and in need of subdividing; it is too tempting to use it as a “grab bag” for all definitions that don’t fit elsewhere. The next most common definition was that creativity is open-mindedness, thinking outside the box, unconventionality, and divergent thinking with 19.52%. The third most common definition was that creativity is the act of ideation or the development of new and unique ideas through brainstorming, synthesis, and greater complexity (complexification?) with 15.37%.
A pie chart of the percentages of each category of definitions of creativity used by students in the Psych 344 class at Cal State Northridge from 1997 to 2010.
Other definitions were not as common, with some showing only a low percentage of usage, the lowest being Definition 5, where creativity is the moment of insight, inspiration, or sudden clarity at 2.14%. Although this is the least common category, I included it because there are a number of well-documented cases in the literature of moments of insight following long incubation, such as the famous example of the discovery of the structure of benzene by August Kekule.
There was no demographic information provided other than the students’ names. Cal State Northridge is in an ethnically diverse part of northern San Fernando Valley, and the students’ names suggest that their classes are also ethnically diverse, as do the photographs provided of student projects. I do not know if the Northridge students have provided significantly different definitions than students at other universities would. I tallied the various semester classes in two groups; the first 12 semesters from 1997 through 2003 and the final 11 semesters from 2004 through 2010. For most of the categories the results are not significantly different, but there is a slight increase in defining creativity as self-expression and a decrease in defining it as an act of imagination. I have not tried to calculate standard deviations or do any sophisticated Chi-squared or other tests. The subjective nature of my categories is not scientific enough to warrant that kind of analysis. I simply wanted to develop definitions that could be used for further studies that will be more statistically valid. I am thinking ahead to my dissertation, which will center around the need for and practices of teaching creativity in science classrooms.
I will try to unpack the details of each definition and give some backup literature in my next post. Eventually, the core of what I am writing and speculating on here will find its way into Chapter 2 of my dissertation. I still have a long way to go, but this is a necessary first step. I hope you don’t mind my taking you along with me.