Feeds:
Posts
Comments

Archive for July, 2017

Trans-Pacifica, Part II

Boarding 777

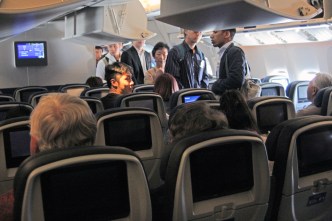
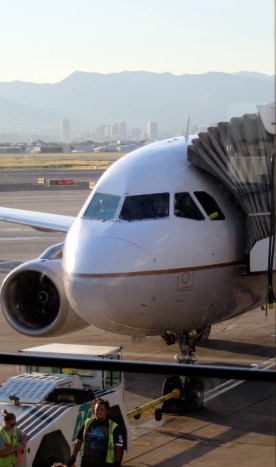
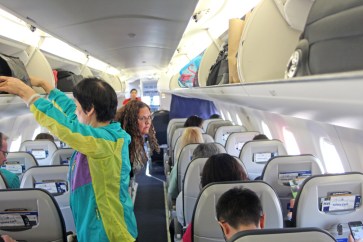
Passengers boarding the 777 for our flight to Narita, Japan on Thursday, July 13, 2017. This was my first time on a Boeing 777.

We flew into San Francisco International (SFO) over the south bay and landed, then taxied to our gate. Because we were late, the captain asked if those not in a hurry could wait to deplane until the rest of us had left. I hurried off the plane and asked a gate agent standing at the departure board how to get to the international terminal. She pointed the way, and I discovered that the agent in Salt Lake needed to come up with new definitions of what “just” and “around the corner” mean. It was quite a walk with my overloaded computer bag to find Gate 101, but I did it in about 20 minutes. As I descended the escalator into the gate area I saw Mike and Alicia, two other TC teachers, waiting in line to board. The flight was departing 15 minutes late, so I hadn’t needed to worry. Oh well.

We went through the boarding line and walked to the airplane. It is a brand new Boeing 777, and I have never seen a first class section like it. Each person has their own fully reclining seat with its own private compartment, counter, and computer screen. Not to mention slippers and other amenities. Perhaps someday I will be able to afford such seats, but not today. I found my seat (30D – just to the right of the left aisle) and put my camera in the overhead bin and my snack bag and computer bag below. Alicia was just behind me and Mike just ahead behind the bulkhead, where he has more leg room. Actually, the legroom here isn’t too bad – my knees don’t touch the seat ahead, which is much better than most domestic flights I’ve been on recently.

First class on 777

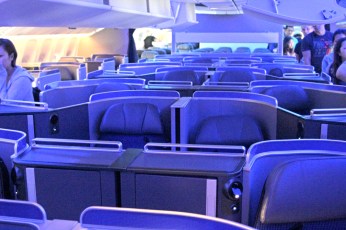
First class compartments on a Boeing 777. Each compartment has a reclining chair and is like a small sleeper car on a train. But these were not my seats.

Everyone finished boarding and 12:00 (our new departure time) came and went. This plane has a built-in mini-computer (similar to an iPad) in the back of the seat before us, so I scrolled through the directory and found the Mars series by National Geographic, which I’ve watched the first episode of back in February. I started watching the second episode. The captain came on the intercom to announce that the delay was because of a radio transponder that wasn’t working right and had to be fixed before we could depart. They were working on it and would keep us updated.

I finished the second episode and went on to the third. The captain came on to say they had called in a ground support team and that a flight from Korea had had the same problem this day. So if it’s a continuing and persistent problem over multiple aircraft, why hasn’t it been fixed? Or why don’t they know how to fix it?

Time dragged on while we sat there and sat there. The third episode moved on to the fourth. 1:00, then 2:00, then 3:00 came and went. They came on the intercom to announce that a team from Boeing was looking into the problem. They let passengers off the plane to get food. I didn’t leave the plane, but did get up to walk around and use the bathroom. It was clear we would miss our connecting flight from Narita to Jakarta. Mike was keeping Sarah apprised of our situation.

Finally, around 5:00, they announced that the radio was fixed but that they now had to replace some of the flight attendants because they would go into overtime if they remained on the flight. They started to reboard the plane, and about 6:00 we went through the safety briefing (United is trying to copy the light tone of the Delta videos) and pulled away from the gate.

But our troubles weren’t over. Our taxi to the runway was delayed, and when we finally got close to taking off, the captain came on again – most apologetically, and said that the flight crew had timed out because of the delay. If we had taken off immediately, they would have been able to reach Narita just under the new regulated maximum flight times for flight crews. They had no choice but to taxi back to the gate and replace the flight crew.

So we turned around and headed back to the gate. The little indicator showing our plane on the map and our route across the Pacific had stayed in exactly the same place for six hours. Now the plane turned around but still didn’t move. It took us 15 minutes to return to the gate and another 15 minutes for United to find someone to extend the jetway. They were going to have a replacement crew standing by, but just before they got the door open they announced that the flight had been cancelled and we would be rebooked for a flight at 7:30 in the morning to Narita.

I am reporting this just as it happened but leaving out the groans and exclamations of disbelief that attended each of these announcements. It was past 7:00 before we got off the plane after going nowhere for seven hours. I realize that these problems were not entirely United’s fault (as compared with my experience getting to Omaha two years ago). But they could have managed the situation better. Knowing the flight attendants and flight crew were getting close to timing out, they could have replaced them before we taxied out to the runway instead of taking the chance.

Stuck in SFO

Alicia and Mike, fellow teachers going to Indonesia. We are stuck in a stationary line at the customer service desk waiting for alternate flights when our flight to Japan was canceled.

We walked to the customer service desk, which was outside of security, and found ourselves in the same sort of extremely slow line I’d experienced two years ago. Canceling a flight isn’t an uncommon problem, so it surprises me that it takes the agents over ten minutes to handle each customer given all flights are available online now. I know getting luggage off of one plane and onto another is also a challenge, but there should be a better system. The agent didn’t seem to know exactly what to do and had to call several people. They need more training and faster systems. Here you have customers that have already been inconvenienced (a euphemism if there ever was one) and are already upset. Then you make them wait an hour in a line that doesn’t seem to be moving (the first class passengers were done before we even got moving forward). It’s not a great way to insure repeat business. They could at least have pulled more agents up to use all of the available kiosks. But no. While waiting in the slow lane, I found an outlet near the front kiosk and charged up my computer partially again.

THe slow line

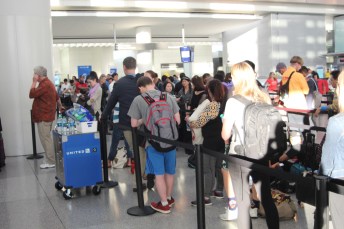
United did provide us with drinks and snacks while we waited in the slow line for alternate flights. We are almost to the front after 45 minutes.

We finally got to the front and they found an alternate flight to Jakarta through Sydney, Australia, leaving later that night at 10:50. They checked our baggage claim tickets to make sure our luggage would be transferred to the new flight and issued new boarding passes. Our final leg from Sydney to Jakarta would be with Delta airlines through Garuda air, so we got a voucher for that flight but would need to get boarding passes at the gate in Sydney. They also gave us $20 in meal vouchers.

I tried all day to keep a calm perspective and positive attitude to all of this. At least we didn’t have to go to a hotel and get up early, recheck our bags, and go through security early in the morning. This way we had about two and a half hours before we needed to board and could get a meal in the airport. And I get to see Australia from the air as we fly over it tomorrow. I am trying to develop a kind of Zen attitude about travel. We’ll get there eventually, and this way, we’ve got another interesting story to tell. But I will not willingly travel on United Airlines ever again. Enough is enough.

Read Full Post »

Salt Lake skyline

The Salt Lake City skyline as seen from the airport, July 13, 2017.

Here I go on another adventure – I’m heading west, then south, on my way to Jakarta, Indonesia. I’ve been chosen for the Teachers for Global Classrooms (TGC) program sponsored by the U. S. State Department’s Bureau of Education and Cultural Affairs. About 75 teachers out of 500 applicants were selected to travel to six countries: Indonesia, Senegal, Morocco, India, Columbia, and the Philippines. It is a teacher exchange program, in that teachers from developing countries are chosen to study English and education theory at colleges in the U.S. for up to one semester or five months, then return to their own schools to act as hosts for two American teachers.

I will be working with Muhammad Nazaruddin, who teaches English at SMA Negeri 1 Mandastana, or Mandastana Public High School # 1. This school is located in southern Kalimantan, the Indonesian part of Borneo, near the city of Banjarmasin. I am also working with Craig Hendricks of Indianapolis who teaches six grade STEM classes. We’ll be observing classes, teaching of American culture and STEM related lessons, and conducting a professional development session on technology integration for teachers from throughout southern Borneo. While in Kalimantan, we’ll get to see batik making, visit an actual diamond mine (wohoo!), see an island sanctuary for proboscis monkeys, visit the famous floating markets, and get to know a part of the world I never dreamed I would ever see. Me? This guy from a Podunk town in western Utah get to visit the rain forest and wilds of Borneo? No way! Yet, here I go.

I’ve been preparing for this for over a year now, what with taking an online course, having medical exams, attending a symposium in Washington, D.C., packing and repacking, getting a passport renewal and visa, etc. Yesterday (Wednesday, July 12, 2017) I spent at the gym to work my legs out, as they tend to swell up when I travel. I took Jonathan and William to swimming lessons, got some brochures from the Utah Valley Visitors Bureau down at the convention center to give to students in Mandastana, bought last minute supplies, packed, cooked baked ziti for supper and egg/sausage muffins for breakfast, watched the Season 10 premiere of Smallville with Becca, sent the receipts for the STEM Action Center grant, charged up all my devices, got the Kindle up and running, gassed up the car, dropped off The Year of Living Dangerously  and an Indonesia travel video at the library, and prepared in every way I could think of. I am as ready for this as I can be.

I got to bed at 2:30 and had to get up this morning at 4:15 to make my flight. We got the boys up and into the car in their pajamas and left home at 5:30. Becca drove me to the airport as a pink to orange sunrise lightened over the Wasatch Mountains. She dropped me off at United Airlines at Terminal 1. I waited through the lines and got my bags checked and my boarding passes. Security was busy but fast, although they had to pat me down and look over my laptop thoroughly. Given the recent ban on laptops coming in to the Unites States, I’m relieved that I made it through so easily.

I arrived at Gate B9 with an hour to spare before boarding, so I worked on cleaning up photos of our recent trip to Four Corners for my presentation in Borneo, until I realized that I was late boarding the plane – but they hadn’t started to board yet. So I looked at the status board above the gate counter and it said the flight was delayed for “air traffic control” issues in San Francisco. It was supposed to depart at 8:15 but was delayed until 9:38. I had a three-hour layover so I was still good. I went back to cleaning up photos. Then I saw that the board now read that our departure would be at 10:05. I asked the gate agent if there would be a problem and she said I should still be fine, because the international terminal was “just around the corner” from our incoming gate, and I’ll have about 45 minutes to reach my flight to Narita, Japan, before it departs. She said they would look after me, but this is United Airlines and I’ve had problems with them before (I will eventually post about my trip to Omaha). I would have chosen a different airline, perhaps Singapore Air, to take me to Jakarta. But since this is a U. S. State Department program, we have to fly under the regulations of the Fly America Act and use an American carrier.

Boarding flight from SLC

Boarding our flight to San Francisco.

At about 9:00 it was announced that we had a window of opportunity to reach SFO through a lull in air control, so we quickly boarded the plane and got our seats for a 9:25 departure. I’m all for seizing an opportunity when we get it. We taxied out and took off, and I hoped to myself this would be the only glitch in my journey. If only. Little did I know that worse was yet to come.

I sat by Stan Jensen from Castledale. He’s traveling to the Bay Area to see his grandson in a baseball tournament. He knows Duane Merrill well – they even coached little league baseball together. This world keeps getting smaller. While boarding the plane, I spoke with two different families who were Chinese and was surprised that my Mandarin was understandable at all. One family was from the mainland and heading back to BeiJing. The other was from Taipei in Taiwan who now live and work in America. They are on a vacation to ShangHai. Things have changed in the 36 years since I lived in southern Taiwan, when there were no relations between the mainland and Taiwan and no one traveled between them. Now relations are almost normalized.

I took some time on the flight to start my notebook/journal from which I have taken these notes. As I thought of the title for this post, it occurred to me that I’ve been fortunate with the opportunities I’ve had as a science teacher. I’ve kept my ears open to hear about these programs, and I’ve been even more fortunate to be selected for quite a few of them. Other opportunities will come, if I can only open up the windows to find them.

When other teachers ask how I’ve managed to do all of these things, I’ve responded, “Because I applied for them.” That seams to be a flippant answer, but what I mean from it is that I’ve looked for opportunities consistently and opened the windows by applying and re-applying if necessary. I’ve made my own fortune, so to speak, and haven’t given up if something is important enough. It took applying four times, once per year, to finally get accepted as the Educator Facilitator for the NASA Explorer Schools program, and so many other opportunities have come because I refused to let that particular window close. Success breeds success, and participating in the TGC program will undoubtedly lead to further opportunities later on. So as I finish the first leg of a grand adventure, I know great things still lie ahead, in Indonesia and beyond, even if I don’t yet know what they will be.

Read Full Post »

Further Adventures in Dyeing

Me in sweater - 7-4-17

Sweater crocheted from 100% wool yarn dyed with natural dyes, including rabbitbrush, madder root, cochineal, indigo, walnut shells, sandalwood, and logwood.

Part I: Woad is Me

In my STEAM it Up class at American Academy of Innovation we have been inquiring into the best formulas for dyeing cloth using natural dyes. I’ve reported on this several time in this blog before, and this will be my last post about it (at least for now). I wanted to describe our follow up efforts and present our final results.

Not woad - but pretty

What I thought was woad – but now plainly isn’t. Woad has yellow flowers. This is quite pretty, though.

The first note I have to make is that I was mistaken in my post about woad. The plant that I had accidentally found and identified as woad is NOT woad. I’ve been keeping an eye on the plants as I drive past the spot on Mountain View Corridor in the southwest corner of Salt Lake Valley, and waiting for them to bloom in May so that I could make a final positive identification. But, alas, woad is me, the blossoms were red and pink – and quite pretty, hanging on long stems in small pendular bell shapes. However, woad has yellow flowers. This is not woad, but a closely related species (the leaves and other features are identical).

Real woad

This is real woad. Notice the yellow flowers and green leaves with white vein clustered at the bottom.

That led me to go on a hunt for true woad, and I soon found it – just five miles further south along Redwood Road across from Camp Williams, by the Herriman Pit. There were plenty of other yellow flowered plants, but these I knew were clover. Then, at this site, along the fence, I saw some plants with larger yellow flowers. I stopped and looked and sure enough, it was truly woad. I am including some photos so you can see it, and I will add a retraction to my previous post about woad (A Woad Twip).

Real woad 2

Real woad, again. This was located near Camp Williams on the other side of Redwood Road in Utah. It is a Class 3 Invasive Weed and has gotten out of control in northern Utah.

I did not have the time left in the school year to go through the difficult extraction process, so I merely noted where the plants were. Two of my 8th Grade Science students had written a report for their Environmental Science Project about invasive species. The project required an action plan, and for their action they travelled down to this spot several days later and pulled up all the woad plants they could reach on the road side of the fence. There are still many more further in that I will harvest in September when the indigotin is the highest and have my chemistry students do the extraction. I still have the extracted powder from the non-woad plants – we will experiment with it this fall to see if it, too, is a dye since the plants appear to be related.

Part II: Born to be Purple

Purple everywhere

Our experiments with logwood yielded this beautiful variegated yarn – and lots of purple dye.

We received our money for the Classroom Grant from the Utah STEM Action Center in early May and sent off our order, which included additional yarn skeins (Kona sports yarn, 100% Merino wool). It also contained bolts of silk and linen as additional fabrics to experiment with (more on these results later). We also ordered a package of a new dyestuff: logwood.

We looked up instructions for basic dyeing with logwood and followed them as our first experiment. It called to pre-mordant the wool in alum, which we did, and to use about the same weight of logwood chips as the yard we were to dye. This seemed excessive, so we used have as much logwood by weight as the yarn. We added about 750 mL of boiling water to the logwood chips as per instructions and soaked them overnight, then simmered the chips and solution for two hours. After filtering out the solution, we placed half the skein in the solution so that we could variegate the yarn for more interest and boiled it. After an hour, the yarn had turned a very dark purple. We turned the skein around (a messy process – do these sorts of things in a sink if you can, or in a waterproof container) and boiled the other end for only 15 minutes, which provided a nice lavender, moving the boundary between the colors in and out to get a gradient of color. After rinsing and washing, the dark end was still very intense purple, as you can see in the photos.

Logwood comes from Central America and was highly prized because, with its dark purple color, all it took was an overdye with a yellow color to produce black, which is a hard color to come by for natural dyes. Keep in mind that in Europe, the only reliable purple dye (more of a burgundy) was the famous Tyrian purple made from the Murex sea snail, which was very expensive. Now we have a reliable (and powerful) New World purple.

We were left with a lot of dye solution. I even collected the rinse water from the sink and saved it in an aluminum foil pan, which was still intense purple. Unfortunately, I left the pan over the weekend and discovered that logwood solution is acidic and reacts with aluminum. I came back on Monday to find purple solution all over the cabinet and the tile floor (Note: Never have carpet in a science classroom). It was quite a clean up job and involved lots of paper towels and bleach. I added more water to the logwood chips and boiled it some more and still got a deep purple. This stuff just won’t quit. Now I have about 1.5 L of logwood dye solution left even after using it for several other experiments.

LInen and silk-rabbitbrush

Silk (left) and linen (right) dyed with rabbitbrush. In this case, the dried blossoms were used, which I collected and dried last fall. You can see that both fabrics accept the rabbitbrush well using alum for a mordant.

We experimented with using silk and linen, and both accepted the logwood well. We tried overdyeing with rabbitbrush (our free go-to yellow dye) and it created a kind of sickly purplish grey color – not my favorite, but interesting if you’re into grey. We did not experiment with saddening or gladdening the color. The literature says that adding even a small bit of an iron compound to logwood will turn it a dark grey. That’s an experiment for another time.


Sandalwood results

Sandalwood dyed on cotton with modifiers added. On the top right, it is plain sandalwood using an alum mordant. On bottom right, tartaric acid (cream of tartar) has been added to lighten (gladden) the color. On top left, tin has been added as a gladdener. On bottom left, iron (II) sulfate has been added to sadden (darken) the color to an interesting reddish grey.

Part III: Modifying Sandalwood

Sandalwood was another natural dye we did some experiments with before we ran out of yarn several months ago, and a team of students had experimented with saddening and gladdening the sandalwood using iron (II) sulfate and cream of tartar, respectively. Iron turned the sandalwood from brick red to grayish brown, and cream of tartar lightened the brick red to more of an orange. Now that we had more wool, I wanted to dye a skein of it with sandalwood. I had read that copper compounds also make an interesting modifier for sandalwood, so we dyed one end of a skein in a 500 mL beaker with un-modified sandalwood (after pre-mordanting the yarn with alum) and the other end in a 500 mL beaker with sandalwood modified with a small amount of copper (II) nitrate. It turned the brick red into a pleasant reddish brown, a bit nicer than our experiments with walnut shells had produced.

Sandalwood process

Skein of yarn being dyed with sandalwood. The yarn is first boiled in an alum solution as a mordant (a metal salt that helps the dye molecule bind with the fabric), then we added copper (II) nitrate to the sandalwood at left, which saddened the color from brick red (right) to red-brown. The sandalwood had been filtered to remove the dye chips, then the solution boiled with the yarn dipped in it for about one hour.

Sandalwood skein

100% Merino wool dyed with sandalwood after it has been rinsed. The yarn was then washed in a machine on gentle cycle and allowed to dry in the air. I like the brick red and the brown-orange hues.

Part IV: Making a Sweater from Our Results

One of the points of this STEAM it Up class is to create final works of art from our investigations and projects. I now had eight different skeins of yarn, each dyed with a different natural dye using a variety of processes. My wife is excellent at crochet, and she volunteered (with some strong hinting from me) to crochet these skeins of dyed yarn into a sweater. She had never attempted a sweater before, and looked up patterns, made careful measurements of me (this was tricky because I have been losing weight), and set to work. First, she had to untangle the washed yarn and roll it into balls for more convenience in crocheting. Then she built the front and back pieces, counting carefully to make sure there were the same number of rows of each color. She completed these parts by March as a birthday present. Once we had the new colors, she completed the sleeves and sewed the pieces together as a Father’s Day gift.

David Black in sweater

David Black in the finished sweater. It is very comfortable. I have enough yarn left for my wife to crochet a beanie and maybe a scarf . . .

I presented our project at the STEAM Action Center’s Best Practices conference on June 21 at the Utah Valley Convention Center and had about 40 teachers attending. I wore one of my ice-dyed shirts, then the sweater over the top, then my Tie-dyed lab coat over the sweater. It was a bit warm, but during the presentation I did a little strip tease to show them the results. I also displayed other shirts, the yarn balls, and cloth swatches we’d made in the class for our experiments. The presentation went over well, and several teachers complemented my wife on her sweater design. It fits perfectly, and is a very comfortable sweater. Here is a photo showing what the different bands are dyed with.

Part V: A Quilt and Some Viking Dye Ideas

I had students in the STEAM it Up class who were experienced at making quilts – two of them even had their own quilting frames. Quilting is quite a big thing in Utah. As part of these continuing experiments, we have amassed quite a few swatches of cotton, silk, and linen fabric dyes various colors. I have the idea to create a patchwork quilt in the form of our school logo, with correct colors. We haven’t pursued the quilt project yet – too little time left in the semester. Another project for next year. We still haven’t gotten a good green, which is one of the colors in our logo. We’ve overdyed rabbitbrush yellow with indigo blue and gotten kind of a mottled olive green, but nothing really bright.

Stack of swatches

A stack of dyed cloth swatches – the results of our experiments. I hope to have them made into a patchwork quilt in the form of our school logo. On the right are our experiments with pyrography (wood burning), which the students got pretty good at.

Then I had a meeting at the Natural History Museum of Utah to plan out some professional development workshops in the fall (incidentally, one of them will include parts of our dye lab) and was allowed to browse through the museum on my way out. There was an interesting display of Navajo and Ancestral Puebloan fabrics and dyes, and a visiting exhibit on the Vikings that was fascinating. They had one display showing green dyed wool fabric, which was made from woad overdyed with weld (a yellow dye) and was bright green. Or maybe the other way around – the display was vague on that. So now we need to get some weld and use it with our own woad and see what we get. Another experiment for another time.

Sweater with labels

The finished sweater: The yellow at the top is rabbitbrush, the light orange is madder root, the deep red is cochineal in its natural color, the light purple is cochineal with some baking soda added (a base), the light blue is indigo, the yellow-tan to brown at the top of the sleeves is walnut shells mixed with rabbitbrush (in two separate beakers), the brick red is sandalwood, the bright red is cochineal again, and the deep purple at the bottom of the sleeves is logwood.

Part VI: More to Come

This is the fun part about STEAM education, project-based learning, and inquiry science: there is always more to learn, more variables to test, more experiments to refine. I’ve spent a great deal of blog space here just describing one continuing lab on dyeing cloth, but there are so many more ideas for combining the arts and history with STEM.

This post is overlong already, so I will wait for a later post to reveal our final results from the entire year’s worth of dyeing. I still need to talk about our year-end STEAM Showcase, which I will do tomorrow in my next post. Then it’s off to Indonesia on Thursday, which will require a long series of posts, if all goes as planned, so you may have to wait until September before I can return to give the dye lab results. I’ll write up a complete PDF you can use.

Read Full Post »

I’m taking a break from reporting on my preparations for my Teachers for Global Classrooms trip to Indonesia to bring you up to date on activities in my STEAM it Up and Chemistry classes, so that I can maintain some semblance of chronologic continuity.

Ice dye shirts 1

Ice dyeing creates intense, random colors.

Once we finished our unit on steampunk sculpture and cosplay costume creation, we began ramping up for the concluding section of our dyeing cloth lab in the STEAM it Up class. To get the students back in the mood, I introduced them to tie-dye and all of its STEAM applications. I’ve reported on how to do tie-dye in previous posts, so I won’t describe what we did again here. We did add a new wrinkle to the process by trying out a different type of dyeing using ice to randomize the colors. This is called ice dyeing, and you can find many beautiful examples online. The colors tend to be much more intense (because the dye powder is less diluted by the ice).

Here’s how to do it:

Adding dye powder

My STEAM it Up students adding tie-dye powder over the ice layer. The T-shirts and other cloth items are scrunched up on a tray under the ice.

First, you find a tray or grate or sieve of some kind that can fit inside a waterproof container, such as a plastic storage box. The grate must have holes to let water through and be raised a few inches above the bottom of the container so that the cloth won’t be sitting in the melted ice water.

Second, you need white or near-white cloth such as T-shirts or aprons or socks. These need to be pre-soaked in washing soda (sodium carbonate) dissolved in warm water. I use about a cup (250 mL) of washing soda to a sink full of warm water. Soak the cloth for at least 15 minutes, then wring out most of the water so that the cloth is wet but not dripping The cloth pieces or T-shirts then need to be wadded or scrunched up randomly and laid in the tray next to each other tightly enough so that they will remain somewhat folded up.

Ice with dye powder

The ice with a completed layer of dye powder. I demonstrated the process at the bottom with a spectrum of colors (and two shirts underneath). Students die the middle and top. Where complimentary colors are mixed, as in the top right, the results were more muddy. Yellow needs to be given more room since any other color will mix in and darken it.

Third, ice or snow is layered on top of the cloth or shirts. We simply raided the faculty lounge refrigerator’s icemaker and poured the ice on top of the cloth. It needs to make a fairly complete and even layer with no holes. We did this in May or we would have gone outside and gathered snow for a finer, more complete layer.

Fourth, tie-dye powder (we used Procion MX dye powder ordered from Dharma Trading Company) is spooned onto the ice or snow. This will use a lot of dye powder, so go sparingly and try to make a rainbow or spectrum pattern, with analogous colors next to each other instead of complimentary colors. Otherwise, the opposite colors will mix and you’ll get muddy results. There is some good color theory that can be taught here.

After the ice melts

To keep the T-shirts from sitting in the muddy melt water, the tray they are sitting in must be raised out of the water. I placed this tray on top of some funnels I use for tie dyeing. This is what the shirts look like after the ice melts. The shirts must sit for 24 hours with a lid on the container before rinsing. By scrunching up the cloth, and by the mixing of colors as the ice or snow melts, the final shirts have bright, random colors.

Finally, put a cover on the container and let it sit overnight undisturbed. It must be airproof, as the dyes need wet cloth and about 24 hours to set in. The colors will mix in the melt water to make a dark olive or brown color that can be saved for other dyeing. The shirts are then rinsed out in a sink with running cool water until no more color rinses out of them. They can then be washed with non-bleach detergent on gentle cycle and dried normally.

Ice Dye shirts 2

Ice dyed shirts.

Here is a photo of the results. Since some of my students forgot to bring their own T-shirts, I brought in all the old T-shirts I could find. Some of them had paint on them or were buried at the bottom of my drawer and hadn’t been worn in years. Now they have a new lease on life and are my favorite tie-dye shirts. Over the years, I’ve built up quite a collection, but these have the most intense colors.

Me in ice dye shirt

Here I am wearing my favorite ice dyed shirt. Notice how bright the colors are, but it does use up a lot of dye powder.


Read Full Post »