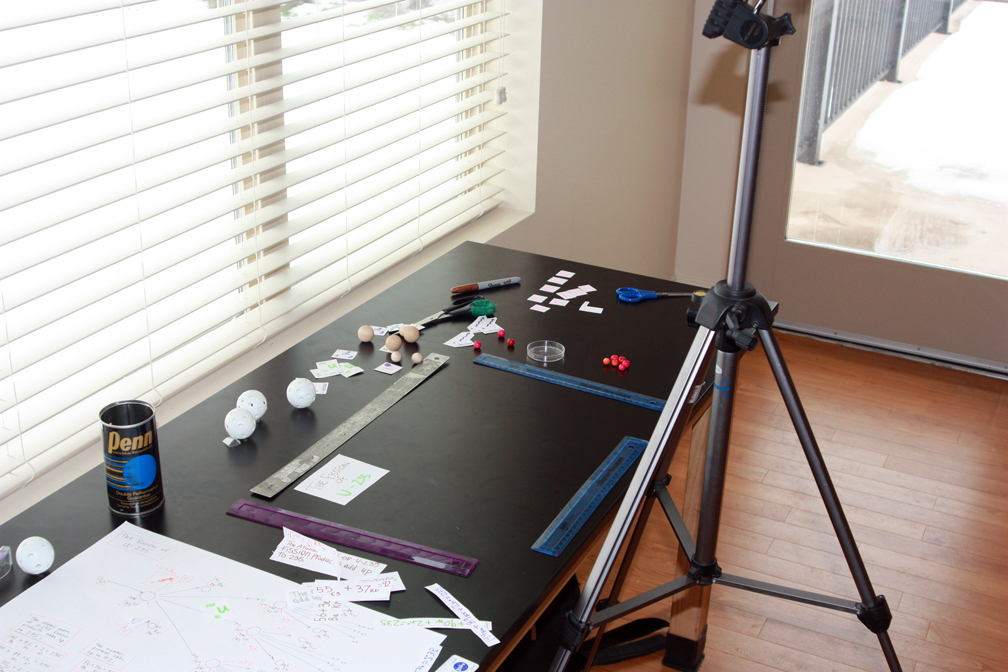
Set up for the stop-motion animation activity. You will need a solid tripod, a black-topped table with good lighting, and rulers to mark the edges of the stage area (camera field of view).
As part of the STEM-Arts Alliance program I’ve initiated at Walden School of Liberal Arts, I am always trying to find activities in my science classes that can integrate art, history, and/or technology. At the NSTA national conference in San Antonio in 2013, I attended a session by Dan Ratliffe from the Breck School in Minneapolis on using stop-motion animation techniques to model a chemical reaction, in this case the burning of methane. He showed how to set up a stage, use student groups and manipulatives, and how to show how energy is absorbed (activation energy) to start the reaction and how energy is released. He uses it in his 6th grade science class, but I’ve adapted the lesson for use in higher level science classes such as chemistry or physics or astronomy.

Animation stage (marked with rulers). Since the camera couldn’t point straight down, the stage is a trapezoid. On the large sheet of paper is our storyboard/plan.
On Jan, 31 this year, I needed to make one of these animations for a demonstration I was doing at the UACTE conference. My chemistry students were studying nuclear chemistry and nuclear reactions at the time, so without any warning to them, I announced we would be making an animation of the nuclear fission of Uranium-235. I had cardstock and permanent markers already in the room, and brought my camera and tripod to class. My small class of students were able to create all the drawings and labels, plan the sequence, and do the photos all in one class period plus a few minutes after school to clean up, so about 80 minutes total. It wasn’t anything too fancy, but it worked. That evening I dropped the images into Apple Final Cut Studio (setting each image to last three frames), then dropped them onto the timeline, expanded them all together so the edge of the stage wouldn’t show, and exported it. I didn’t try to add narration or sound effects, but it did the job. Then I demonstrated the process at the conference the next day.
This lesson meets standards HS-PS1-8 of the Next Generation Science Standards to model nuclear reactions as a core idea in chemistry. I have written it all up as a PDF lesson plan. I’m including the process steps here, but you can download and use the lesson plan here: Stop-Motion_Nuclear_Reaction
Objectives: By the end of the activity, students will be able to:
- Create storyboards and sketches showing the stages of a chemical or nuclear process;
- Set up a stage and move objects around from frame to frame to demonstrate the process;
- Edit and align sequential images in an image editing software package;
- Import a series of still images into video editing software and export the sequential images as a continuous animation.
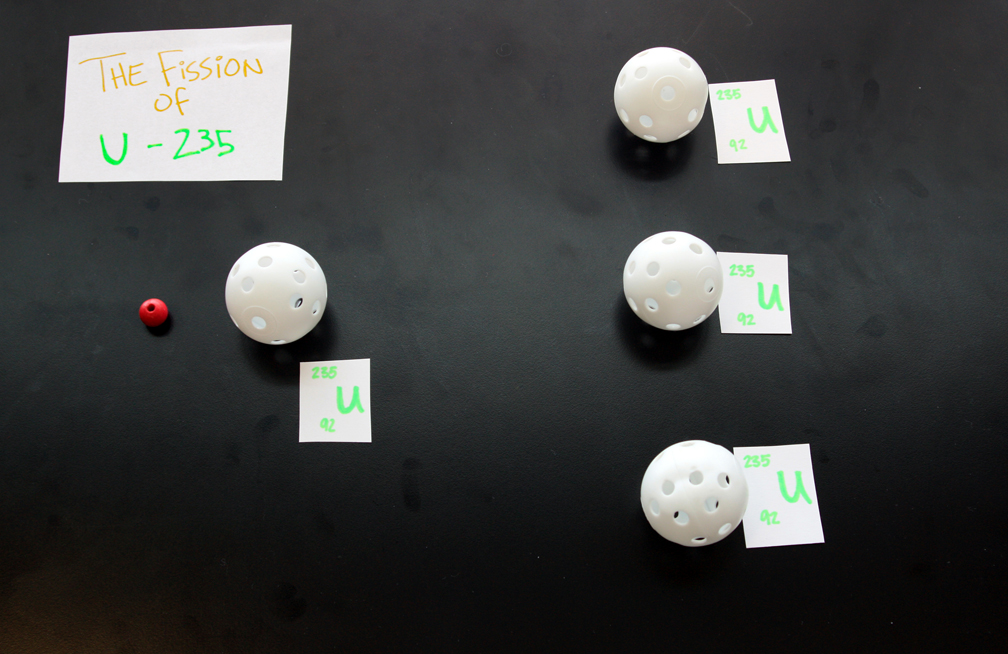
An early frame for the animation. A neutron (red bead) approaches an atom of U-235.
Materials for each group:
Regular unlined copy paper (for storyboards)
Cardstock paper (for labels)
Marker pens or colored pencils
Balls of different sizes to represent large uranium atoms, smaller fission products, and
neutrons. You can use poker chips and tiddlywinks instead.
Scissors
Clear tape
A black-topped lab bench or table with a black tablecloth
A digital camera and tripod that can look down on the table without seeing the edges
Meter sticks and smaller metric rulers
Computer with video software
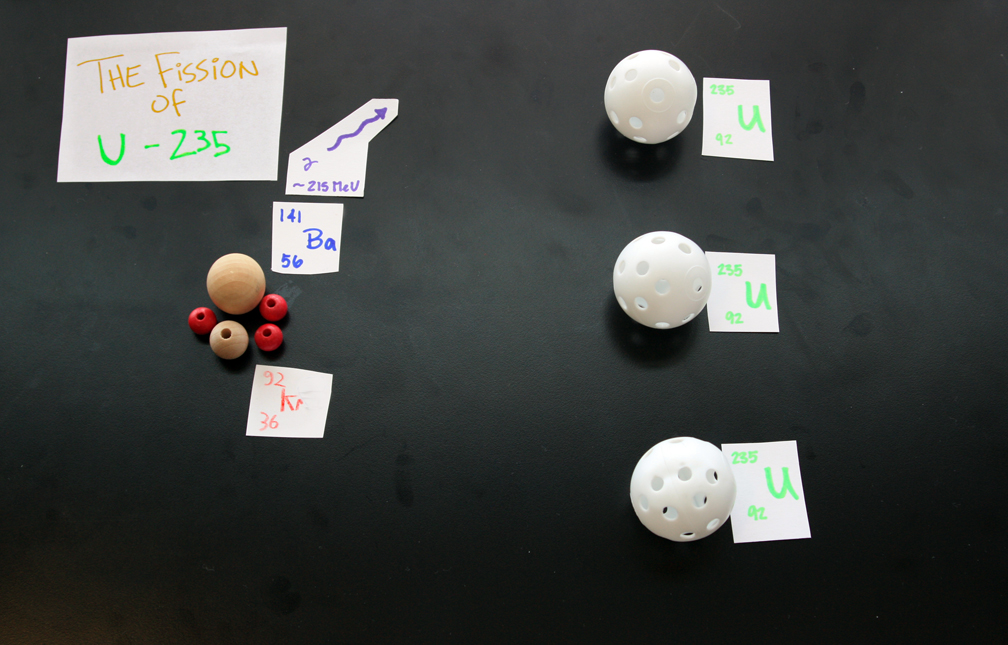
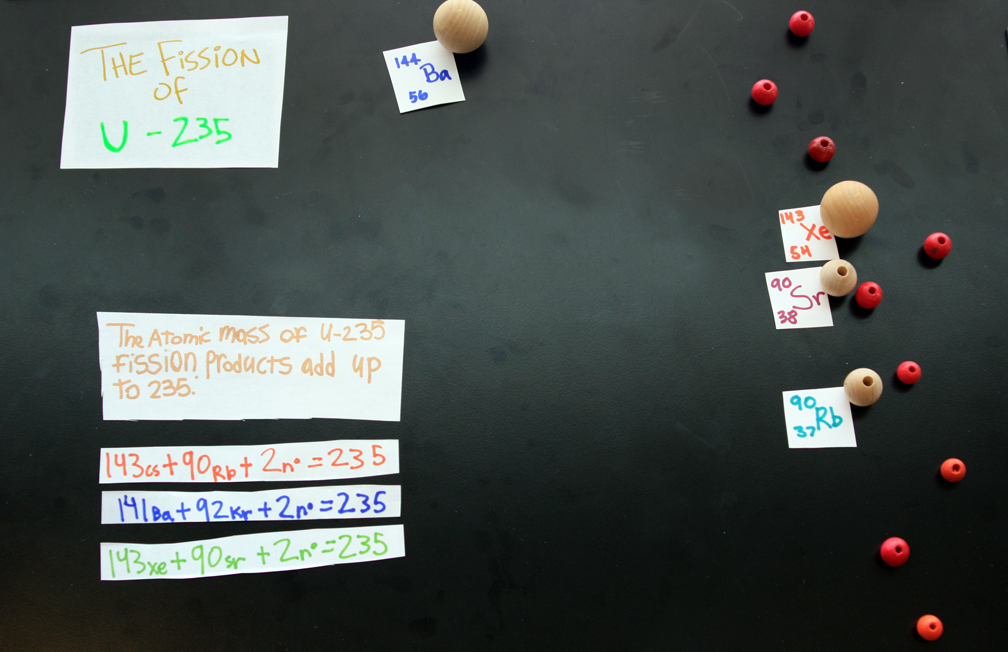
The first atom of U-235 splits into Barium and Krypton plus energy and two additional neutrons.
Step One: Introduction
Introduce this lesson by showing your students some examples of stop-motion animation and discussing how traditional animation was drawn frame by frame on acetate sheets. Explain that they will be creating their own animations in groups.
Review the types of nuclear reactions that are most often learned in a unit on nuclear chemistry, such as the fission of Uranium-235; the fusion of hydrogen; nucleosynthesis inside a star; the conversion of a neutron to a proton, anti-electron neutrino, and beta particle through the weak nuclear force; the beta and alpha decays of various elements; the conservation and conversions of energy and matter in a nuclear reaction; etc. List these reactions on your whiteboard. Assign students to groups of 4 to 5, and have each group pick a different reaction.
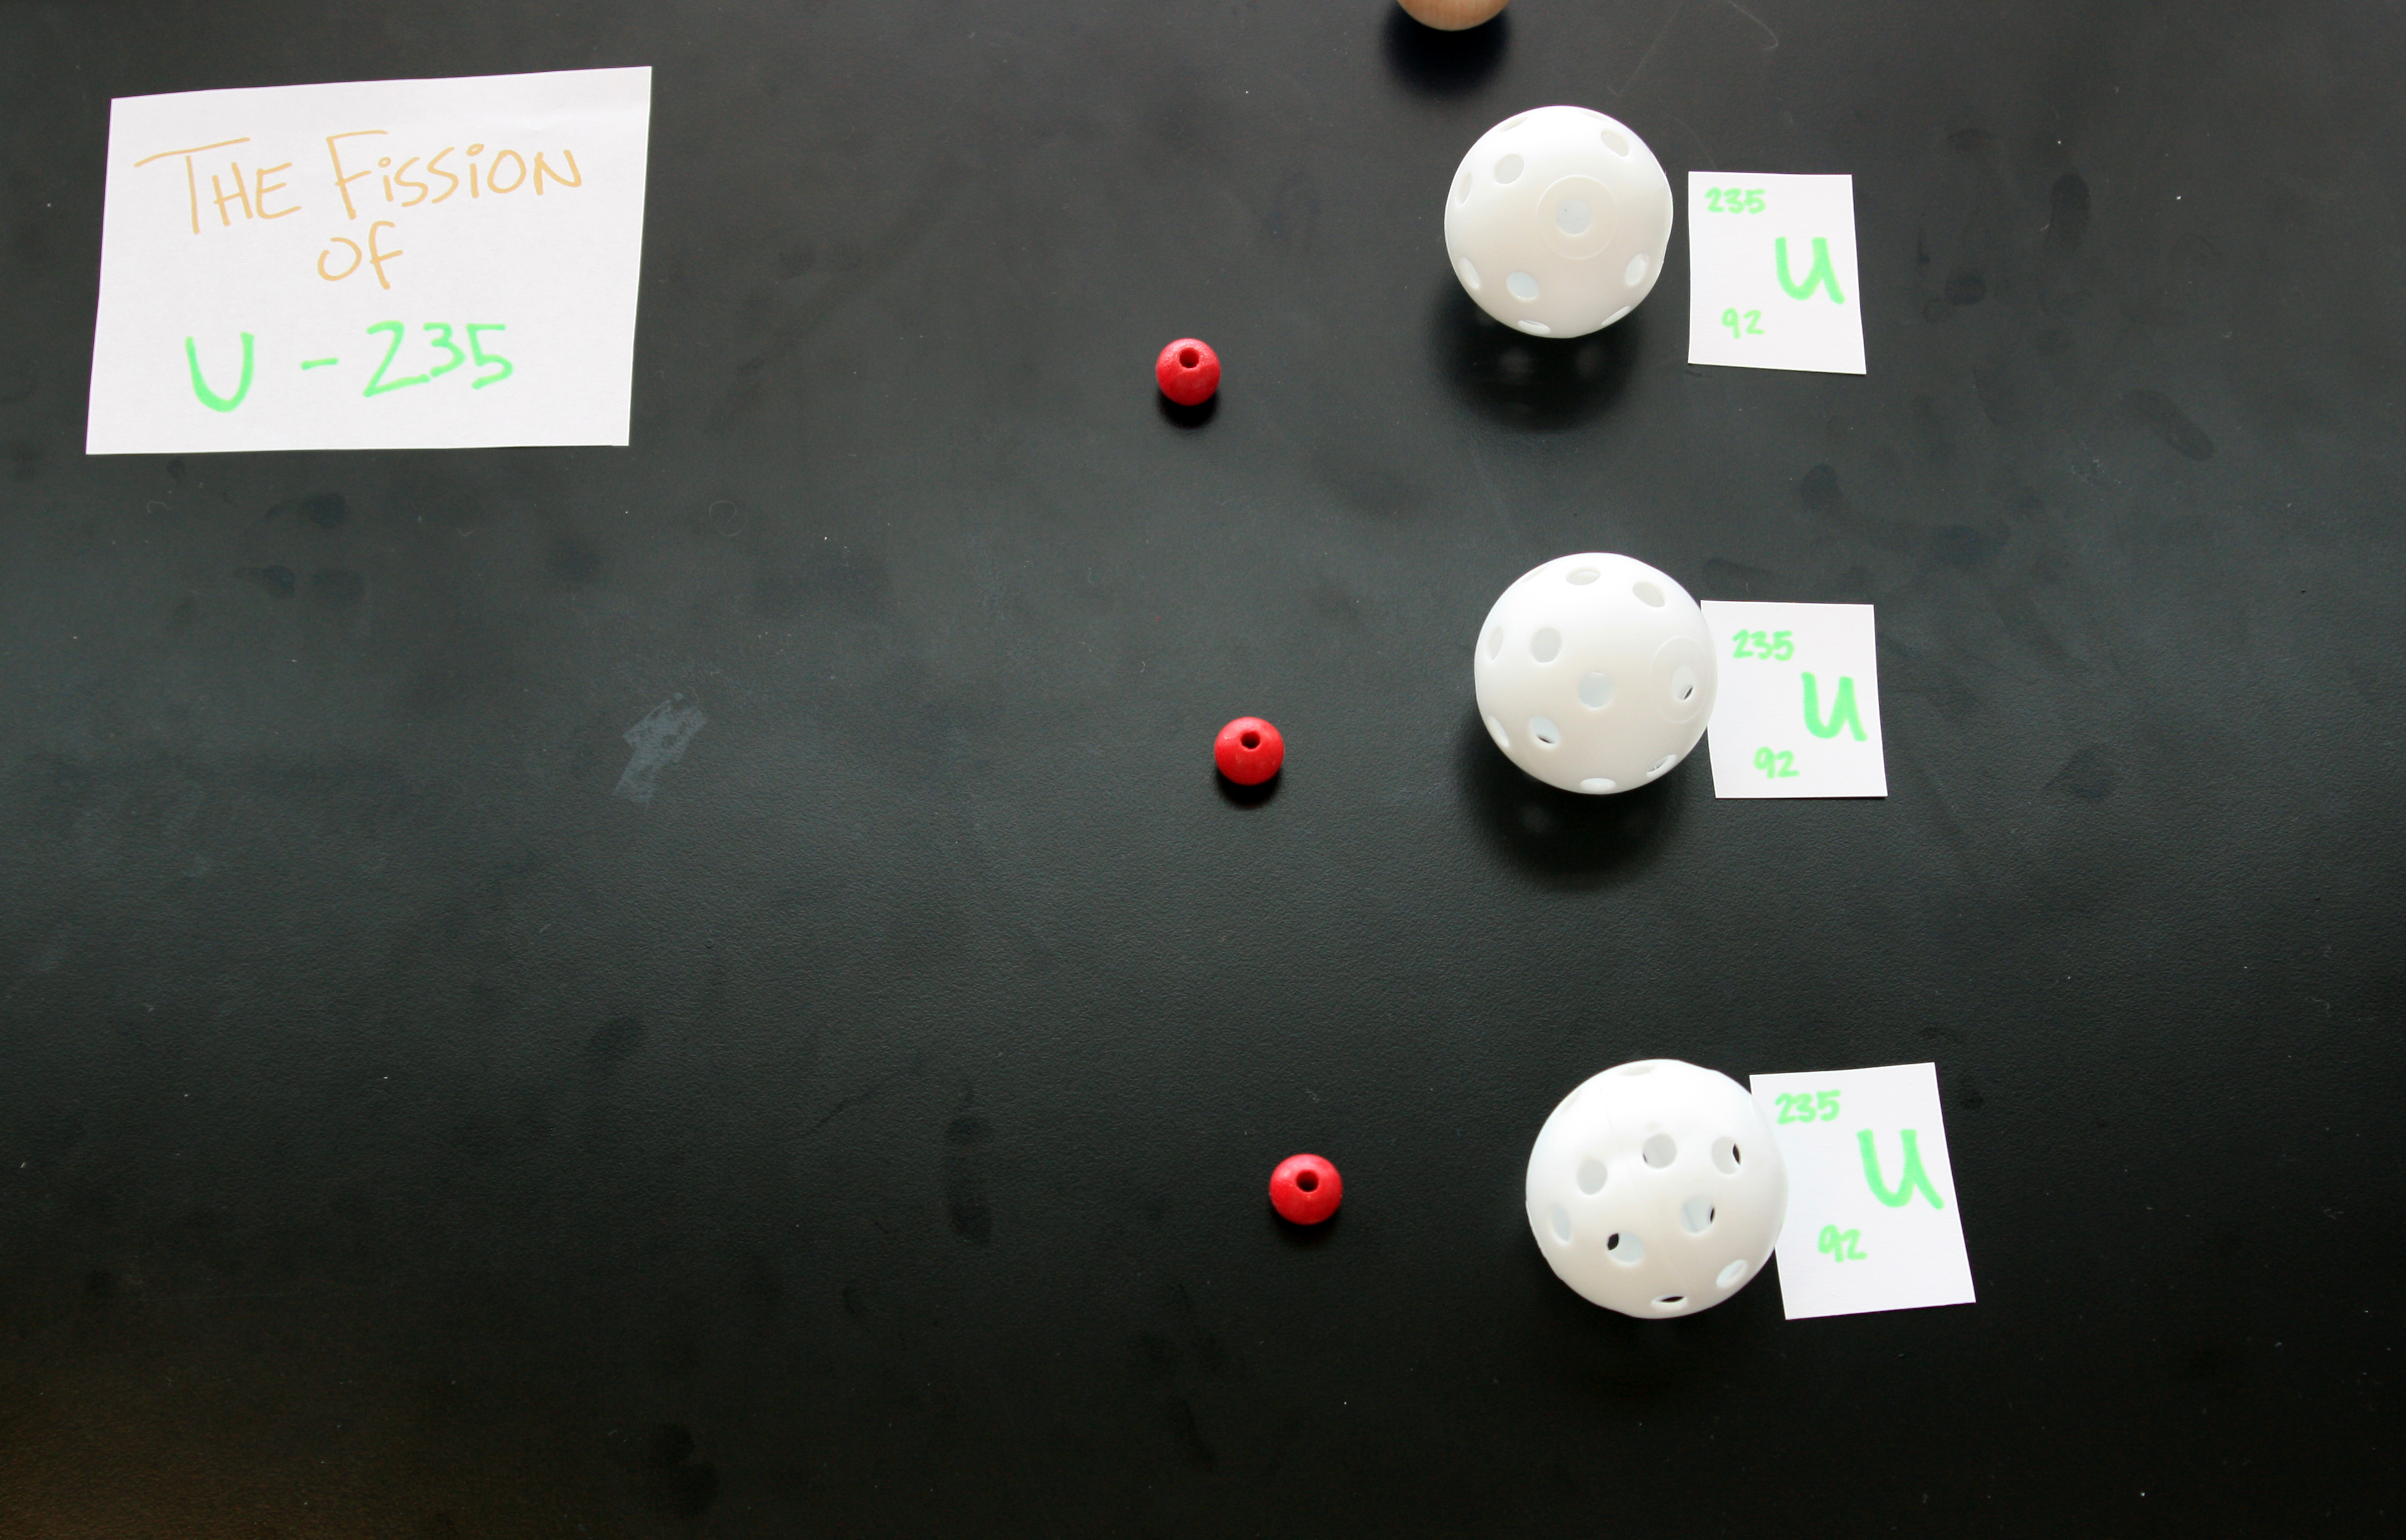
The three neutrons travel on toward three more U-235 atoms.
Step Two: Planning the Animation and Creating the Pieces
Divide the students into groups and provide them with the materials they need. For this first period (initial 45 minutes) they will research the relevant reactions, draw out a storyboard or plan for the steps of the process, write a narration script (optional), then create the pieces they need. They can represent atoms or subatomic particles by balls or paper drawings on cardstock. If they use balls, they should create paper labels for each object. Energy can be represented in different ways, such as drawing lightning bolts or gamma rays or bursts of energy.
Give the students encouragement and suggestions as needed, but allow them to use their creativity and have fun with this activity. They may want to bring in their own props. The final storyboards and animations should be scientifically accurate and demonstrate deep knowledge of the reaction they choose as well as be aesthetically pleasing and well designed. They should also create titles and show the reactions as equations. By the end of 45 minutes they should have their plans complete and their pieces, labels, and drawings finished and cut out.
As an option, you may want each group to write up a narration script and record the narration using a microphone. If you do this, then allow for an additional class period. The final animation will have to be carefully timed to match this narration.
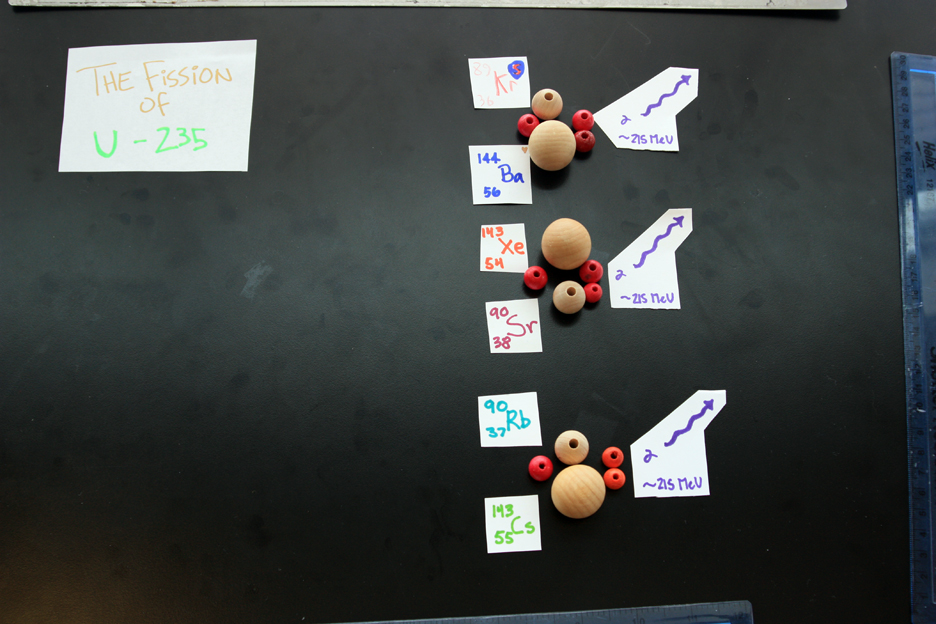
The three atoms of U-235 split to create new byproducts, more energy, and a total of nine neutrons.
Step Three: Filming the Animation Frames
To set up the animation, a camera should be mounted on a tripod or other solid structure and placed so that its field of view encompasses a black lab bench or table topped with a black tablecloth without seeing any edges. To find out the exact area of this “stage,” use meter sticks or other straight edged objects and move them in on all four sides of the camera’s view until you can just barely see them at the edge of the view. If your camera is facing straight down, the stage will be a rectangle, but this is often difficult to achieve without making a special frame or mount for the camera. If it is on a tripod, then it will be looking at the stage at an oblique angle and the stage area will be a trapezoid. Once the stage area is set and the camera is in place, they must not be moved.
To film the frames, have one student assigned to use the camera (and not bump it or move it between frames). The other students will move the pieces. They will want to practice the process, deciding how far to move each piece between frames. A good frame rate for the final video would be 10 images per second. Since digital video plays back at 30 frames per second, this means one image will be three frames long. This means for a 10 second animation, you will need to take 100 photos. If each piece is moved too much between images, the resulting animation will be jerky and too fast. If it is moved slower, the resulting animation will be smoother but you will have to take more photos. The amount of motion between frames should be consistent or the movement will seem to speed up and slow down for no reason. Students should use a ruler to measure the distances to move objects between frames exactly. Objects such as atoms that need to stay in place for several seconds can be taped down with clear tape.
Once they get going, the group can develop a kind of rhythm. They will stand around the stage with the camera operator calling out, “Move. Clear! Move. Clear!” and taking photos as the students clear out, then move their assigned pieces as planned. A student should also be assigned as the Director to ensure the storyboard is followed and object placement is correct from frame to frame. Labels should be used for all parts, such as neutrons, atoms, energy, equations, titles, etc. When an atom is split or atoms fuse, if energy is released, it can be shown appearing and moving outward from its origin or creating a flash. Byproduct particles can then move on to collide with other objects. For example, if you are splitting U-235, then a neutron enters, collides with an atom of U-235, which splits into two products (there are several possibilities, such as Krypton-89 and Barium-144, or Xenon-143 and Strontium-90, etc.) along with two new neutrons and gamma radiation. A chain reaction can be demonstrated going through several steps. They could even show a mushroom cloud at the end.
Special effects can be created, such as blinking objects (having an object appear in one frame, then disappear in the next, and alternate – it will appear to blink or flash in the video). With a little practice you can get the timing right. You can create explosion graphics and add white or colored frames to simulate a flash of energy. If your students know how to use image software to create alpha channels, then separate images can be filmed and added with transparency to the final video as layered animations. In the end, the only important things are to keep the motion smooth and consistent, don’t bump the camera, and don’t get anyone’s hands in the photos.
The nine neutrons travel on to split nine atoms of U-235 and release even more energy and more neutrons . . . thus becoming a chain reaction that will result in a nuclear explosion if left unchecked. Labels and equations can be added as the final particles migrate off the stage.
Step Four: Creating the Video
The photos will need to be uploaded to the computer which has the video software. Ideally each group should have a computer capable of doing this; almost any video software including iMovie and MovieMaker will work. There are apps available for iPads or other tablet computers such as iStopMotion. As you import the images, make sure they are numbered sequentially. Most digital cameras will do this automatically.
If there was any bumping of the camera, then the images may need to be aligned or registered using image editing software. Each image can be imported as a separate layer and moved around to align it with the rulers seen along the edges in the bottom layer. This will be a tedious process, so it is far better not to bump the camera in the first place!
If the photos are well aligned, then you can import them directly into your video editing software. Some programs allow you to set the length in frames of each imported image. You would want to set the images to three frames each if your final frame rate is 10 images per second. Once imported, if they are numbered sequentially, all you need to do is select all the images and drag them to your timeline in the video software and they will be in the right order and length.
Since the rulers can be seen along the edges of each image, you will need to enlarge the images. This can be done in two ways. The first is to expand the first image, then apply the same settings to each subsequent image. This is a slow and boring process. It’s much faster to simply export the video as is, then open a new file and import the draft video and place it on the timeline. Then the entire video as a single clip can be expanded to move the rulers off stage, and the final video exported again. You can add special effects (inserting flash frames, titles, additional layers, etc.), add narration and/or music and sound effects, and export the final version.
Step Five: Evaluation
Once the videos are done and ready to view, give the students feedback forms that ask them to evaluate the final videos, including their own, on such areas as scientific accuracy, depth of knowledge, technical ability, and aesthetics/design. Leave room for comments. Show the animations to the class, and have them fill out a feedback form for each video, encouraging the students to make positive suggestions. Then collect the forms and tally the results as a final grade for the assignment. You will want to evaluate the videos yourself as well and give more detailed feedback on how they can improve. You could also create a master video by piecing all the group projects into one video, then upload the whole thing to YouTube so other schools/classes can view it.
Notes on this Lesson:
This idea could also be used to model any process or natural cycle, such as chemical equilibrium, phase changes, types of reactions, conservation of matter and energy, kinetics, pH titrations, and thermodynamics in chemistry and the rock cycle, the water cycle, the carbon cycle, stellar evolution, plate tectonics, etc. in other sciences. I would enjoy hearing your ideas. Please let me know how you are using this activity by e-mailing me at: elementsunearthed@gmail.com.
